Pages

Monday, August 30, 2010

Upcoming Posts

I've had a lot of traffic lately due to THIS post from House Of Smiths and I'm thrilled to have so many new visitors.

Thanks for stopping by!

But I realize many of those visitors may have been a little bummed not to see more posts on my blog.

Sorry to disappoint!

But, in my defense, this blog is only about 2 weeks old, so I ask you to bear with me and keep coming back!! :)

And just so you know.... I have the following posts in the works...


Big Girl Room Makeover (x 2)


Pantry Makeover


Master Bath Vanity Makeover


Decorated wood letters for kids' doors


Powder Room Makeover (x 5)


DIY Canvas Art


Patio Chair Score!


Playroom Makeover


Playroom Organization


Nursery Makeover (x2)


Dollar Store Hurricanes Project


I'm hoping to post one big project each week. 95% of those projects have already happened and just need to be written up and posted. I figure it should be enough to keep me busy (and readers interested) for a while! :)
 
Hope you come back!
(and feel free to become a follower! ;)
 
:)


Score! -- Leaning Bookcase

I've wanted to put some sort of shelving unit in our master bedroom (specifically on MY side ;) since we moved in. That way, I wouldn't have to cramp all of my crap treasures on top of my dresser. Unfortunately, there isn't much extra wall space in the room to have any sort of large bookcase. In fact, the only real space I have for something, is a nook less than 30" wide in between the wall and my dresser. Now, while I found plenty of pretty, tall and skinny bookcases... there was a problem.

Houston, we have a problem!

The problem is that there is a heating/AC vent... on the floor... right. in. that. corner. And since I obviously couldn't place anything on top of it, that ruled out nearly every one of my options. :(

BOOHOO

But then I thought.... why not get one of those leaning ladder-style bookshelves?? That would be nice and open on the bottom! So I searched the internet for one that was skinny enough to fit in the space but that didn't break the bank either. And even though I found a few that would work from a size perspective, the shipping on the darn things cost just as much as the item itself. Seriously???

So... as is pretty typical of me... I waited... and waited... and waited...

Until one day...

While perusing craigslist...

I found one! Local! Cheap! In the right size!

It was actually still brand new in the box and the seller was asking $40 for it -- even cheaper than any of those I'd seen online (without shipping). So I went out on a limb and offered $25 (knowing I would still pay $40 if she wouldn't budge) but... she accepted it!

~happy dance~

Apparently she had tried to sell it in a yard sale and had no takers, even though she had reduced the price from $40 to $35 during the day. I guess she just wanted it out of her living room by that point so she gladly accepted my $25 offer. Score for me!! :)


Here it is right after I assembled it and put a few things on it.


I need to spruce up all of my stuff a bit and go shopping in my house for a few more accessories, but not bad for a $25 brand-new shelf!


Sunday, August 29, 2010

I Won!

Apparently this humble CPA does have at least one creative bone in her body!

A couple days ago Shelley over at House of Smiths hosted a contest to see who could come up with a name for a new spin-off of the up-and-coming website GroopDealz. She solicited the creativeness (is that a word?) of her readers to help and...


they picked mine! 


Holy crapola!


~happy dance~
 :)

They're keeping the new name on the Down Low until the site gets further along so my lips are sealed. But I have to say I am quite proud of myself for being able to tap the other side of my brain in a successful manner! Check out Shelley's announcement of the winner HERE. Yay me! :)

And a big THANK YOU goes out to Shelley for hosting the contest and for having such a FABULOUS blog. 

PLEASE be sure to check her blog out!!


Thanks Shelley!


Giving new life to an old table

So our house has a fairly nice-sized deck. In fact, it was one of the selling points when we bought the place 2 years ago. And one section of the deck even has a built-in bench which is the perfect size for a pretty, round, patio table.


1. No we are not alcoholics - this pic was taken when we were hosting a party with a "beer exchange"
2 . Yes, I HATE that our neighbors are so close and we have ZERO privacy. But we deal with it.

Too bad, though, that we didn't actually have a pretty round patio table...

And wouldn't be buying one anytime soon since I am too cheap frugal to spend several hundred dollars on one.

So for the past couple of years we put up with the inexpensive, white, plastic, oblong table I had purchased from Ikea back in 2000. But it never really fit in the space very well. And it was... well... cheap, white and plastic.

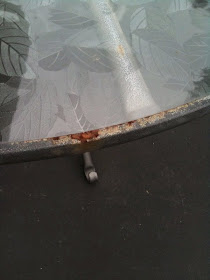
Then, ~one fine day~, I spotted an ad on craigslist for a glass-topped, round, patio table. It had a really nice leaf design in the glass AND a built-in lazy susan AND a hole for an umbrella. And not only was it located in the next town over, but they only wanted $25 for it!! What?? Apparently the sellers had already bought a new table so they really just wanted someone to come get rid of the old one for them. Plus, the frame was in rough shape with lots of rust and it didn't come with chairs since they were keeping them. Hence, the low low price.


But I knew the rust was fixable and since we have our lovely built-in bench, we didn't need any chairs. So I immediately sent my husband (and his always-convenient truck) on a mission to get it ASAP! Well, when he got there, it turned out that the sellers didn't have any change for his $20+$10 bills - - so they willingly accepted only $20 for it!!

Here you can see one of the worst spots of rust that was around the edge. (but notice the pretty leaf detail on the glass)


BEFORE

~~~ PAUSE~~~
(I'll admit that it sat in our driveway for a week or two or three...)

We finally tackled it one weekend while our girls napped. I started out by scraping the rust with a wire brush and managed to get most of it off. But the Heelamonster (aka - my husband) decided he wanted to go even further with the rust removal so he took a quick pass over the worst areas with his electric sander and then did a full wipe-down with some Naval Jelly.

(and I apologize for not having any pics of the process, but I didn't have a blog at the time so it didn't occur to me to document the transformation process - DOH!!)

Next step was to give the table a new paint job so I picked out a can of Rustoleum in "HAMMERED BROWN". The Heela volunteered to do the painting for me and I was thrilled by the end result.


AFTER
LURVE IT!!!!

We "splurged" on a nice umbrella and stand from Costco and couldn't believe our luck with the pure coincidence (I swear, it really was!!!) that the color of the umbrella and stand are the same exact color as the new paint on the table.


ahhhhh ahhhhh ahhhhhh
 (ok, in my head that is sounds like the heavens singing, but on the screen it just doesn't quite convey that way)

They honestly look like they were part of a set!! Anyway, we couldn't be more pleased with our "new" table. And can you believe this gorgeous beauty only cost us about $30 total?? (used craigslist table plus one can of spray paint)

As always, here is the Before and After

BEFORE


AFTER


SO?? What do you think?? I love the way it turned out!!


Linking up to these parties:

Friday, August 27, 2010

Mirror Transformation (aka the Frame Fiasco)

So a few days ago I shared my Master Bath Makeover HERE . One of the big impact changes I made was to add a mirror frame to our humongo builder-grade  mirror.

Now, I have seen other wonderful DIY-ers who built their own frame using molding and liquid nails. (of course now I can't find any links). But I didn't want to deal with cutting my own wood and glue and all that hassle.  So, when I stumbled across the Mirror Mate website HERE , I was sold! The measuring process was surprisingly easy since they provide you with detailed instructions on how to do it. The hardest part is choosing which frame you want. I sent away for a few samples (I think it was $5 for 3 different frame samples) and decided on this one:

Pemaquid Black (photo courtesy Mirror Mate)

I ordered the frame in early December 2009 with the intention of putting it up over my Christmas vacation. Unfortunately, due to some family medical emergencies, this wasn't possible.

So it sat... and sat... and sat... in our garage. For a loooooooong time.

Finally, about 3 months ago, I decided I was going to put the darn thing up already! So I unpacked the frame pieces and laid them all out in our dining room. Only to discover that the Heelamonster (my husband) had "misplaced" (aka "lost") the assembly kit which had been mailed along with the frame pieces.

So the frame sat... and sat... and sat... in our dining room while Heela "looked" for the missing kit.

 After about a month, I couldn't take it anymore so I called Mirror Mate and told them we had lost the kit and that I wanted to buy a new one. Well, I'll be darned if they didn't send me a new one free of charge! How nice was that???

~~happy dance!~~

So after yet another month, I FINALLY set out to get the darn thing up already! First I laid out all my pieces in the playroom...
Ready for Assembly!          

Then I followed the instructions and put it all together

Ready to Hang!


Now it's time to go put it on the mirror! YAY!


Wait... NO... It won't work... CRAPOLA!!!

*sigh*

So the installation concept is that you basically take your frame and walk straight towards your mirror and stick it on (more or less). Simple. Provided that... there is nothing blocking your "straight-on attack" on either side. Which is what we had. On both sides!! AUGH! On the right we have a medicine cabinet that sticks out a bit that we had to somehow shimmy around. And on the left, we have this built-in shelf thingy (yes, that is the technical term) which we realized we would have to cut away enough so that the frame could fit in the newly-created gap. (Obviously, I hadn't thought about these obnoxious design elements when I ordered the frame!)

In-the-way Medicine Cabinet - CHECK!


Cut-Away Shelf Thingy - CHECK!

Once we got the "gap" big enough (using a chisel to remove some of the molding at the end of the shelf), we knew we'd have to slide the frame in from above (after shimmy-ing around the medicine cabinet) (and without letting the frame stick to the mirror until we wanted it to). But, as our luck would have it, our lovely ~Hollywood Lights~ prevented us from sliding the frame in from above. CRAPOLA!  But, thankfully, we knew we wanted to replace those anyway, so we decided there was no time like the present!


Light Fixtures Removed - CHECK!

This created enough room on top to raise the frame up and... FINALLY, after much cursing, we were able to shimmy the frame around the medicine cabinet, slide it down into the newly-created gap and stick it into place. 

YAYAYAYAYAYAYAYAY! 

And although I'll admit it was a huge headache to install,

 I LURVE IT!!

Frame Finally Installed - CHECK!

Now before you freak out decide to choose another option, I have to say that this product really is easy to install. You just have to be careful if you have any design elements on the sides of your mirror that could be in your way and prevent you from taking a "straight-on" approach. Otherwise, (as you can see if you check out the helpful installation video on Mirror Mate's website), it really is easy peasy! And in all honestly, I would definitely recommend the product AND use it again!

Here is another view of the Before and After


BEFORE


AFTER


SO??? What do you think?? Nice transformation, huh?


For the record, I have not been compensated in any way by Mirror Mate for this review or for using the product. I paid full price for my frame (ok, not true - I used a discount code I found online - this is ME, after all!!) and was given no personal guidance on installation (clearly!! LOL)

Thursday, August 26, 2010

Craft Project teaser

Here is a ~teaser~ of my latest craft project.


Some paint and a DIY stencil... any ideas? ;)


Wednesday, August 25, 2010

I Love You Too Much

This is my 2 1/2 year old's latest saying to me.

~I Love You Too Much~

How precious and heartwrenching is that??  It is always accompanied by a bear hug and a big smackerooni on the lips. I'm not sure where she picked up the "too much" part (I certainly say the first 3 words a lot) but I really don't care! I. love. it. Such a nice way to end the day.

I love YOU too much too Boogey!!


Tuesday, August 24, 2010

Grocery Shopping - saved 46%!

I usually go grocery shopping every weekend. Some weekends are a BIG shop while others are just the basics (milk, bread, produce). This past weekend, it was supposed to be a basics trip. Until... I saw THIS...


Well, who can pass up Double $1.00 coupons?? I mean, getting $2.00 off a product often means very cheap, if not FREE, items! Wahoo! So even though I've been dreadfully sick and felt like crapola, I sifted through my coupon pile, pulled out practically every $1.00 off coupon I could find and headed out.

I won't bore you with details, and I don't have a picture of my purchases, but I can show you this...


OOOOOHHHHHH, AAAAAAHHHHH, SQUUUUEEEEEE!

Love getting some good deals! Now you may be saying, "eh, yes, you saved $76 but you still spent 100 smackeroos". But keep in mind that I got some larger-priced (is that a word?) items. For example, 3 boxes of kitty litter, a bag of cat food AND an 18-pack of 'name brand' toilet paper. If you look closely, you'll see that I got 60 items for that $100.

For those of you who are mathematically challenged, that works out to $1.67 per item! Per item, people! Given that the total includes those big ticket items, that is pretty good if I do say so myself. Clearly, I got quite a few things for free. And it is a grand savings of 46%!! Not too shabby!

Of course I felt even worse by the time I got home, but it was worth it. I love getting a good deal. That is for sure! :)


I'm linking to the Cha-Ching Challenge!

Cha-Ching on a Shoestring

Monday, August 23, 2010

Master Bath Makeover


We bought our house a couple of years ago and were thrilled that it was already in really nice shape which meant we weren't going to have to tackle a lot of new projects immediately upon move-in. We just didn't have the energy at the time.


And while the kitchen had been upgraded with lovely silestone countertops, tile floors and ~stainless steel appliances~, the rest of the house had only had the basics done - fresh, but plain jane neutral paint everywhere and neutral new carpeting upstairs. The rest of the decorative touches in the house are all "builder grade" boring. From the mid-1990's. Which means a lot of BRASS door knobs and HONEY OAK cabinets. Loverly! NOT! But, we knew we could live with it all until we could find the time, energy and money to make some changes.

And... we lived with it... and lived with it.. and lived with it. For like 20 years until I finally asked my toddler to poke my eyes out with a fork.


OK, that isn't true... it's only been 2 years, not 20. But it feels like it's been forever!

When I finally decided to make some changes, I figured the most logical place to start was the master bathroom. After all, it is where I start and end every day - shouldn't it be a pleasant experience? It already had a nice double sink vanity but... it was HONEY OAK, with a HUGE, plain, unframed mirror above. And the whole thing was topped off with *~*HOLLYWOOD LIGHTS*~*.

Don't you wish your bathroom was HOT like mine? Don't you? Don't you?

This doesn't show all of the wonderful features we were presented with when we moved in, but here is a photo from the original real estate listing (funny how they didn't want to show off the oak cabinets or the hollywood lights either!).


The first thing I did was get rid of the pink curtains. I searched everywhere for the right length but couldn't find ANYTHING that was 52" (unless I wanted to pay for custom - which I didn't!). Eventually, I found some "make-your-own length" panels at Ikea and was able to create some nice light and airy curtains in the perfect length I wanted. 

Next was to get rid of the HONEY OAK cabinets. Replacing them wasn't an option, so I painted them instead - a nice satin black - and added brushed nickel knobs to the doors. I LURVE the end result! More details to be provided on this project later.


The next thing i knew I wanted to renovate was the huge builder-grade mirror. Since the bathroom has cathedral ceilings, we can't paint the room ourselves and we just don't have the budget to hire professionals right now. So removing the mirror was not an option since we'd be left with no choice but to paint the area behind it. So.... Enter... a mirror frame

Now I know there are plenty of DIY-ers out there who have built their own frame and I applaud them. But, I opted for the custom-cut-kit route instead and am THRILLED with what an amazing difference it makes. More details on this project can be found HERE.

We finished off the look by replacing the Hollywood Lights with modern brushed nickel lovelies.


I still need to replace the faucets and we need to patch the holes in the wall left from the old light fixtures, and I want to replace the towel racks... but still... what a difference!

Here is the before (again, when we moved in) and after for you admiration:


BEFORE


AFTER


What do you think? I never enjoyed brushing my teeth so much! :)

This post was featured!! Thank you House of Hepworths!!

HookingupwithHoH


Linking this project up to the CSI Project's Beautiful Bathrooms Challenge
Visit thecsiproject.com


Squeeee!! I made the Top 10! Soooo honored!

This post was also featured by Remodelaholic! Thank you!!


Friday, August 20, 2010

So I've been thinking a lot about exactly what I wanted to share on this blog. In order to figure that out, I decided to jot down the main topics around which my life currently revolves. These include:

- My kids
- Work
- Cooking
- Grocery Shopping
- Decorating our Home

And before anyone criticizes, I realize my husband is not listed above but that doesn't mean he is not a key part of my life. Truth is, he IS my life. 'Nuff said.

I follow a lot of different blogs which focus on the last 3 items (check out all of the fabulous links to the right!) and LOVE all of the great tips and tricks I've found on them. Whether it is a great couponing deal or a thrifty way to decorate, I am a HUGE stalker fan of all their ideas. But I'm no expert on those matters - at least not to the extent I could blog about JUST ONE of them. So... I've been thinking that, in MY blog, I will simply share some of my experiences with all 3 of those items.

What does that mean, you ask?

Well, I may brag about share the great savings I just got at the store. Or I may detail one of my favorite recipes. Or I may display one of my decorating/DIY achievements. Or I may just ramble about whatever is going on in my head at the time.  Heck, I figure if nothing else, this blog can be like free therapy for me! Hey look, there is my first tip - start a blog and save yourself $200 an hour on therapy. You're welcome! :)

Now I know that any "real" blogger would probably tell me that I need a theme and should focus on just one main topic if I want to be successful. But, since (A) I'm not doing this to become some nationally known celebrity and gain thousands of followers (I can simply hope and pray for... maybe... 2? please please please!) and (B) I'm certainly not doing this to make money (not that I'd turn away anyone who wanted to advertise on my blog! ;-), I don't really care that my subjects are going to be all over the place. There. I said it.

So for my first endeavor, I'm going to tell you about the recent changes we made to our Master Bathroom. Stay tuned... :)

Like I have time for this.

Well, I've done it. I've decided to start a blog. And while I don't really have time for this, I'm going to do it anyway. And while I don't really expect anyone to follow this, I'm going to do it anyway. And while I don't necessarily have a whole lot of exciting things to post, I'm going to do it anyway. And while I don't even have a specific "theme" for this blog, I'm going to do it anyway. Why? Because I am an egomaniac who likes to hear herself talk. Because it gets my husband off the hook of having to listen to all my incessant drivel. Because it gives me a better way to share all the chatter going on in my head without having to post it all on Facebook. Because everyone else is doing it. Because I can. :)

Now let's see how long it takes for me to do my first "real" post.