So SweetPea has been asking for a Growth Chart for a while now. I don't know where she got the idea from, but she knows what they are and she wants one, dammit! LOL. When I was growing up, we used the basement door jamb to track our growth and I remember how fun it was to see the changes of that pencil line over the years. So, I've been wanting to do one for both of the girls for a while now, but just never got around to it. (Considering they are 3 and 4 years old, I've clearly missed a few years already! *sigh*) So, a couple of weeks ago I finally decided to get my act together and get some growth charts.
As usual, I did some searching online but it seemed the ones you could buy were either really cheap (-looking) or really expensive. Not to mention that most of the ones I found were very child-like with princesses or cartoon animals or such on them. And while they would be cute in a little girl's room, I really wanted to find something that could be "stylish" for more than just a few years. I mean, I really didn't want to be stuck with some cutesy-wootsey baby thing that my future young hellion tween would refuse to use. Besides, we're really short on wall space in our house (lots of open rooms and windows) so I couldn't even guarantee the charts would be hung in the girls' bedrooms.
Soooo... I thought... why not MAKE one???
Yes! I could surely pull that off! All I need is a wood board and a sharpie!
So I went up to Lowes and looked for a few boards. I decide that I wanted to make each girl her own growth chart so I picked up 2 boards for only $2.28 each. (Tip: be sure to lay your pieces on the floor before you buy them to ensure they are flat otherwise they won't lay flush against your wall. You'd be surprised how many pieces of wood are warped!). I decided my growth charts would start at 2.5 feet and go to 6.5 feet so I bought boards that were pre-cut to 4 feet long (they are about 3.5" wide and not quite 1" thick - but they were marked "1x4x4"). I also picked up a coarse grit sanding sponge for a couple of bucks.
The edges of my boards were really square and I wanted to soften them up a bit so I sanded them down with the sanding square to create some subtle rounded corners.
 |
| Softened up the edges with sandpaper |
Next, I took some white paint I had leftover from SweetPea's Big Girl Room makeover seen HERE and gave the boards two coats of paint. Once the white paint was on I thought they looked too harsh and plain, so I decided to add some distressing to them. First I went back at my boards with the sandpaper to rough it up a bit.
Then I took some of the Burnt Umber paint I had leftover from my DIY Canvas Art project {HERE} and diluted it with some water to make a "mock" glaze/stain.
I took a rag and wiped my glaze on, then off, then on, then off, until I had the look I wanted. Along the sanded edges and in some of the natural holes in the board, I wiped some undiluted paint with my fingertip to create an even darker look (wiping off as necessary).
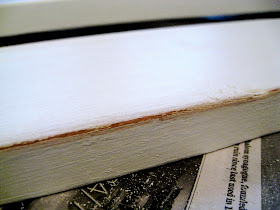
It is kind of hard to see in this photo, but the one on the right is the plain white board and the one on the left has been "glazed/stained".
Here is another close up of the distressed effect.
 |
| Roughed up the edges with some sandpaper. |
Then I took some of the Burnt Umber paint I had leftover from my DIY Canvas Art project {HERE} and diluted it with some water to make a "mock" glaze/stain.
 |
| Acrylic paint mixed with water to create a "glaze/stain" |
I took a rag and wiped my glaze on, then off, then on, then off, until I had the look I wanted. Along the sanded edges and in some of the natural holes in the board, I wiped some undiluted paint with my fingertip to create an even darker look (wiping off as necessary).
 |
| Here you can see the difference in the edge after I added a little paint |
It is kind of hard to see in this photo, but the one on the right is the plain white board and the one on the left has been "glazed/stained".
 |
| The left one is distressed, the right one is plain white |
Here is another close up of the distressed effect.
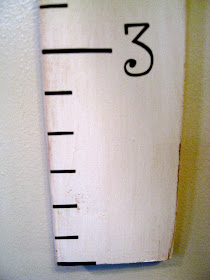
Now, originally, I was just going to draw the foot/inches lines and numbers on the board with a black sharpie. But, as mentioned here, I bought myself a Silhoutte cutter last fall so I decided this would be a great opportunity to try my hand at making some vinyl decals. I chose a font I liked and simply "printed up/cut" the numbers 3 - 6 on brown vinyl since I thought it would work well against the white/brown paint.
Next, I used a tape measure and a pen to mark off the foot increments.
As mentioned before, I had originally just planned on using a ruler and a sharpie to draw the lines. But I had a bunch of extra vinyl pieces that I had trimmed off the edges of my number "printouts" and decided to cut those into small strips to use as my lines. It took a while to cut all the pieces and stick them on (and a sharpie probably would have looked just as good) but I'manal a perfectionist and I like the idea of perfectly straight vinyl lines. :-\
As mentioned before, I had originally just planned on using a ruler and a sharpie to draw the lines. But I had a bunch of extra vinyl pieces that I had trimmed off the edges of my number "printouts" and decided to cut those into small strips to use as my lines. It took a while to cut all the pieces and stick them on (and a sharpie probably would have looked just as good) but I'm
I made the foot marker lines the longest, the 6 inch markers the next longest and the in-between inch markers the shortest. Then I just applied all the vinyl and.... VOILA! (I also cut out each girls' name in some brown vinyl and applied it to the top of each chart along with a pretty flourish).
 |
| The boards start at 2 1/2 feet |
The next decision to be made was "where to hang them?". There really isn't much free wall space in their bedrooms and I worried that we wouldn't update the charts regularly if they weren't more readily accessible. So I scoured the main floor of the house for a good spot and decided on the door frame that connects our dining room to the kitchen - one on each side. Because the boards I used were only 4" wide, they would fit perfectly in the 6" space! Originally, I thought I would hang them with ribbon or twine, but the Heela came up with the great idea of using velcro so they wouldn't swing every time someone walked through the doorway. I found a pack of Command Picture Hanging Strips, placed one at each end of the board and hung them up.
 |
| Boogey's hangs on one side of the door frame |
I'm really pleased at how great they turned out and SweetPea couldn't be happier to finally document her weed-like stature. :)
And one of the best things about it... it's portable. If we move, we can take it with us and not lose all those fun memories!
Not bad for less than $3 each! ($2.28 = the cost of the wood - I already had the paint and vinyl) (Note: although I used vinyl for my numbers and lines, you could easily do the same with paint or even a sharpie!)
What do you think?? Success?
Linking up to these parties (also see tab above):
Under the Table and Dreaming
The DIY SHowoff
C.R.A.F.T.
The Tattererd Tag
Keeping it SImple
Polish the Stars
Polly Want a Crafter
Krafty Kat
Until Wednesday Calls
Todays Creative Blog
Not just a housewife
Passionately Artistic
The Thrifty Home
Someday Crafts
Somewhat Simple
A Little Knick Knack
Fingerprints on the Fridge
Green Door Designs
This project was linked up to the CSI Project's $5 challenge!


Boy were you right on about being too nursery. But this solves that dilemma. I LOVE this idea and hope to win! My boys would enjoy this as much as I would. Thanks for sharing!
ReplyDeleteSo darling and so creative
ReplyDeletethat came out so cute, kyra! and i am sure your daughter is thrilled.
ReplyDeleteLooks great! I just finished one for my kids, it also took me a looong time to get around to doing it! They are so thrilled now and like to measure themselves 3 times a day!
ReplyDeleteGreat tutorial!
Ps-I am your newest follower! Look forward to seeing your other projects!
Tasha
www.dotdotdotthis.blogspot.com (we have a link party every Tuesday and would love it if you stopped by!!)
I love your growth charts!! I was just looking at buying one on Amazon for my daughter, but I am definitely going to make one myself now. Thanks for the tips! I am interested in the vinyl numbers! Thanks :) Brie brielaw@hotmail.com
ReplyDeleteI was just looking at growth charts and not loving what's out there! These are perfect! I'd love the vinyl numbers! Thanks for sharing this idea!
ReplyDeletetmt678@gmail.com
Such a nifty & creative idea! I would like to invite you to share your idea by linking to my blog bash K.I.S.S. Happy to be a new follower too :)
ReplyDeleteDrop by The Tattered Tag
I love how they turned out! I like the clean, simple look of them. I would love to win the numbers so I could make a chart for my grandchildren. Thanks for sharing!
ReplyDeletevery creative!
ReplyDeleteI am hosting a giveaway from hair candy for girls.$15 store credit that lets you select flower clips, ziper clips, pettiskirts, bottle cap necklaces and more from the store.
Check it out
http://houseonashwelllane.blogspot.com/2011/03/15-store-credit-giveaway-from-hair.html
Love this! Such a simple design and easy to move up with the kids style!
ReplyDeleteThis is great! We just marked our height on the wall, and then had to paint over it when we moved, it was very sad. This is much better.
ReplyDeleteThese turned out awesome - I LOVE them! Great job and definitely success!
ReplyDeleteLove this! I like the glazed finish to them! If you have kids, you need some kind of growth chart. I don' t know why I don't have one! Thanks for linking up this week! :)
ReplyDeleteI would love to win the numbers! I have been wanting to make a growth chart for my kids but haven't seen one I thought was doable until this!
ReplyDeleteShauntel
http://the-polka-dot-umbrella.blogspot.com/
shauntel122@hotmail.com
This is such a simple, thrifty, but totally cute idea! I love it. :) Thanks for sharing. I am your newest follower! Have a great day.
ReplyDeleteHumble Homemaking
Very cute! I love it. Aren't command strips brilliant! I'm never using nails again! :)
ReplyDeleteThank you for sharing your great project by linking up to my blog bash K.I.S.S. @ The Tattered Tag. Please remember tomorrow is another fun blog bash, so drop by and link up more of your creativity! :)
ReplyDeleteDrop by The Tattered Tag
Kyra ~ beautiful! I'm including a link in this week's highlights! Thank you so much for sharing in the DIY Project Parade. I love your creativity. ;)
ReplyDeleteHave a great week!
Roeshel
I just wanted to let you know that I featured your growth charts! http://www.polishthestars.com/2011/03/link-party-monday_14.html Thanks for linking it up to my party! :)
ReplyDeleteI have been commissioned to paint a growth chart, this is very helpful, thank you.
ReplyDeleteKyra! These are adorable! You did a fantastic job. I need to make one for Little Monkey, but haven't gotten around to it yet... At the moment I literally have NO wall space and that's my excuse. I need to just suck it up and do it! Thanks for the inspiration. I love the neutrality of it. Definitely something to grow with them. Awesome job!
ReplyDeleteI love these!! And I love the fact that they will work for years to come. Great job!!
ReplyDeletesuch a cute idea Kyra! I know the pain of moving and then forgetting all of the doorjamb marks left behind. :( *sniff* so cute. We still mark our girlie's growth at age 10! have fun!! great memories.
ReplyDelete