Pages

Wednesday, March 30, 2011

"Springed Up" Clearance Find


"Springed up"? I guess that probably isn't a real term, huh? Would it sound better if I said "Made Springy"? Or perhaps I should say "Brought spring-like features thereto"? 

Nah, I'll stick with SPRINGED UP! :)

Whatever you want to call it, that is what I did to a recent clearance find. Sit back and let me tell you all about it... :)

A couple of weeks ago I got the chance to swing by TJ Maxx. I was on the search for a fun new purse for the spring/summer. Mind you, I'm not one of those women that has loads of purses. You know the type - switches their purse out daily depending on their outfit, or the season, or the weather, or their plans or whatever. Maybe this is you. But, no, not me. I have one purse. ONE. It is black, leather and rather plain on the outside. But... it has lots of pockets inside to help organize all of my crap stuff. And I love it. LOVE, people. And I've used it every day for the past 3 years (give or take a year). Did I mention that I love it?

However, around Thanksgiving the straps finally started to give way and get all broken and crusty and worn. You know the look I'm talking about. Can we say "Ewwww?" So I headed out to Kohls and bought myself a new one for Christmas. But it didn't have all the same awesome pocketness of the old one. And for some reason I bought a RED one. Yes, red. Maybe I was caught up in the Christmas spirit, but seriously, RED?? For me?? Well, needless to say... it sat on one of our extra dining room chairs for about a month (with the tags still on) while I tried to convince myself to actually succumb to the change.

And it sat... and it sat...

Then in early February I cut off the tags in the hopes that would motivate me to make the changeover. Um.. yeah... no. It continued to sit there on that dining room chair for another month. {Note to self... it's time to host another dinner party}. But the damn straps of my beloved purse got worse and worse and I finally decided I just HAD to bite the bullet and make the change. But as much as I did KINDA like that "new" one, I just couldn't start using a dark red purse at the beginning of spring! Surely a fashion faux-pas!

{ok, yeah, maybe it was an ounce of denial}

So... {as mentioned way too long ago at the beginning of this post - wow, longest sidetrack EVER!}... I headed out to TJ Maxx a couple of weeks ago in search of a new purse.  And while I was there...

I wandered over to the clearance section and spotted this pretty thing...


Love the details on this tall pitcher!

I love the details of it - the texture of the handle, the rim and around the middle. They all add so much character to this plain, white, Ralph Lauren pitcher. And it is big - over 8" tall! But the best part...

Only $10!!

SCORE!! Only $10 for this beauty!! This was the second markdown so really a nice bargain. I snatched it up quickly and headed to the checkout (along with my new purse ;).

I immediately added it to my Spring-decorated mantle when I got home, but I have been thinking that it needed something more (despite all of its fabulous details). So today (while home with a strep-throat-laden SweetPea), I broke out my Silhouette SD and some vinyl and "spring-ified" it.

All "Springed Up"


What do you think???? I LOOOOOVE the font of "bloom" but I'm not sure if I like how the flower looks with it. I like the idea of a flower there, but I think the image I chose may be too heavy with that font. Perhaps something a little more delicate may look better? Then again, maybe the heavy flower adds some balance to the delicate letters. I'm just not sure... What do you think?

**EDIT - See my "Take 2" on this vase HERE


Linked up to these parties:
Someday Crafts
While He Was Napping
A Little Knick Knack
Polish the Stars
Until Wednesday Calls


Monday, March 28, 2011

Local Bloggers Brunch

Happy Monday!! (If I say it with cheer in my voice, maybe I'll actually believe it??) My weekend was a mixture of great times and not-so-great time times. On the down side, SweetPea came down with a fever Friday evening and it went up and down all weekend. Which meant she was in our bed all weekend. Which meant I got no sleep all weekend. Which means I am a walking zombie today. UGH. The Heela is taking her to the doctor today to see what is going on since her fever keeps getting up to 103* whenever the ibuprofen wears off. We fear strep throat... :(

However, on the up side, despite SweetPea not feeling well on Saturday, I was able to escape the house for a few hours to attend a Local Bloggers' Brunch! The brunch was the brainchild of the amazing Cassie from Primitive and Proper and Melissa from HOUSEography and was so much fun! 

Melissa was our gracious host, opening up her beautiful  home (in Arlington, Virginia) to 14 of us. We spent our time eating yummy food, sipping refreshing drinks and, of course, lots of chit-chatting and laughing!  It was so much fun to get to know other local bloggers and share project ideas, stories about our kids and plenty of blogging tips (and gripes). ;) 

Here's a picture of all of us (minus Danielle who had to leave early).
(Photo courtesy of Cassie @ Primitive and Proper)
Back Row: Katelyn, ME, Shannon, Kathy, Angie, Andi, Felicity
Front Row: Cassie, Amy, behind Amy is Renee, Sarah, Laurie, and Melissa

On our way out, our fabulous hosts gave us each one of these super-cute mustache mugs (complete with biscotti and a list of attendees). So sweet!
(Photo Courtesy of Cassie @ Primitive and Proper)

It really was a great time and I want to send a BIG thank you out to Melissa and Cassie for pulling it all together! THANKS ladies!!! :)

If you are a local blogger (DC Area) and want to be included on the list for the next gathering, send me an email and I'll be sure to get your name added! :)


Wednesday, March 23, 2011

Excuses and I should play the lottery!

Well, as you've surely noticed [don't call me shirley!], I haven't posted any projects in the last couple of weeks. Sorry!! :-/ But if you've been around for a while, you know it isn't all that unusual for me to take a hiatus every now and then.

You see, for starters, I have a pretty high-falootin' full-time job in the headquarters office of a large, international company. And while we're certainly busy all of the time... sometimes we're REALLLLY busy with various special projects and deliverables and I just don't have the time or ENERGY to do any fun craft projects, let alone blog about them. In addition, the Heela's job often requires him to go into work early and come home late and even work at least one weekend a month. This means I have even LESS free time since I frequently have to manage two pesky little pre-schoolers by myself. Hence the lack of crafting time and energy!

(And before anyone flames me, I do love my children more than you'll ever know so no comments from the peanut gallery for calling them 'pesky'. :P)

The downside of all this is that I don't get to post fun new projects for my fabulous followers as often as I would like. But the upside is that, when I do post projects, they are usually relatively easy and non-time-consuming! :)

So those are my excuses for my occassional lapses in posting. I really hope you enjoy following my humble little blog and I thank you for sticking around (regardless of how often I post)!

Now... even when I am super busy, I still do my best to make time to go through my reader so I can keep up-to-date on what everyone else out there in blogland is doing. I often bookmark ideas for later and truly enjoy seeing all of the wonderful creativity everyone has!

In addition, I also love to participate in giveaways. I mean, seriously, who doesn't love free stuff?? So, I also make the time to enter various giveaways I come across as I stroll through my reader. It usually only takes a couple of minutes to enter and, hey, you just never know! Well, I have to brag and share that this past month was RIPE with LUCK for me. Despite me not decorating at all for St. Patrick's Day or even wearing green on the 17th, I somehow still managed to land some luck 'o the Irish because I won THREE giveaways over the past few weeks. Yes, you read that right... THREE! Squuueee!

First, I won a special Facebook giveaway hosted by Krista over at While He Was Napping. The prize? She is including my blog button in her sponsors section for a couple of months! Score! {And yes, I realize that I don't have any product to sell, but she has over 800 followers and maybe one of them will decide to come check me out. Hey, you never know!}

Second, I won a giveaway hosted by Cassie over at Primitive and Proper. This is actually a "custom giveaway" and she is going to create a mystery gift just for me! I am so excited to see what she comes up with - I know it will be amazing no matter what it is because she is SO talented!! I'll be sure to show it to you once I receive it!

And lastly, I won a giveaway hosted by Gina over at The Shabby Chic Cottage.
I will be receiving two complete sets (of every size they offer) of DISC plate hangers from AllPlateHangers.com! I've been wanting to try these for a while! Score!!

Squueee! I want to sincerely thank all of those wonderful women for having such fabulous blogs and, of course, for hosting such fabulous giveaways. :) Please be sure to go check them out - you won't be disappointed!!

Monday, March 21, 2011

Spring Tot Swap

So last fall {HERE}, I told you about my trip to our big semi-annual local consignment sale, "Tot Swap", and how I scored an entire winter wardrobe for SweetPea for less than $100. Well, a couple of weeks ago it was time for the spring sale. Once again, I needed to get a full wardrobe for SweetPea (spring/summer this time) so I was looking forward to scoring some great deals.

This time, however, I decided to also be a consignor myself! We have been storing a bunch of big baby items in our basement and garage for a while now and just wanted to get it all out of the house. We were about to donate it all but then I figured "why not try to make a few bucks at the same time?". So I registered to be a consignor in the Spring Tot Swap and got started cleaning and "tagging" all the items. They use a special online consignment software program which enables you to create price tags for you items complete with bar codes. The tags include your registration number and then lists the price you want, details about the item, etc. It takes a little while to type it all up, but you get 65% of the sale price so it can be worth the effort.

I made a point to price the items really low just to make sure they would sell - we just didn't want to bring them back into the house!! I was a bad blogger and forgot to take pictures of my input, but I had:
- single stroller
- double stroller
- highchair
- pack N play
- infant swing
- infant bathtub
- diaper bag
- infant sling
- bedding/nursery set
- breathable bumper
- potty
- about 50 pieces of clothes


Here is the only photo I have from the day (taken on my cell phone) but you can get a semi-idea of the volume of clothing and baby/toddler items at this sale.


In the end we sold every single non-clothing item that I put in and about 1/2 the clothes I submitted. Woohoo! Of course, I spent about $100 on clothes for SweetPea and another $10 on books for the girls. But I still net about $100 after my registration fee so not too shabby. A profit of $100 AND getting all that unused stuff out of our house AND getting a summer wardrobe for the 4 year old?? FABULOUS! Here is a photo of all the clothes I bought for SweetPea...

37 pieces of clothes @ an average of $2.75 each. Not too bad! :)


My score for $101 (including tax):
- 2 bathing suits
- 3 Pajama sets
- 3 pairs of capris
- 1 long sleeve shirt
- 10 pairs of shorts
- 18 t-shirts/tank tops

I plan on participating again in the fall as a consignor - this selling stuff is addictive! How about you other mom's out there? Do you buy all new clothes for your children or are you cheap frugal like me? Ever consign?


Sunday, March 20, 2011

New Toaster Oven

We got a nice Cuisinart brand toaster oven for our wedding 5 years ago. It worked nicely for small baking jobs and regular toasting. Then, before Christmas, the selector knob broke. And it couldn't be repaired. We tried to deal with using a pair of needle nose pliers to change our selection for a while but it was realllly difficult to do. So we finally just left it on TOAST all the time and dealt with it for a few months.

But I really missed being able to use it as a mini oven. And with summer coming up, I just didn't want to have to heat up the big oven (and our whole house!) just to bake a few fish sticks. So a couple of weeks ago I finally broke down and decided to buy a new one. Now if you haven't researched toaster ovens recently, there are a lot of choices in a variety of price ranges. And as much as I love having lots of choices, it also drives me bonkers!! How do I decide??

Anyway, I won't bore you with the details, but I finally decided on the Kitchen Aid Convection Countertop Oven. It is quite a bit bigger than our old toaster oven so it required us to re-arrange our countertop (which if you know me, you know that drove me batty!). But it is nice! I'm still getting used to the various settings but am pleased with the purchase. Here is the "little" beauty.

This thing can actually use TWO racks at the same time - it really is a mini oven. But I'm lovin' it. :)

I know it is a little silly to be excited about a toaster, but it really makes me smile to see this new little appliance in our kitchen. {And, yes, I'm a dork}. :)


Saturday, March 5, 2011

DIY Growth Chart

So SweetPea has been asking for a Growth Chart for a while now. I don't know where she got the idea from, but she knows what they are and she wants one, dammit! LOL. When I was growing up, we used the basement door jamb to track our growth and I remember how fun it was to see the changes of that pencil line over the years. So, I've been wanting to do one for both of the girls for a while now, but just never got around to it. (Considering they are 3 and 4 years old, I've clearly missed a few years already! *sigh*) So, a couple of weeks ago I finally decided to get my act together and get some growth charts.

As usual, I did some searching online but it seemed the ones you could buy were either really cheap (-looking) or really expensive. Not to mention that most of the ones I found were very child-like with princesses or cartoon animals or such on them. And while they would be cute in a little girl's room, I really wanted to find something that could be "stylish" for more than just a few years. I mean, I really didn't want to be stuck with some cutesy-wootsey baby thing that my future young hellion tween would refuse to use. Besides, we're really short on wall space in our house (lots of open rooms and windows) so I couldn't even guarantee the charts would be hung in the girls' bedrooms.

Soooo... I thought... why not MAKE one???

Yes! I could surely pull that off! All I need is a wood board and a sharpie!

So I went up to Lowes and looked for a few boards. I decide that I wanted to make each girl her own growth chart so I picked up 2 boards for only $2.28 each. (Tip: be sure to lay your pieces on the floor before you buy them to ensure they are flat otherwise they won't lay flush against your wall. You'd be surprised how many pieces of wood are warped!). I decided my growth charts would start at 2.5 feet and go to 6.5 feet so I bought boards that were pre-cut to 4 feet long (they are about 3.5" wide and not quite 1" thick - but they were marked "1x4x4"). I also picked up a coarse grit sanding sponge for a couple of bucks.

The boards were less than $5 for both!

The edges of my boards were really square and I wanted to soften them up a bit so I sanded them down with the sanding square to create some subtle rounded corners.


Softened up the edges with sandpaper


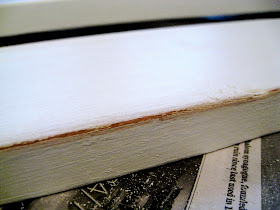
Next, I took some white paint I had leftover from SweetPea's Big Girl Room makeover seen HERE and gave the boards two coats of paint. Once the white paint was on I thought they looked too harsh and plain, so I decided to add some distressing to them. First I went back at my boards with the sandpaper to rough it up a bit.


Roughed up the edges with some sandpaper.


Then I took some of the Burnt Umber paint I had leftover from my DIY Canvas Art project {HERE} and diluted it with some water to make a "mock" glaze/stain. 


Acrylic paint mixed with water to create a "glaze/stain"


I took a rag and wiped my glaze on, then off, then on, then off, until I had the look I wanted. Along the sanded edges and in some of the natural holes in the board, I wiped some undiluted paint with my fingertip to create an even darker look (wiping off as necessary).


Here you can see the difference in the edge after I added a little paint


It is kind of hard to see in this photo, but the one on the right is the plain white board and the one on the left has been "glazed/stained".


The left one is distressed, the right one is plain white


Here is another close up of the distressed effect.


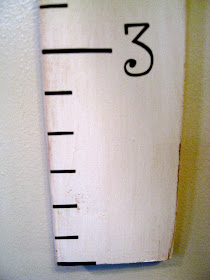
Now, originally, I was just going to draw the foot/inches lines and numbers on the board with a black sharpie. But, as mentioned here, I bought myself a Silhoutte cutter last fall so I decided this would be a great opportunity to try my hand at making some vinyl decals. I chose a font I liked and simply "printed up/cut" the numbers 3 - 6 on brown vinyl since I thought it would work well against the white/brown paint.

Next, I used a tape measure and a pen to mark off the foot increments.


As mentioned before, I had originally just planned on using a ruler and a sharpie to draw the lines. But I had a bunch of extra vinyl pieces that I had trimmed off the edges of my number "printouts" and decided to cut those into small strips to use as my lines. It took a while to cut all the pieces and stick them on (and a sharpie probably would have looked just as good) but I'm anal a perfectionist and I like the idea of perfectly straight vinyl lines. :-\

I made the foot marker lines the longest, the 6 inch markers the next longest and the in-between inch markers the shortest.  Then I just applied all the vinyl and.... VOILA! (I also cut out each girls' name in some brown vinyl and applied it to the top of each chart along with a pretty flourish).

Finished DIY Growth Charts!

Varying line lengths help discern inches and feet

I love how the distressing came out!


The boards start at 2 1/2 feet


The next decision to be made was "where to hang them?". There really isn't much free wall space in their bedrooms and I worried that we wouldn't update the charts regularly if they weren't more readily accessible. So I scoured the main floor of the house for a good spot and decided on the door frame that connects our dining room to the kitchen - one on each side. Because the boards I used were only 4" wide, they would fit perfectly in the 6" space! Originally, I thought I would hang them with ribbon or twine, but the Heela came up with the great idea of using velcro so they wouldn't swing every time someone walked through the doorway. I found a pack of Command Picture Hanging Strips, placed one at each end of the board and hung them up.


Boogey's hangs on one side of the door frame


SweetPea's is on the other.
  
I'm really pleased at how great they turned out and SweetPea couldn't be happier to finally document her weed-like stature. :)

And one of the best things about it... it's portable. If we move, we can take it with us and not lose all those fun memories! 


Not bad for less than $3 each! ($2.28 = the cost of the wood - I already had the paint and vinyl) (Note: although I used vinyl for my numbers and lines, you could easily do the same with paint or even a sharpie!)


What do you think?? Success?


**Special note... I have two extra sets of the numbers (3, 4, 5, 6) in BLACK vinyl. Each number is roughly 1.5" tall and .75" wide. The font is the same as seen above. I am giving away one set each to two lucky readers! Simply leave a comment below specifically letting me know you are interested in them. In a couple of days, I will randomly select 2 winners to whom I will mail the numbers. I'd love to see you use these for your own growth chart, but you're obviously free to use them however you want. Just be reminded that this is for the numbers only (not the board) and that you will only get numbers 3 through 6. Winners have been contacted via email. Thanks!

This project was featured - THANK YOU!!

The DIY Show Off


This project was linked up to the CSI Project's $5 challenge!
Visit thecsiproject.com