Pages

Thursday, February 24, 2011

Big Girl Room #1 - Hand-Painted Flowers


Prior to buying our current home two years ago, we lived in a modest townhouse that I had purchased on my own (i.e. - pre-Heelamonster in my life). After the Heela moved in, we decorated a few rooms here and there, including both of our daughters nurseries once they came along. Since we didn't find out our first child's gender, we had to decorate it in a neutral theme so we  I chose Classic Winnie the Pooh. I did most all of the decorating work by myself since the Heela was traveling alot back then and, if I do say so myself, it came out pretty darn good! (I hope to post more details on that project later, but here is a pic).


Glimpse of SweetPea's Nursery in Old House

Painting that room had been ALOT of work (granted I was 7 months pregnant at the time) so when we moved into our new house, I just had no desire to re-do that nursery or all that painting despite the fact that SweetPea was still in her crib. Besides, I knew it wouldn't be too long before she moved into a "big girl bed" and the decor would need to be updated at that time anyway. So we left the room in its natural, move-in state and I simply used the Winnie the Pooh accessories to make it liveable for a little while. Here it is in all its sad, pathetic and very plain glory....


SweetPea's Nursery in New House

But when it came time to upgrade to a big girl room, I still had no desire (or energy) to paint the whole room. So I racked my brain to try and figure out how I could add some LIFE and COLOR to the room without having to deal with tape and primer and trim and all that [crapola].

Meanwhile, I came across this awesome comforter cover on clearance at Company Kids. I loved all the bright colors (hmmmm.... no wonder I like the colors of THESE costumes so much!) and knew I she just had to have it.


Comforter Cover bought on clearance from Company Kids


I also liked the fact that it wasn't all ~{Little Girly}~. I figured it would be great if I could find a style that wouldn't absolutely need to be changed in the next few years (i.e. - Dora, Princesses, Elmo, etc.) when SweetPea was 5 going on 15.

And then it dawned on me...


Those flowers look hand painted...


What if I could re-create those comforter flowers...

 ...on the wall?!?!

YES!!! That's it!!

A friend of mine had recently painted a Curious George mural on her son's wall using a basic image found on the internet, projecting that image onto the wall, tracing the image and then painting it in. Easy Peasy!

So, I immediately scanned each of the flowers onto my computer, (splicing multiple scans as necessary) to get .jpg images like this...


I then used a projector (borrowed from work) to project the images onto the wall. Once each image was where I wanted it, I traced the general form with a pencil. (I apologize for not having any pictures of the process - this was pre-blogdom. SO SORRY!). Then I started painting. [I had taken one of the pillowcases up to Lowes and bought the small sample jars of paint (Valspar) in each color of the flowers. I didn't officially "colormatch" them - just eyeballed using the paint swatches. And since I only needed one sample jar of each color, it really wasn't that expensive even though I had 6 different colors]. I had to work in layers to create the flowers, so it took pretty much all day to finish it all, but I couldn't have been more pleased with the results!! And...

{{TA DAAA!}}


Flowers painted on wall to match bedding


I think those flowers came out pretty darn good, if I do say so myself! :)


Close Up


Close Up


And here are a few more pics of the updated room.


The vinyl over the bed says "Always Kiss Me Goodnight" (found on clearance at Kohls for $4)


New girly curtains replaced the heavy, formal ones left by the previous owners.

Green Gingham Panels and Hot Pink Sheers all bought on Clearance (Lowes and BB&B)


This is actually a bath rug but it matched perfectly! (bought on sale at Kohls for $6)

A large green tub at the end of the bed holds (way too many!) stuffed animals.

And I had to add a photo of this awesome little table light from Ikea (not seen in original photos above). Originally I had borrowed a normal old lamp from our guest room and put that on SweetPea's nightstand. But after she burned her fingers on the lightbulb while trying to turn it off one night, I knew I needed something different. I eventually found this little thing at Ikea.

Ikea Table Lamp

It is completely plastic so it won't shatter if it is knocked over. And the lightbulb is totally enclosed (even on the underside of the shade!) so no burned fingers! It has one of those little switches on the cord which SweetPea loves being able to turn off and on herself. I will admit that it doesn't give off a whole lot of light, but it is still enough to read by without using the overhead light. Which is this monstrosity...


Impossible to get a good photo of this light.

I'm not really into these chandeliers but they were here when we moved in. If this had been in the master bedroom, I would have taken it down immediately - just not my style - but I figured it could work in a little girl's room. They each have one. We call them the "sparkle lights" since they make fun designs on the ceiling and the prisms make colorful rainbows on the walls. Not to mention that everyone knows monsters are afraid of "sparkle lights" when they are on the lowest dimmer setting. ;)


I want to paint the lovely {NOT!} brass skelton of that light, but haven't gotten around to it. Plus, I really don't know what color to paint it. Got any ideas? White? Silver? Would love to hear your feedback!


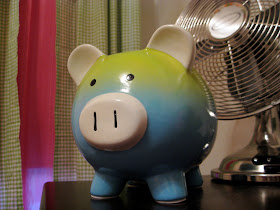
Lastly, on the dresser, is... A green basket I picked up for about $5 on sale at Michaels - it currently holds hair detangler, body lotion, etc.  The "A" was in the Dollar Spot at Michaels. The little bird is from a set my mom gave the girls last summer. The piggie bank is from Target - picked it up during a sale - SweetPea loves to put coins in it.


Needless to say, my daughter absolutely LOVED her new BIG GIRL ROOM!


SweetPea was so excited about her new room!

 
As always, here is the Before and After


BEFORE

AFTER


Linked up to the CSI Project's Kids Places Challenge!
Visit thecsiproject.com 


Also linked up here:

 
Thrifty Decor Chick
Roomspiration


Tuesday, February 22, 2011

New Winner of the CSN Gift Code!

Well, I never heard from the original winner selected for the CSN gift code giveaway, so I've chosen a new one. The new winner is...


Lucky #7!


Congrats Green Door Girl! Please email me (see side bar) within 72 hours (or I'll have to choose yet another winner).

Friday, February 18, 2011

Homemade / DIY Hair {Detangler}

I've always had long hair. My whole life. Always. 

[OK, not entirely true. It has been cut short-short-short 3 times. Once when I was in Kindergarten. Once in college. And once about 5 years into my working career. Everyone is allowed a few acts of craziness in their life, right?? But other than those 3 times, it has always been long. Long, I tell ya!]

So naturally, both my girls have always had long hair. Granted, they get trims to keep the ends healthy, but otherwise, we do the long hair thing in this household. They both got haircuts right before New Years when we all agreed that SweetPea's hair was just a little out of control in terms of its length.

Gorgeous, but just too long to manage!

Here she is waiting to get a trim...


Her hair is like mine and grows like a weed.

I will say, the stylist was a little surprised when I showed her where I wanted her to make the cut... but she did it anyway.


Whoa - that's a big chop!

SweetPea was quite happy to get it cut shorter - it was just too difficult to do anything with it that long. I admit, however, that I did cringe a little bit when all of her beautiful summer highlights and baby curls wound up in a pile on the floor. (and yes, even though this was her 3rd haircut, I did take those curls home and put them in an envelope for safe keeping - I AM a mom, after all! ;).

Big pile 'o' hair  - *boo hoo*

However, as mentioned, it is still long. {And to be honest, has already grown about 2 inches since that cut}. *sigh* Needless to say, when it is time to brush hair, my girls are not fans. Why? 

Tangles. 

That dreaded occurrence. Tangles. *sigh*  No matter how we style their hair (except maybe in braids) these girls get tangles. I attribute it partly to the fact that we live in an area with realllllly hard water. But, truth is, I've always gotten tangles too - no matter where I lived. Now I suppose one could blame it on me and say that I must simply just be a bad care-taker of hair. But given that I've had long hair all my life, I'd like to think I know what I'm doing. So I'd much rather just say that it is a fact of life that if you have long hair, you will be burdened (to some degree) with tangles.

If you have little ones, you know that brushing long or curly hair is NO fun due to those dreaded tangles! I know what I am doing when it comes to getting out tangles and it is still NO fun. I know all the tricks - "work from the bottom up" and "hold the hair in your left hand while you brush with the right", etc. - it is still NO fun! NO FUN, I TELL YA!!

The solution.... detangler.

We've been using it for years - my girls both came out of the womb with full heads of hair. So much that you could tie a ribbon in it when they were 1 day old. So we are well-versed in the benefits of using detangler. And all this time, I've been using J&J detangler. You know the stuff. It works well. Smells sweet like little girls. :)

Our long-time friend.

But it is expensive - way more than it should be. I'd always stock up when it was on sale or I found a coupon. But when you've got 2 kids using it every other day, it goes fast. Then one day, while I was lamenting my grocery budget, I got the brilliant idea to try making my own. Surely it couldn't be that difficult and would definitely be A LOT cheaper more frugal than buying it at the store every other day.

A quick search on the internet and I found plenty of other moms out there who had already had this brilliant idea and gave good tips on how to make your own. Basically, all you need is:

- Hot Water (using hot water helps the conditioner dilute better)
- Conditioner
- Spray Bottle

Basically, you just dilute some conditioner in water and voila - homemade detangler! The ratio I decided to use was roughly 1/8 cup of conditioner to about 1 cup of hot water. {You may need to play around with your proportions to see what works best for you/your child so that it detangles well, but doesn't weigh down their hair either}. I just used one of the conditioner samples I had in the linen closet (I'm a sucker for freebies! And this is such a great way to actually use these up.) and mixed it with about 10 oz of water. I wasn't exact with my measurements.

A free sample of conditioner was the perfect amount for my spray bottle!


I mixed up one batch for SweetPea and funnelled it into the empty J&J bottle. And made a second batch for Boogey and just put it in an empty spray bottle that I happened to find in the linen closet. 


How I love my label-maker! :)


They still dread getting their hair brushed (must be a preschool power thing) but at least it isn't quite so painful anymore. For any of us. :)

Do you have any DIY tricks to help save money? I'd love to hear them! I'm cheap frugal, remember?? :)


Wednesday, February 16, 2011

Reminder - Giveaway ENDS tomorrow!! $35 CSN Stores gift code!

If you haven't already entered my giveaway for a $35 gift code from CSN Stores, time is running out. The giveaway ends tomorrow (Thursday, 2/17) at Noon (EST)! Don't miss this opportunity to access over 200 online stores!


Head on over HERE to enter!!


Wednesday, February 9, 2011

100 (+) followers GIVEAWAY!!!

Giveaway CLOSED


As I mentioned a few weeks ago, I wanted to have a ~giveaway~ to celebrate the fact that I had reached 100 followers. WOOHOOO! I really am blown away by all the "love" and truly appreciate each and every one of you who takes the time to visit my humble little blog.

THANK YOU!!!

So, I've been mulling over what to do for this giveaway... "What would be a good prize, that would suit all tastes/locations/etc.?", I wondered. And while I was still trying to decide, I happened to be contacted again by CSN Stores. [Those of you who have been around for a little while may recall my giveaway with them back in November]. Now, I admit, when they gave me the option to do a review on one of their products (instead of doing a giveaway), I was really tempted - I've had my eye on a few of their items for a while now. But, I decided that the timing couldn't be more perfect for my 100 followers giveaway, so it is all for you! So... here we go... :)


Have you ever heard of CSN Stores? Well, in case you haven't, CSN is comprised of over 200 online stores, selling everything from this uber comfy-looking Eames Lounge Chair to cookware to shoes (yes, I said shoes!!). Really, I don't think there is anything they DON'T sell!

Check them out yourself... starting HERE. I am sure you will find at least 3 things you would love to have! I know I sure did!

Well, the wonderful folks over at CSN Stores have offered a $35 gift certificate to one of the lucky followers of RACKS and Mooby!!

In order to be entered in this giveaway, you must do the following:

1) Leave me a comment telling me what item you think you would like to use your gift card towards. You can visit them at this link--> CSN Stores.

**IMPORTANT NOTE: You MUST be a follower of RACKS and Mooby to win this giveaway! (After all, this is a giveaway to honor my followers - it is only fair that you be one - I will verify this.) If you are not a follower yet, simply click on the 'subscribe' link in my side bar.


For an extra entry to the giveaway:
2) Post about this giveaway on your blog and leave me a link to your post (in a separate comment).

There you go! Up to 2 chances to win!! Good luck!


This giveaway ends on Thursday, February 17th at 12 noon EST.  Winner will be chosen via random.org and announced by Friday, February 18th.

I apologize to those international folks, but this contest is only open to residents of the USA and Canada. (CSN's rules, not mine!)  (And please note that extra International shipping fees MAY apply on Canadian orders.)
Legal stuff: I have not been compensated in any way by CSN Stores to host this giveaway.


Pink Mod Monkey Party - Part 2

Well, Boogey's 3rd birthday party (a Pink Mod Monkey party) was a fabulous success! Everyone had a great time and the decorations all turned out spectacular, if I do say so myself! (Actually, I did get a lot of compliments on everything so it isn't just me ;)

As mentioned HERE, the theme was "Pink Mod Monkey" and I made great use out of the file that I had purchased from Cupcake Cutiees. {See Part 1 of this party post where I decided on the theme and made the invitations HERE}

Here are a couple of collages and then I'll show you some of the details.

Pink Mod Monkey Party Decor
Pink Mod Monkey Cupcakes

This is how the dining room looked:

Mod Monkey Party Table setup


First, I used the monkey "tag" images in the downloaded file (discussed HEREto make my own stickers to decorate some plain white cups ($2.99 for 24) I had purchased at the party store. I bought a pack of sticker paper at Staples ($13 for 30 sheets - not a bad price considering I only had to use 1 sheet to make 12 stickers). I simply sized the images to the size I wanted and then printed it out on the sticker paper using a color printer. I used a 2" circle punch to cut them out and the girls helped me stick them onto the cups. A cheap and easy way to customize your own cups!


DIY Customized Mod Monkey Cups


In the cups, I placed a pink or green straw (from a multi-pack I already had). As usual, I cut about an inch off the bottom of the straw to lessen the risk of a tip-over since being used by pre-schoolers. I bought packs of pink and green paper plates and napkins from Target for only $2.99 each. I think there were 80 plates/napkins in each pack, so they were really a good deal for the price. I placed everything on a pink plastic tablecloth ($2.99 from Target for a two-pack) which I layered over a white cloth tablecloth I already had.


I liked how the dinner-size green plates looked like "chargers".


Pink and green balloons added extra flair to each chair and were sent home with the kids at the end of the party.


Who doesn't love balloons?!


Once-again, I used the images in my downloaded file to create a fun banner. I cut the triangles out of some cardstock I already had (from my old scrapbooking stash) and simply glued on the images I had printed out on my color printer. On one of the triangles, I added sticker letters (again, from my scrapbooking stash) to spell out "Happy Birthday". A hole punch and some string and you've got a cute banner/bunting!


DIY Mod Monkey Birthday Banner


The polka dots at the top were from one of the "papers" included in the download file - printed on a color printer, cut and glued on.

Stickers spell out "Happy Birthday"

I picked up a few pink monkeys at the Dollar Tree and hung them in various places around the room. They were supposed to be for Valentine's Day but the colors worked for the party and the theme was perfect. I cut off the cheesy red bows they had around their necks and they were a great addition to the decor.


Dollar Tree monkeys added some fun when hung from the chandelier.


Goody bags were lined up along the buffet. I bought these pink paper bags at Target in a pack of 12. (I think it was only $1.99 for the pack). I used my scallop scissors to create a little fancy detail along the top and then placed some more of my homemade stickers in the center.


DIY Customized Party Favor Bags


Inside each bag I placed a super-cute little stuffed monkey ($14.99 for 12 at Oriental Trading), a few monkey tattoos ($4.99 for 72 tattoos at Oriental Trading) and a few Lollipops left over from my Lollipop Flower Pot project (seen HERE).


Party Favors from Oriental Trading


At each end of the table, I placed one of my homemade Dollar Tree Hurricanes (see tutorial for the DIY hurricanes HERE). Inside, I first layered some brown Dollar Tree paper shred (I split one bag between the 2 hurricanes). On top of that, I placed a crumpled-up pink paper napkin and then a green paper napkin. And lastly, I poured in some pink and brown Whoppers (one box of each in each hurricane - bought them at the Dollar Tree). Around the base of the hurricane, I wrapped some of the perfectly matching ribbon I had found at Michaels in the Dollar Spot and another print out from my downloaded file. So cute yet so inexpensive!


Pink Mod Monkey Hurricane


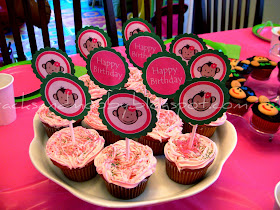
In the center of the table were the cupcakes. I made them myself (with a little help from Betty Crocker! ;) coloring the yellow cake batter pink to keep with the theme. Half of the cupcakes were topped with pink frosting and sprinkles. I made my own cupcake toppers (first time!) using an image from the download file.


DIY Pink Mod Monkey Cupcake Topper


Pink Mod Monkey Cupcake Toppers

The other half of the cupcakes were decorated as... monkeys! I found this idea out there on the internet somewhere and knew I just had to replicate it. I started with chocolate frosting and then added cut cookies, M&M's, and black and red gel to create the faces.


Cookies cut with a knife make up the face and ears of the monkey


DIY Monkey Cupcakes
SweetPea did everything but the gel nostrils and mouth so even a 4-yr old can do this decorating!

DIY Monkey Cupcakes


In the kitchen, we had some more food and snacks. My Lollipop Flower Pot [see tutorial HERE] was placed on a Dollar Tree polka dot placemat at the back of the table. I made a couple more (smaller) Dollar Tree Hurricanes, wrapped them with some more ribbon and poured in some pink and green M&M's (the pink M&M's were from a Valentine's bag of M&M's and the green ones were literally picked out of a regular big bag one by one! LOL).


Another homemade hurricane housed some M&M's


And some homemade chocolate-dipped pretzels added some extra sweetness to the table. These are so easy to make and are DEE-LISH! (see tutorial HERE from another party)

Homemade chocolate dipped pretzels satisfy those sweet-salty cravings!

The only organized activity we did was to play "Pin the Belly-button on the Monkey". I "splurged" on a jumbo blow-up monkey from Oriental Trading (only $12.99 so really not all that expensive). I used my circle punch to cut out pink and green circles for the belly button and the kids had fun taking turns trying to place it in the right spot. Here is the cute guy before we attacked him with spots. :)


Whew!! That was a long and picture-laden post! But I know how much I like to see all the details of other people's parties, so hopefully you do too. :) If you have any questions about anything, feel free to contact me.

**If you are interested in purchasing any of the Mod Monkey items seen here (i.e. - cupcake toppers, stickers) please contact me to discuss options.**


This project was featured! Thank you so much - I am truly honored!!

UndertheTableandDreaming


WWFB


Linking up to these parties:


The CSI Project's Birthday Party Challenge

Visit thecsiproject.com