Thursday, June 30, 2011

Baked Crab Rangoon

At a recent family gathering I was tasked with bringing some appetizers. One of the tasty treats I decided to make was Baked Crab Rangoon. I love getting this yummy fried goodness when we order takeout, but it really isn't that figure friendly given that whole "fried" aspect. However, this version is a little kinder to your waistline since it is baked instead of fried and uses light cream cheese and mayo. These were a HUGE hit with everyone and so delish!


(pardon the lousy cell phone pic - it's all I had that day!)


What you need:


I made a double batch so my pic shows 2 cans of crab. The recipe below is for a normal batch using 1 can.


  • 1 can (16 oz.) white crabmeat, drained
  • 4 oz. (1/2 of standard 8 oz. package) light cream cheese, softened
  • 1/4 cup thinly sliced green onions
  • 1/4 cup light mayonaise
  • 12 won ton wrappers


{Tip: Won ton wrappers can usually be found at the grocery store in the refridgerated produce section}.


What to do:
  • Preheat oven to 350 degrees.
  • Mix crabmeat, cream cheese, onions, mayo together in bowl.
  • Spray 12 medium muffin cups with cooking spray.
  • Gently place one won ton wrapper in each cup, allowing edges of wrappers to extend above sides of cups.
  • Fill wonton cups evenly with crabmeat mixture. (I used a small cookie scoop to do mine).
  • Bake 18 to 20 minutes or until edges are golden brown and filling is heated through.
  • Serve warm. Garnish with chopped green onions, if desired.
  • ENJOY! :)


Next time I will:
- Not fill my cups quite so full - I felt there was a little too much filling in each one (and I'm a filling gal!)
- Add a garnish of chopped green onion to each one - these definitely needed some extra color
- Use a different brand of crab meat - this stuff was pretty wimpy with no substance
- Make extra because they were sooooooo good! :)


This project linked up here:

Pin It!

Sunday, June 26, 2011

Boxes on our Walls - Part 2 {Sizing}

So in my last post HERE, I told you about how I decided to add boxes to my walls and go from this...


*yawn*


To this...


*KA-POW!*


And I did it all by myself! Even better! :)  So here is what I did…

First, I decided which walls I wanted to add the boxes to and measured the length of each one.  Next I needed to determine how many boxes I would put on each wall (this wasn’t so difficult – sometimes it was pretty obvious – um, one! Duh! LOL) and how big the boxes would be (this was the tougher part!).


I knew I wanted to have 3” borders around my boxes (the research I did indicated borders on boxes like these are typically either 3” or 6” – but obviously you can do whatever you want!), so this is when I had to break out the math skills. {see, I knew those letters after my name would come in handy after all!}.

Here is an example…My first wall was 90” long so I subtracted 6” to account for a 3” border on each end (A). This left me with an area 84” wide (90”-3”-3”) to fit in some boxes.


I decided that putting only two boxes in that space would result in some really long boxes (just not the look I wanted) so I decided to go with three boxes. From my remaining 84” I then subtracted another 6” to account for the 3” borders in between the three boxes (B).


This left me with 78” for my three boxes (84”-3”-3”). I divided the 78” of box space by 3 to come up with boxes that were 26” wide (C).


To figure out the height of the boxes, I simply measured from the bottom of the chair rail to the top of the base board and then subtracted 6” (for a 3” border on the top and 3” border on the bottom). {Note: I will note here that I later realized that neither the chair rail nor the base boards were exactly level all the way across which led to slightly different heights along each wall. However, none of the differences were material enough to really be that noticeable so I just cut all of my heights the same. I knew it would be much easier to take this approach and just deal with the very slight differences. Besides, imperfection = “character”, right?!? ;} 

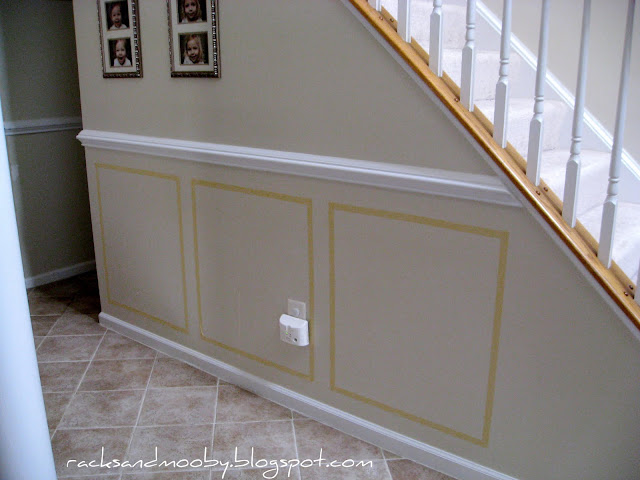
Once I had all my measurements penciled out on paper, I wanted to be sure that I would like the layout/sizes of the boxes. So I took some masking tape and my tape measure and roughed out the look of the boxes on the walls. 


Masking tape helped me visualize how my boxes would look.


Thankfully, the Heela (and my folks who were visiting at the time) all agreed that they looked good. So, I set off to Lowes to buy the makings for the boxes.


Stay tuned for the rest of the story... :)


**You can see the rest of this series here:
Part 1 - Idea
Part 3 - Cutting

Part 4 - Assembly

Pin It!

Wednesday, June 22, 2011

Boxes on our Walls - Part 1

When we bought our house about 3 years ago, it already had some nice chair rail in the dining room and the foyer, as well as going down the main hallway to the back of the house, going up the stairs to the second floor and on the walls of the second floor landing. I always liked the extra little detail it added to those areas but felt that it never really “popped”. This was because the paint color above and below the chair rail was the same – a very light and plain manilafolderyellowcreamivory kind of thing. B.O.R.I.N.G.


The walls were really more yellow/cream/ivory than they appear in this photo - rather boring!


So when we finally decided last month to paint all those plain jane walls a different color (Sherwin Williams Balanced Beige), I knew that I wanted to take full advantage of that nice little detail and actually “use” those chair rails to make a statement. My decision… paint the wall space under the chair rail a nice crisp semi-gloss white. Not only would it make a nice statement and highlight the chair rail, but it would prevent having too much of a broad expanse of beige from floor to ceiling (we have one of those double story foyers with two HUGE walls as well as 9’ ceiling throughout).

But the more I thought about it, the more I thought… “Why stop at a plain white treatment? Why not add some molding boxes and REALLY make a statement?!”  I had seen plenty of other bloggers out there do the same thing and figured, “Hey, it doesn’t look that hard. Besides, I have letters after my name… I can handle it!” {Never mind that those letters have absolutely nothing to do with construction or wood cutting or DIY – but I tried not to think about that minor detail}.

While I am sure there are plenty of fabulous tutorials on blogs out there, my go-to posts were found HERE (Thrifty Décor Chick ~video~) and HERE (Décor Chick). These ladies helped me out so much (indirectly, of course) with their useful tips that it made this project so much easier. Thanks ladies!! The end result was this...


Boxes on my walls! (before painting)


Doesn't it make such a big difference? The above photo was taken before the boxes had even been caulked and before the walls were painted, but still such a nice change already.


In my next post, I’ll give you all the “Deets” on how I made them. Stay tuned…


**You can see the rest of this series here:
Part 2 - Sizing
Part 3 - Cutting

Part 4 - Assembly


Pin It!

Thursday, June 16, 2011

What I've been up to...

Work, work and more work. 


Via


A quick weekend away up to the in-laws Kabin


Then more work, work and more work with crazy multiple deliverables.


Via


Then I got sick, sick and more sick. Ugh.


Via


My parents are now in town for a visit. We haven't seen them since Christmas. So nice to catch up! {for the most part - heehee}


Via


And a fun trip to the...


Cheeeeez!!


But I've got some fun projects in the works...


Honey, why is there masking tape all over our walls??


Decisions, decisions...


Once things settle back down a bit I'll provide more details - I promise! :)


Not to mention that I just noticed that I surpassed 200 followers sometime recently! You know what that means... a giveaway!  Stay tuned!!!

Pin It!

Wednesday, June 1, 2011

Rainbow Pudding Popsicles

Today I bring you a tutorial on how to make rainbow pudding popsicles...


Rainbow Pudding Popsicles


My car thermometer read 101 degrees yesterday. Yes, 101. On May 31st. And, no, I don't live on the equator.


We've been having a mini heatwave and I have to admit I am always a little thankful to head into the office on days like this.

But...

it is the perfect weather for a treat like this...

Rainbow Pudding Popsicles

We actually made these back in March when my nephew came over for a playdate (and I forgot to post about it - d'oh!) but they'd be perfect for this kind of weather!

First we made some vanilla pudding. It was the first time the kids had ever done that and I gotta tell ya, they had so much fun making pudding "from scratch" {thank you Jell-o for making me look like a master magician chef!} LOL.

A large box of jell-o instant pudding (vanilla) and cold milk (not pictured) can make you look amazing!

Then we divided it into 6 separate bowls. And added food coloring (I used the liquid drop kind which we already had in the pantry) until we got the colors we wanted. I admit I had some trouble getting the purple to come out right, but EH, I was working with preschoolers and they didn't care!


Colored pudding


Then I had the kids fill up some plastic cups in layers to create a rainbow effect. Here is Boogey's - not exactly the neatest rainbow out there, but quite a fun swirly visual. She really had fun making these!


A 3-yr old's version of a rainbow - gotta love the swirls!

Lastly we stuck 2 popsicle sticks in them (we needed 2 since the cups were so wide), covered with saran wrap and placed them in the freezer for several hours.


Rainbow Pudding Popsicle


When the kids were ready to try them out, I simply removed them from the freezer and {carefully} ran the outer sides of the cup with hot water to help loosen the frozen pudding, and popped them out. YUM!

Refreshing Frozen Pudding Popsicle - yum!
For those of you who have asked, these simply taste like vanilla pudding - just frozen. I was worried the taste would be compromised with freezing, but it wasn't! Definitely a YUM! :)

Do you have any favorite summer treats you like to make with the kids?

{For the record, I saw this idea on someone's blog last summer but can't remember where. If it comes to me, I'll be sure to give credit!}


This post has been featured - THANK YOU!! Please be sure to check out these amazing blogs!


ADesireToInspire.com

Keeping It Simple


Somewhat Simple
A little Knick Knack
Mommas Kinda Crafty
While He Was Napping
Pin It!
Related Posts Plugin for WordPress, Blogger...