Showing posts with label Molding. Show all posts

Wednesday, July 13, 2011

Boxes on our Walls - Part 4 {Assembling}

When I left off before, I had cut all of my molding pieces and gotten out this baby...


I gave this Nail Gun and Compressor to the Heela for his birthday this past year and he graciously showed me how to use it for this project. Now, you could clearly do this project with a hammer and nails, but if you have access to a nail gun, I highly recommend using one!

If you want a play-by-play visual of how to do this, check out THIS POST here by Thrifty Decor Chick. She actually made a video of the process and it was my go-to guide! I won't go into too much detail since that video is so great, but here are the basics...

{NOTE: Before you start assembling your boxes, I recommend painting your wall (if you plan to) as well as painting your molding pieces. According to all the research I did, it is much easier to paint everything before you put the molding up on the walls. Then later, you just fill in nail holes, caulk edges and touch up paint where necessary. I admit I had the luxury of skipping the painting step altogether since we had hired painters to come do our entire lower level the week after I did my boxes. But if we had not had them coming in, I would have painted everything before nailing, etc.}

Starting at the edge of your wall, use your spacer to determine how far away from the edge/top/bottom your left piece of molding needs to be. I cut my spacer from a paint stirrer/stick.

Use a pre-cut spacer to determine how far from the edge/top/bottom you need to be.


Use your level to make sure your molding is straight.


Make sure it's straight!


Nail in place using nail gun or hammer and nails. Line up the corner of the top piece and repeat the process, then repeat with the right piece, and lastly with the bottom piece. Don't worry if you have some gaps as they can be hidden later with spackle.


Align your angles to make a nice corner.


Here is a finished box - ta da!


For boxes on the same wall, again use your spacer to ensure you are the proper distance away from the first box and from the top. Continue, continue, continue. :)


Use your pre-cut spacer to make the positioning of your boxes easier.


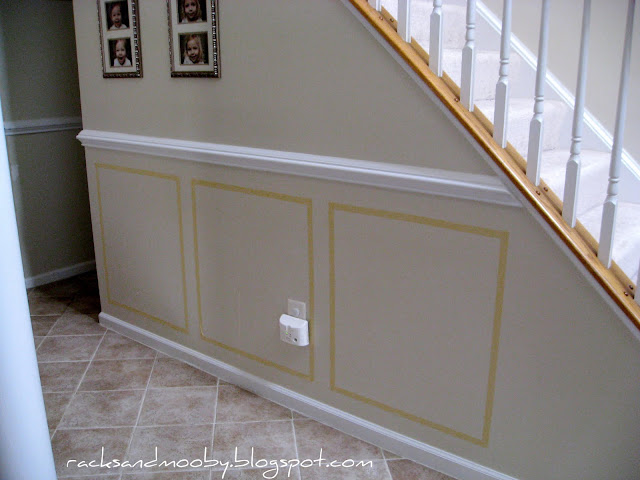
Here is how it looked once I had all my boxes up (before caulking, filling in nail holes or painting).


LOVE!


Your next step would be to fill in all of your nail holes and caulk the edges. As mentioned above, I did not have to do this step myself since the painters we hired to do our lower level preferred to do it themselves. However, go HERE to see recommendations on this step (again from the fabulous Thrifty Decor Chick - she rocks!).

Lastly, your final step would be to touch up any paint. Again, since we had the painters coming in the following week, I was able to avoid the paint process. Here is the final result after they had caulked and painted a coat of primer.


Already looking so good!


And here is the final result after the walls were painted (Sherwin Williams Balanced Beige) and the area below the chair rail was finished out in semi-gloss white.


Finished {mock} Wainscoting - LOVE!


And here is a before and after collage...

What a nice change!

SO?? What do you think? How'd I do? Personally, I love the way the boxes came out! I plan to do some more in the dining room and on the upper landing (where we already have chair rail). Those areas have already been painted white semi-gloss so I'll just need to add my boxes (I'll paint them before hand) and caulk. I'd like to add some along the stairs too, but those require a little lot more work since they will have funky angles. We'll see if my math skills are up to the test - someday! ;)


I'd say this project was a fabulous success and couldn't be more pleased with how it came out. :)


**You can see the rest of this series here:
Part 1 - Idea
Part 2 - Sizing
Part 3 - Cutting


This post has been featured - THANK YOU!! Please be sure to check out these amazing blogs!


UndertheTableandDreaming


Linking up here (see tab above for more details):


Pin It!

Tuesday, July 5, 2011

Boxes on our Walls - Part 3 {Cutting}

Remember how I told you HERE about how I had decided to add some boxes to my walls? And then HERE I told you about how I decided what size to make my boxes. Well, now it is time to tell you how I actually "built" them. In other words, how I cut the molding and put it on the walls.

When I left off before, I had headed out to Lowes to buy the molding to be used for my boxes...


So I knew that I did NOT want to make wood boxes. Yes it would be more professional and all that, but I also knew it would be more difficult to cut, nail, etc. So I took Thrifty Décor Chick’s advice and went for the foam-like stuff that is so much easier to work with. Initially I was going to use the stuff she recommended HERE which costs less than $5 for an 8’ length. 


(pardon the glare and crappy cell phone pic)


But the more I looked at it, the more I felt it was a little too wimpy for the look I was trying to achieve. So I splurged on this stuff which was much more interesting even though it was much more expensive and decided that the extra cost was worth it (although I admit, I had a realllllly hard time telling my cheap frugal side to shut up!).


Much more expensive at $13 a piece, but also much more stylish


I ended up needing 9 pieces for my 7 boxes - ouch! (but oh, so worth it! :)


Next step was to do all my cutting. I had previously purchased a miter box at Lowes (less than $15 for the box and saw) and got it set up in the garage. 


Handy Dandy Miter Box and Saw


Now, mind you... we have a whole wall’s worth of work tables, but the Heela has it all covered in junk important “man stuff” so I had to improvise with a couple of trash cans. Hey, I can be resourceful like the best of 'em! {Tip - I recommend putting something with “grip” under the miter box as I found mine really slipped around a bit. The Heela found an old rubber car floor mat in his pile of junk “man stuff” and it worked perfectly!}


Improvised work area - puts the term "white trash" on a whole new level - LOL


Then I just started measuring my pieces and cutting the ends at a 45 degree angle. {Tip - If your molding strips are like mine and not uniform on each side, make sure you are making your angle cut the right way}. Huh?? Ok… so my molding looked like this.


I decided that I wanted the right edge (as you look at it in the photo above) to be on the inside of my boxes. This means that my angles always need to look like the piece on the right in the photo below…


My angles all needed to be like the piece on the right


I admit that I made my cut going the wrong way more than once. {Rookie mistake!}


Be sure to pay attention to which way your angle needs to go!


But once I got into the groove of things, it just flowed. {Tip - I had previously tallied up how many pieces I needed of each length. Then I determined how to get the best “bang for my buck” from each 8’ length of molding. Some 8’ lengths gave me 3 pieces of cut molding which were all the same size, while others were cut into 4 pieces of different-sized molding. Just play around with the numbers until you are satisfied. The goal is to buy the fewest number of 8’ strips possible}

{Tip - As I cut each piece of molding, I wrote the exact length on the back. This way I wouldn’t have to guess which piece was which or re-measure them later to be sure I had grabbed the right one}.


Jotting down the length on the back of each piece of molding helps keep them organized


Here they are all lined up and ready to go. Yes, it was a lot of cutting, but thankfully, this foam stuff cuts SO easily!


That's a lot of cutting!


Now it was time to put them up on the walls. So I gathered my molding pieces, a level, a 3" spacer (I cut mine from a paint stick) and this lovely baby...


Not a necessity for this project, but it makes it soooo much easier!


In the next installment, I'll tell you about how I actually built the boxes on the walls. To be continued... :)


**You can see the rest of this series here:
Part 1 - Idea
Part 2 - Sizing

Part 4 - Assembly


Pin It!

Sunday, June 26, 2011

Boxes on our Walls - Part 2 {Sizing}

So in my last post HERE, I told you about how I decided to add boxes to my walls and go from this...


*yawn*


To this...


*KA-POW!*


And I did it all by myself! Even better! :)  So here is what I did…

First, I decided which walls I wanted to add the boxes to and measured the length of each one.  Next I needed to determine how many boxes I would put on each wall (this wasn’t so difficult – sometimes it was pretty obvious – um, one! Duh! LOL) and how big the boxes would be (this was the tougher part!).


I knew I wanted to have 3” borders around my boxes (the research I did indicated borders on boxes like these are typically either 3” or 6” – but obviously you can do whatever you want!), so this is when I had to break out the math skills. {see, I knew those letters after my name would come in handy after all!}.

Here is an example…My first wall was 90” long so I subtracted 6” to account for a 3” border on each end (A). This left me with an area 84” wide (90”-3”-3”) to fit in some boxes.


I decided that putting only two boxes in that space would result in some really long boxes (just not the look I wanted) so I decided to go with three boxes. From my remaining 84” I then subtracted another 6” to account for the 3” borders in between the three boxes (B).


This left me with 78” for my three boxes (84”-3”-3”). I divided the 78” of box space by 3 to come up with boxes that were 26” wide (C).


To figure out the height of the boxes, I simply measured from the bottom of the chair rail to the top of the base board and then subtracted 6” (for a 3” border on the top and 3” border on the bottom). {Note: I will note here that I later realized that neither the chair rail nor the base boards were exactly level all the way across which led to slightly different heights along each wall. However, none of the differences were material enough to really be that noticeable so I just cut all of my heights the same. I knew it would be much easier to take this approach and just deal with the very slight differences. Besides, imperfection = “character”, right?!? ;} 

Once I had all my measurements penciled out on paper, I wanted to be sure that I would like the layout/sizes of the boxes. So I took some masking tape and my tape measure and roughed out the look of the boxes on the walls. 


Masking tape helped me visualize how my boxes would look.


Thankfully, the Heela (and my folks who were visiting at the time) all agreed that they looked good. So, I set off to Lowes to buy the makings for the boxes.


Stay tuned for the rest of the story... :)


**You can see the rest of this series here:
Part 1 - Idea
Part 3 - Cutting

Part 4 - Assembly

Pin It!

Wednesday, June 22, 2011

Boxes on our Walls - Part 1

When we bought our house about 3 years ago, it already had some nice chair rail in the dining room and the foyer, as well as going down the main hallway to the back of the house, going up the stairs to the second floor and on the walls of the second floor landing. I always liked the extra little detail it added to those areas but felt that it never really “popped”. This was because the paint color above and below the chair rail was the same – a very light and plain manilafolderyellowcreamivory kind of thing. B.O.R.I.N.G.


The walls were really more yellow/cream/ivory than they appear in this photo - rather boring!


So when we finally decided last month to paint all those plain jane walls a different color (Sherwin Williams Balanced Beige), I knew that I wanted to take full advantage of that nice little detail and actually “use” those chair rails to make a statement. My decision… paint the wall space under the chair rail a nice crisp semi-gloss white. Not only would it make a nice statement and highlight the chair rail, but it would prevent having too much of a broad expanse of beige from floor to ceiling (we have one of those double story foyers with two HUGE walls as well as 9’ ceiling throughout).

But the more I thought about it, the more I thought… “Why stop at a plain white treatment? Why not add some molding boxes and REALLY make a statement?!”  I had seen plenty of other bloggers out there do the same thing and figured, “Hey, it doesn’t look that hard. Besides, I have letters after my name… I can handle it!” {Never mind that those letters have absolutely nothing to do with construction or wood cutting or DIY – but I tried not to think about that minor detail}.

While I am sure there are plenty of fabulous tutorials on blogs out there, my go-to posts were found HERE (Thrifty Décor Chick ~video~) and HERE (Décor Chick). These ladies helped me out so much (indirectly, of course) with their useful tips that it made this project so much easier. Thanks ladies!! The end result was this...


Boxes on my walls! (before painting)


Doesn't it make such a big difference? The above photo was taken before the boxes had even been caulked and before the walls were painted, but still such a nice change already.


In my next post, I’ll give you all the “Deets” on how I made them. Stay tuned…


**You can see the rest of this series here:
Part 2 - Sizing
Part 3 - Cutting

Part 4 - Assembly


Pin It!
Related Posts Plugin for WordPress, Blogger...