Showing posts with label Batman. Show all posts

Friday, December 17, 2010

How To Make a Superhero Cape {no sew!}

So in my post HERE about my daughter's 4th birthday party, I told you how it was a Batman-themed "Superhero Academy". And as part of the whole "transformation" into a Superhero, each kid got to put on a ~cape~. I mean, c'mon, who doesn't love wearing a cape???!!! 

Now initially, I went to my good old stand-by, Amazon. But it seemed that they wanted about $15 per cape! WHAAAAAAT???? Um, yeah, I don't think so!! Not when I've got 10 kids coming to this party!!

So, I thought... hmmmm... maybe I could MAKE the capes...

Ha! This from a woman who doesn't sew.

But, the more I thought about it, and the more searching I did on the internet for examples, the more I thought... yes, I can do this! I found a great template available for free HERE at Serving Pink Lemonade and started out on my quest!

Tutorial: How to make a no-sew superhero cape

So I headed out to Joann's Fabric and bought a whole lot of black fleece. I chose black to stick with the yellow and black "Batman" theme I had going. And when I say I bought a "whole lot" I mean "way too much"! LOL. Given that I have never bought fabric before I really didn't judge properly how much I needed - d'oh - but I am hopeful I will be able to find a use for it in some future project. Even though I had bought waaaay too much fabric, I only spent about $12 since it was on 60% off sale.

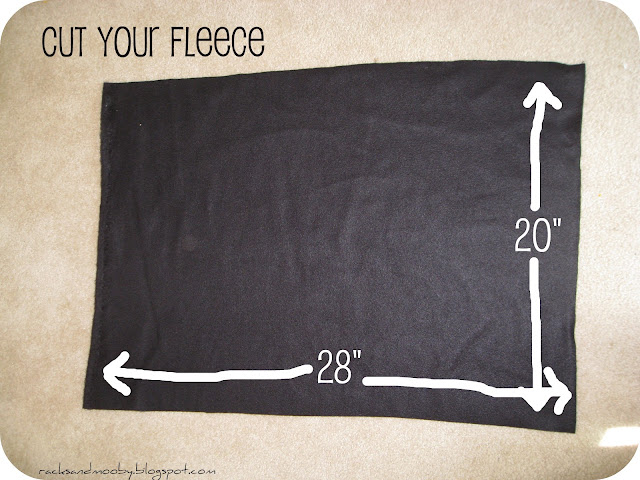
Anyway, I brought it home and, after a little trial and error with my daughter, I cut a piece of fleece into a 20" x 28" rectangle (you may want to adjust your size depending on the height of your child - mine were just right for 4 year olds). I learned that fleece won't fray so it was perfect for this project!


Then I folded it in half and placed my template on it. I have to admit that it took me a minute to figure out which direction to place the template. In case you are as pattern-challenged as I am, the fold is on the right in the below photo with the 2 open edges on the left.


Then I simply cut around the edges of my template. (I didn't even pin the template down - I just held it in place while I eyeballed my cutting). Then I cut some squigglies (yes, that is the technical term) along the bottom.


And here is what it looks like when you open it up. Don't worry if your two ends don't touch. When you put it around the child's neck, it will close just fine. Besides you want it to have plenty of room and not be too tight.


To enable easy closure around the neck, I applied some self stick velcro (about a 1" x 1" square) to each end of the skinny part at the top. Keep in mind that you want to place your velcro on opposite sides of the fleece so the two pieces of fleece will overlap when closed. Again, I had some trouble with this so I'll try and explain it clearly. In the picture below, you'll only see one side of the velcro (on the right) because the piece on the left is on the underside of the cape. When you close it, you'll essentially place the left piece on top of the right piece. 


Next it was time for the "applique" on the back. Be reminded, I DON"T SEW, so I had to improvise. I bought sheets of felt at AC Moore (a local craft store similar to Michaels) for 29 cents each. I used yellow for the boys and pink for the girls. And white for the letters. I cut them out using the templates I found HERE at Tip Junkie and applied them to the back of the fleece with Permanent Fabric Glue. Now, if you're like me and have never used this product before, be advised that this stuff takes a loooooong time to dry. It does say on the back of the tube that you need about 24 hours for it to cure, but I admit I was a little worried when it wasn't sticking AT ALL after about an hour. I'm used to the instant gratification of a glue gun and crazy glue, so that delay really threw me! LOL. But the next morning, that felt was glued on TIGHT! Here is the final product.


You can see my glue "star" a little in this pic
 
As an FYI, I did find that, because the felt was rather thin, that the Fabric Glue showed through when applied (and stayed that way when it dried) so I made a point to apply it in a star-like pattern so it wouldn't look too "messy" underneath the trapezoid.

I have to tell you that all of the kids were thrilled to get their very own personalized capes. I am still hearing from parents a month later about how often their child wears their cape around the house. One has even insisted on wearing it to the store!

They even look good with bedhead and pajamas! :)

Obviously you can do this with any color fleece and felt. The nice thing about the fabric glue is that the capes can be washed without damage! (I'll be honest that I don't know how the self-stick velcro will hold up in the wash as I haven't had to wash ours yet, but you can always add a few hand stitches with a needle and thread if you have troubles with it sticking).

And the best part, each cape cost less than $1 to make!! Now THAT'S what I'm talking about!!! :)

Pin It!

Sunday, December 12, 2010

Superhero (Batman) Birthday Party - Part 2

So in my post HERE, I gave you the low-down on the decorations and food for my daughter's 4th birthday party - a BATMAN party! Now it is time to tell you about the activities we did.

As mentioned, the whole premise was that the kids were attending a "Superhero Training Academy". Now, again, I will NOT in any way take credit for this amazing idea. I fully admit that I copied these ideas from Tip Junkie HERE and Designer Girl 007 HERE and only made minor adjustments to suit our needs.

The first thing on the agenda was to get the kids outfitted as Superheros. After all, if you want to be a superhero, you need to look like one! So I made each kid a cape out of black fleece (see my tutorial for this no-sew project HERE) with their initial on the back.


Next we put temporary tattoos on each kid. I found these batman ones on eBay for a reasonable price. I don't know why, but toddlers and pre-schoolers LOVE temporary tattoos so these were a big hit!


Once all the kids were properly outfitted as superheros, we headed to the basement. Our first activity was the "Power Push" - after all, any good superhero needs to know how to defend themselves and push a bad guy away. My husband happened to have this defense target (from his job) and the kids loved giving it a good push and a kick!

Time for the "Power Push"


The next activity was the "Batcave". We set up the girls' tent and tunnel in the basement and draped a tarp over top to make sure it was nice and dark inside.


"Batcave!"

On the inside of the tent, I hung lots of black streamers (I found the roll of black streamers at Target's Halloween clearance for only 15 cents!). I then taped a bunch of those glow sticks that can be made into bracelets to the walls and ceiling (these were also bought on clearance at Target - 50 cents for a pack of 10) .

The concept was that the kids had to crawl through the tunnel and retrieve 2 glow sticks (kryptonite). They got to wear the bracelets once they came out and take them home with them. Again, what kid doesn't love glowstick bracelets?? Another big hit!


Impossible to get a good pic of the inside of the tent! LOL

Next we moved up to the living room where it was time for "Mighty Muscles". For this activity, I made a set of dumbbells out of foam craft balls (bought with 40% off coupons from Michaels) and a wood dowel that I spray painted black. The kids had fun taking turns lifting the "heavy" weights and I took a photo of each one holding it up. The photos were later emailed to each parent (I had intended on printing them out and including in the thank you cards, but totally forgot until after the cards had been sealed - d'oh!)

Here the Heela demonstrated how "heavy" the dumbbell was. :)
SweetPea shows everyone how it is done!


The last formal activity was "Vaporize a Villain". 


This was the one sign I had to make myself - came out pretty good I think! The others were borrowed from the sites listed above.

For this, we headed out to the garage... here are all the bad guys...

We taped the pictures to a tarp so the silly string wouldn't make a mess of the garage door


And here were the vaporizers!! Silly string!!! (well, knock-off brand from the Dollar Tree! "Goofy String". LOL)


Each kid got a turn spraying their choice of color at their choice of picture(s) and, let me tell you... they LOVED it!! I don't think any of them had ever used silly string before and they had an absolute BLAST!!! (I will note that most of the kids had a little trouble pushing down the nozzle so the Heela had to help them - but they still loved this activity!).


Anihilated!


I had intended on sending a can of string home with each kid, but admit that I totally forgot to do this at the end of the party. Frankly, I don't think any of the parents were all that disappointed! LOL.


Once the activities were done we had the pizza and cupcakes. All in all, I think everyone had a great time. I know that SweetPea really enjoyed her party - I'm so glad I could make it special for her.


Happy 4th Birthday SweetPea!!!


Pin It!

Monday, December 6, 2010

Superhero (Batman) Birthday Party - Part 1

As you know (if you've been following my posts! ;), SweetPea turned 4 a few weeks ago. And as mentioned HERE, my sweet, little, precious, delicate, flower wanted... a BATMAN party. *sigh*. But I decided not to dwell on the "gender appropriateness" of it and figured if that was what she wanted, that is what she was going to get.

I immediately hopped online and started searching for ideas. Thankfully I hit the jackpot and found a few fabulous websites with tutorials for putting together a ~Superhero Training Academy~ with a Batman-centric theme. They even had a bunch of free downloads for activities and decorations. So before I go any further, I will state that 90% of the ideas for SweetPea's party were stolen borrowed from Tip Junkie HERE and Designer Girl 007 HERE and I will do my best to give appropriate credit where it is due.

It started with a combo pack of Batman invitations and thank you notes that I found on clearance at Target. Only $2.38 for 8 invites and 8 TY notes! Squuueee!! If you've been following me for a while, you know I'm ALL ABOUT being cheap frugal! :)  


Following the lead of the Batman logo, I decided to go with a black and yellow color scheme. The dining room was staged as the main eating area for the kids. I bought black and yellow balloons and attached one to each chair. The kids were given one to take home at the end of the day - always a big hit with preschoolers! And I "splurged" on a $4 plastic Batman tablecloth from the Party Store to protect the dining room table but the rest of the decorations were all handmade.

Batman Party Decor - Table

At Target, in addition to the invites, I had also scored several packs of matching Batman paper plates and napkins - only $1.23 each on clearance - score! For drinks, I bought a pack of yellow paper cups at the party store onto which I slapped a Batman sticker (also purchased at the party store). Into each cup, I stuck a black straw that had been in a pack of orange and black straws I bought during halloween clearance. [Tip - Cut about an inch off the bottom of the straws so they won't be too tall for the cups or the preschoolers using them - less chance of tip-over! We do this all the time in restaurants!]

Batman Plates, napkins and self-customized cups

I made a fun banner using yellow cardstock I already had on hand (from my scrapbooking days) and the Batman Logo shared by the Tip Junkie. I printed the logo on regular copy paper and the "Happy Birthday" letters are stickers (again, from my scrapbooking stash).

Batman Banner/ Flag Bunting


Batman Flag Bunting / Banner

Batman Flag Banner
Batman Banner


I hung some more Batman logos from the chandelier along with some Batman streamers I found at the party store.


Scrap Paper and Batman logos hung from the chandelier

Along the sideboard, I lined up the Batman water bottles I "made" as take-home gifts for the kids.


DIY Batman Water Bottles


The yellow water bottles were another clearance find from Target - only 48 cents each!! I ordered the Batman vinyl decals from a seller on eBay (this was before I had my own Silhouette Cutter otherwise I could have made these myself!).

Vinyl Batman decals

DIY Batman Water Bottles

DIY Batman Water Bottles


As usual, I made cupcakes (I love Betty Crocker! ;) and decorated them with some plastic Batman rings I found on Amazon.


Batman Cupcakes


Hanging over the kitchen table, I hung a Batman-themed wreath that I made. The black wreath was another Halloween clearance item (only $1 from Michaels) onto which I hot glued printed out "POW"-like images from Living Locurto HERE.


Superhero Wreath


Superhero Wreath


Superhero Wreath


On the kitchen table, I placed all of the other snacks and munchies (don't worry, pizza was served before the cupcakes!). We had the usual fare... like some veggies with dip and tortilla chips and salsa. But I also wanted to try and stick with the black and yellow theme, so I made some white yellow chocolate dipped pretzels and decorated them with black spinkles.

White Yellow Chocolate-Dipped Pretzels


These are so easy to make. Just melt the chocolates in the microwave according to the directions on the bag, dip your pretzels in it (you can use any shape but I find the rods are the easiest and fastest to dip) and then add sprinkles. Be sure to add the sprinkles right away - you don't want the chocolate to set up or they won't stick. I've also made these with drizzled coordinating colors (ie - white chocolate with green and red drizzles for Christmas). Lay the "wet" pretzels on wax paper to set - they'll dry pretty quickly. I use the Wilton Candy Melts for this project - the vanilla flavor is so yummy with the salty pretzels and they have so many color options. You could probably even use food coloring in the white ones to customize your own color. You can find them at Michaels - be sure to use your 40% off coupon! :)


Supplies for Chocolate Dipped Pretzels


Dip the pretzel into the melted chocolate


I also put out some yellow M&M's (yes, I sat and picked out all the yellow ones from a Costco-sized bag) and mixed them up with a bunch of little black bat candies (another Halloween clearance find - Michaels this time).

(sorry, I forgot to take a pic of the whole snack table).


Leftover Halloween bats double for Batman


Lastly, I made some bat-shaped sugar cookies (using a cookie cutter I bought during Halloween clearance at Michaels). Yeah, clearly I'm no baker or decorator! I had originally planned on coloring the dough yellow, but totally forgot so I had to improvise with some yellow spinkles and black gel. Not the look I was going for, but I figured 4 year olds probably wouldn't care! LOL

Halloween Bat Cookie Cutter doubles for Batman

I packed them up in plastic bags as another take-home treat for all of the kids. I got the batman design from Tip Junkie, printed it out on regular copy paper and hot glued it on to the bags (before putting in the cookies).


Batman Cookie Goodie Bags

And there you have the food and decorations part of it! Whew!

In my next post, I'll discuss the activities - a Superhero Training Academy... stay tuned!!

**Update** See all of the fun activities from the Superhero Training Academy in this post HERE**
The CSI Project's Birthday Party Challenge

Visit thecsiproject.com


Pin It!
Related Posts Plugin for WordPress, Blogger...