Thursday, March 29, 2012

Spraypainted {Dollar Spot} Owls

{WHoops - don't know why this reposted - I simply made an update to this old post but it re-posted it today - sorry for the repeat!}


Last weekend I decided it was time to bring a little life and color to our front porch. Some nice flowers were certainly a must, but I wanted something more. Then I saw this post over at Jane of All Crafts. I knew I had to get me some of those cute little owls and add some color to them... and to my front stoop!

So I picked up 4 of these ceramic owls from the dollar spot at Target (one to represent each of us - me, the Heela, SweetPea and Boogey).

Cute, but kinda creepy too.


Then I bought a can of Krylon spray paint at Michaels (yes, using a 40% off coupon).

Funny how the camera is focused on the fritos... guess my mind was thinking of something besides paint!

And here they are all decked out in aqua and in their new place of honor on the front stoop.

Peek a Boo Hoo!


Hark! Hoo goes there?


Much Cuter Now!


I'm thinking maybe they could use a little more dimension... maybe some distressing or aging with a dark glaze or something? Doubt I'll ever get around to it though... LOL.


Linking up to these parties:


Pin It!

Wednesday, March 21, 2012

Mini Marshmallow Flowers {and rabbits!} [re-visit]

Sorry I don't have a new post for you this week. The past few weeks have been a little crazy (yeah, yeah, yeah, I know, what else is new?) but I am actually recovering and trying to re-energize after a trip to the ER (complete with an ambulance ride and everything! woohoo! :/  Um, yeah... fun, it was not). I'm totally fine now but the "episode" inspired me to re-focus my sights and efforts on what is really important in life. And right now, household/diy projects aren't at the top of the list.

Soooooo.... I'm going to re-post about a fun foodie project I did last year for Easter.


Mini Marshmallow Flowers


I originally posted about these super cute mini marshmallow flower cupcakes HERE and still love how they turned out! They were quite easy to pull together and everyone thought they were so fun and pretty! I made them for Easter, but they'd be fun as a celebratory Spring treat or even nice for Mother's Day!

I also made some edible bunny rabbit cupcake toppers to stick with the Easter theme...


Marshmallow and chocolate bunny rabbit


So head on over to THIS POST for the full details and a step-by-step tutorial.


Pin It

Linking up to these parties - check 'em out!
A Turtle's Life for Me
Bacon Time with the Hungry Hypo - Spring Battle!
Centsational Girl - Spring Party
The Frugal Girls
Kitchen Fun with my 3 sons

Pin It!

Saturday, March 10, 2012

Stuff it! {aka - How to make snacks go further}

Today I'm going to share a "Quick Tip" with you...


Have you ever found a really cute bowl in your 'stash' or in a store and wanted to use it for chips, cookies, rolls, whatever, but then realized you would need to fill it with, oh, I don't know....  about 5,000 POUNDS of said chips, cookies, rolls, whatever so that it wouldn't look pathetically empty? Yeah. Me too. Sucks, don't it?

Well, I'm here to share my little secret with you on how to get around that little dilemma...

NAPKINS!


Yes, you read that right, I use paper napkins. {and, yes, you could easily use cloth napkins if you want to be more green, I just prefer to use paper - especially if they already match my theme. sue me.}. The first time I discovered this trick was during the great popcorn fiasco. Haven't heard that one? Oh, do let me share...

Sometime last summer, I found these super cute plastic popcorn containers in the Dollar Spot at Target (it's so dangerous to wander in there, isn't it??). I got one in each of 4 different colors. So cute, right?

Plastic popcorn containers from Target


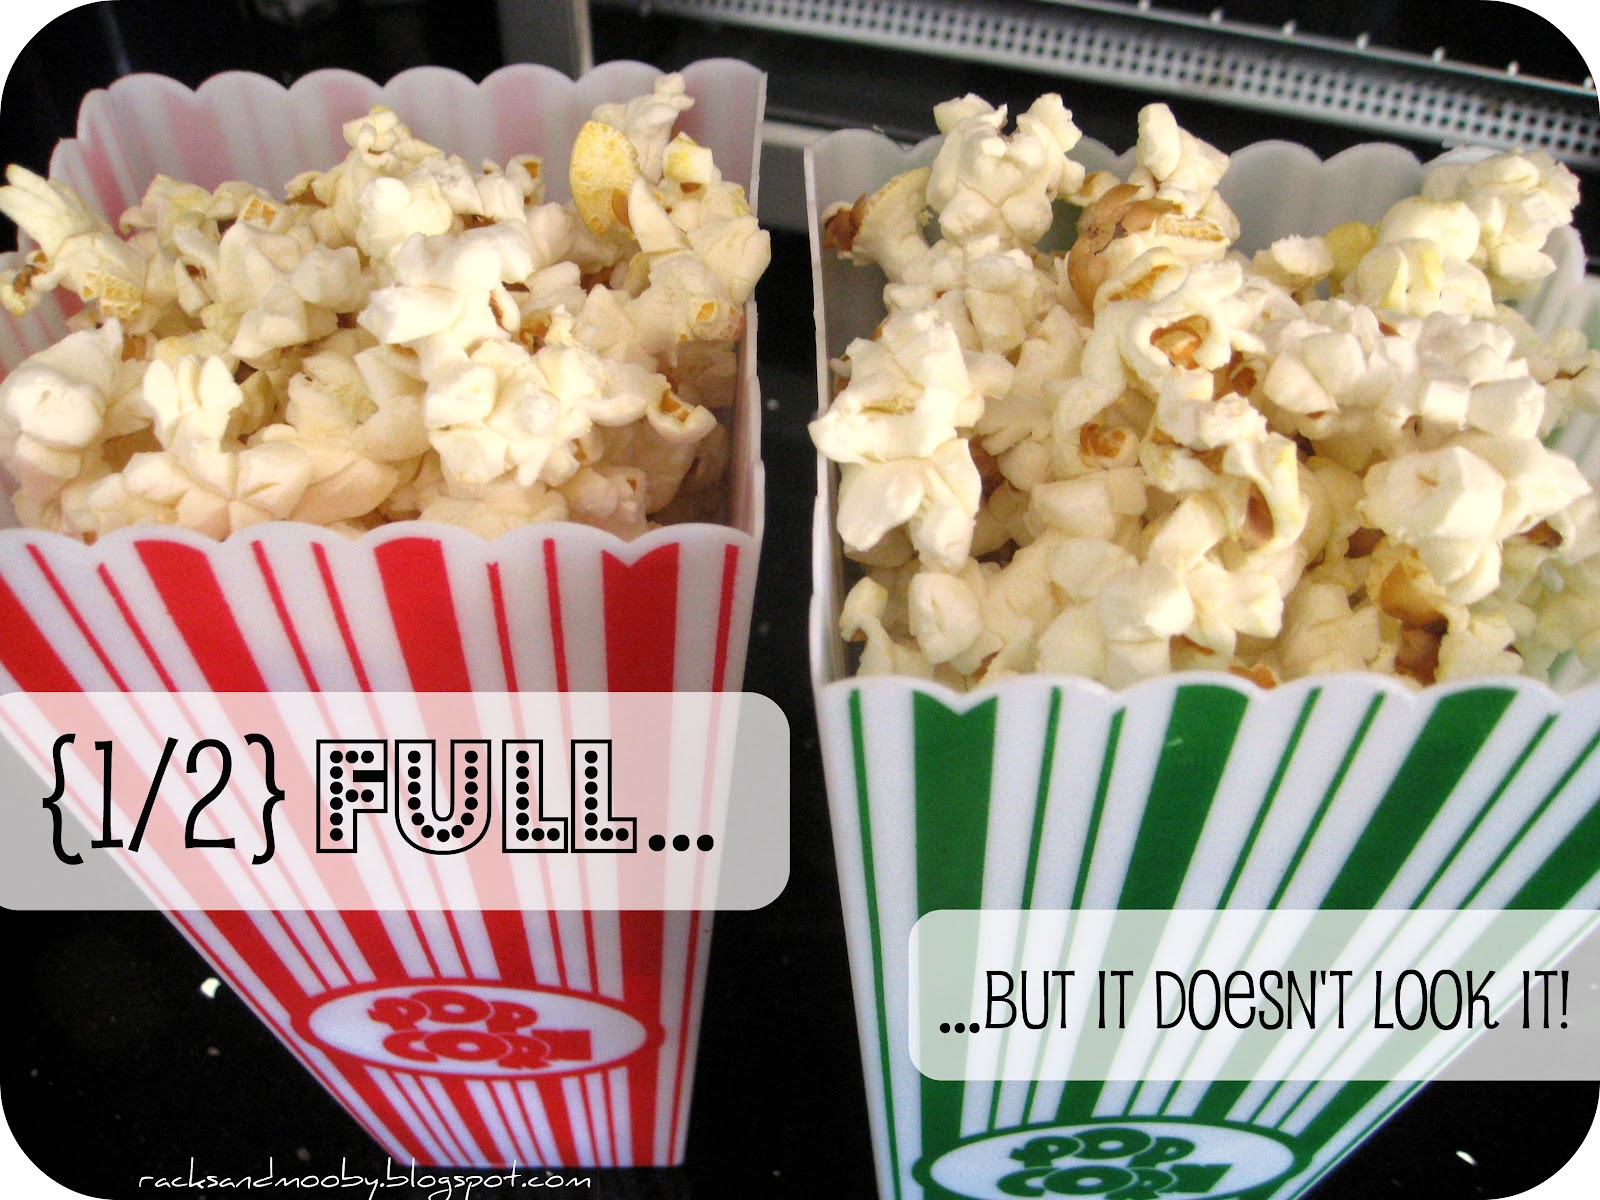
The only problem was that they were just way too deep to fill all the way up with popcorn for my pre-schoolers. There was just no way they could eat all that popcorn. Well... on second thought... maybe they could, but they didn't need to! ;)  So, I usually make one of those 100 calorie packs and let them share it between themselves. But when I dumped 1/2 of the bag into each container, they only got filled up about 1/2 way full.

Well, if you have little ones, you know that THAT was NOT going to fly. Don't mind the fact that this is the SAME AMOUNT they would always get in the OTHER BOWL I used to use...

As far as they were concerned, there was PLENTY OF ROOM LEFT! They wanted the container to be filled up to the TOP!!!!!!!!!!!!!!!!!!!!!!!!!!!!!! Give me MOOOOORE!! Hey, and while I'm at it, I'd like to point out that... SHE has MORE than I DO!!! MOOOOOOOOOOOOOOOOOOOOOOOMMMMMMM! NO FAAAAIIIIIIRRR! {ever hear those kind of shrill cries coming from a 3-year old?? yeah, good stuff.}

So, I quickly drank a shot of tequilla improvised and stuffed a loosely-crushed napkin down into the lower half of the container to help take up space.


Then I poured the popcorn back in (which now went right to the top) and the rugrats couldn't have been happier. And it isn't like they didn't know the napkin was in there. I guess it was the ~visual~ of a half-empty container that just didn't sit well with them. You know, like I was trying to gyp them or something. Not that I have ever tried to do that to my children. Ahem. Moving on...

(and yes, that is how you spell "gyp" - looks weird, I know, but I checked Webster's HERE and it's right).


Sneaky, sneaky!

Ahhhh... peace and harmony had been restored to our household... at least for the next 5 mintues. :/


I also used this trick during Boogey's RAINBOW party (posted HERE). I had found some cute colored buckets at the party store and grabbed them on a whim, not really knowing for sure how I planned on using them. Ultimately I decided to use them to house some chips, pretzels and goldfish. But they were so deep that I knew I would need double the amount of chips, pretzels and goldfish than I had just to fill them up to the top. Um, yeah... not going out to buy more snacks, especially when I know they won't all get eaten anyway.

Insert... the napkin trick!


Use a paper napkin to take up space in the bowl

I ever so slightly wadded up a paper napkin and stuffed it into the bottom of the buckets. The napkin minimized the amount of open space in the buckets so I was able to use less snacks to make them look "full" and, therefore, make my snacks go FURTHER! Yay!


Make your snacks go further! It's all an ~illusion~!

Of course the napkin trick won't work as well with really heavy snacks but works great with things like chips, crackers, etc.  If you have something that is heavier, you should, instead, use an inverted bowl or cup as your filler. This is a pretty common trick for vases and such and would be a great option to make heavier treats like M&M's and other candy items go further. Yes, it's all an ~ILLUSION~ folks! :)

And that's my 'quick tip' for the day! Do you have any food display "cheats" you like to use? Let me hear about 'em!

p.s. I want to say a quick "THANK YOU" to Michelle over at Macaroni Kid for featuring my Rainbow Cupcakes on the Macaroni Kid (Harlem edition) website {Click HERE to see it!}!

This project was featured! Be sure to check out these fabulous blogs!!


Pin It

Linking up to these parties - check  'em out!
Someday Crafts
The Thrifty Home
A Turtles Life for Me
Bacon Time with the Hungry Hypo
Polish the Stars
Keeping it Simple
The Scott's Crib


Pin It!

Friday, March 2, 2012

Rainbow Treats

Yes, another post about Boogey's RAINBOW Party (see full party details HERE). Are you sick of reading about rainbows yet?? Well, if you are... too bad. I'm not done yet! :P

:)

This time I thought I would talk about the Rainbow Treats we made.

{Fruity Pebble} Rainbow Treats


Now, I have to say I was kind of surprised at what a big hit these were. Frankly, I'm not really a fruit-flavored cereal type of gal. So, to be honest, I wasn't "blown away" by these. But apparently, I'm alone in my indifference to fruit-flavored snacks because these knocked the socks off all the guests and were devoured by the kids and adults alike! (although I did notice that it seemed like the dads consumed the majority of these treats... huh, go figure! Wives, take note! LOL)

There really isn't any rocket science behind making these. Essentially, they are just like rice krispie treats but you make them with Fruity Pebbles instead. Here is the recipe I followed (from the fruity pebbles website and on the inside of the box):


Rainbow treat ingredients

What you need:

  • 1/4 cup (1/2 stick) butter or margarine
  • 1 pkg. (10-1/2 oz.) miniature marshmallows (6 cups)
  • 1 pkg. (11 oz.) Fruity Pebbles Cereal (about 8-1/2 cups)


  • What to do:
    Microwave butter in 4-qt. microwavable bowl on HIGH 45 seconds or until melted. Add marshmallows; toss to coat. Microwave 1-1/2 minutes or until marshmallows are completely melted and mixture is well blended, stirring after 45 seconds. Add cereal; mix well. Press firmly into greased foil-lined 13x9-inch pan. Cool. Cut into squares.

    That's it! Easy peasy, lemon squeezy!

    These were an absolutely perfect addition to the snack table as they were so pretty and all RAINBOW-Y!


    Rainbow treats are so pretty!

    We hardly had any left at the end of the day and I froze the leftovers. Yes, did you know you can freeze these kinds of treats?? Well, you can! Read on... ;)

    I have done this before with a regular batch of rice krispie treats and they freeze fabulously! This is a great idea when you have leftover cereal or marshmallows (as is often the case in our house) but don't need a whole pan of tempting goodies sitting around for you the kids to eat. Simply whip up a batch of {your choice type of cereal} marshmallow treats. Cut into individual sized portions, then wrap in foil. I just take a large piece of foil, cut it with scissors into small squares, wrap my treats in them individually, and then store everything in a freezer bag in our deep freezer. You can take out one at a time and just leave them on the counter (or throw them into a lunchbox!) and they are defrosted in no time. I typically take a couple out of the freezer before I start making dinner and they are ready to go for dessert. The kiddos love them! I usually press some M&M's on top as they are cooling for an extra special yum-factor. ;)

    Anyway... back to my rainbow treats... definitely try these sometime as a nice variation to the "usual" rice krispie treat.


    {fruity pebble} marshmallow treats

    These would also be a fun treat for St. Patrick's Day!


    *See the rest of this RAINBOW party HERE!


    Pin It
    Pin It!
    Related Posts Plugin for WordPress, Blogger...