Pages

Monday, August 22, 2011

Happy Blogiversary to me! :)

Wow. There you go. My one-year blogiversary was this past Saturday. Kind of hard to believe that it was a year ago that I posted THIS - my first blog post. Kind of funny to go back and read that first post, because, the thing is... it is just as true now as it was then... I really don't have time for this. LOL.  Because, as you've surely noticed if you've been following me, I tend to go about a week at a time in between posts. Sometimes it's even longer! Between the hubby, the house, 2 pre-schoolers and, oh yeah, that annoying thing called WORK {grrrr} I don't have all that much time to do fun projects, let alone blog about them! But, I like doing projects when I can, and it is so fun to blog about them. Even if I'm not one of the most frequent posters.

And I give you folks credit... you stick around anyway. Regardless of how often I post (or not)! And I know I've said this before, but I'll say it again... I am eternally grateful for that. It warms my heart (and feeds my ego ;) to know a few people out there really like hearing reading about my latest project/craft/babble.


So let's take a look back over this past year...

The first project I ever blogged about was my Master Bath Makeover [HERE]. I had actually done this project pre-blogdom so I didn't have any pics of the "before" or even the "during", but the "after" post was pretty successful being featured on a few other blogs. I remember being so proud of myself!  (And, no, not only for the features, but just for doing such a great transformation on the room). :)


Master Bath Makeover


Now, if you've learned anything about me over the past year, you know that I am very cheap frugal. So one of my next projects was to jump on the "Dollar Tree Hurricane" bandwagon. In THIS POST, I showed you how to make a pretty and versatile glass hurricane for only $2! I really love this hurricane and have dressed it up for so many different holidays and parties.


Dollar Store Hurricanes


Another one of my early (but favorite) projects was my DIY Canvas Art [HERE]. These continue to hang over our bed, and I still love them just as much today as I did back then.


DIY Wall Canvas Art


In October, I posted a few Halloween projects including my Dollar Tree Trick-or-Treat bucket, some spooky specimen art, and these no-sew DIY Jessie Costumes (which happens to be the post with the 2nd most hits over the past year - almost 8,000 pageviews!)


DIY No-Sew Jessie Costume


Another thing you may have learned about me is that I like love to organize things and one of the tips I've shared was about how I tidied up our playroom using fabric bins. The 'piece de resistance' were the photos of the toys I added to the bins to make them more user-friendly for my non-reading little ones. See full post HERE.


Organize Toys with Photos


Obviously, my 2 kids are the center of my life - they are amazing girls and bring so much joy to our lives. SweetPea and Boogey are only 15 months apart and currently both in pre-school. Needless to say, we get invited to alot of birthday parties. Many of those parties are at locations like ChuckECheese or those activity gym places. But I've always thrown my girls' parties at our house doing all the decorations myself. SweetPea had a Superhero Academy/Batman-themed birthday when she turned 4 in November. It was so much fun! You can see details HERE.


Superhero / Batman Birthday Party


And when Boogey turned 3 in February, I organized a Pink Mod Monkey Party [see details HERE]


Pink Mod Monkey Birthday Party


In the spring, I made some Growth Charts for my girls [seen HERE]. The great thing about these is that they are portable so you can take them when you move or just give you the option to relocate them in the house - so nice! These were another cheap frugal project and so easy to make!
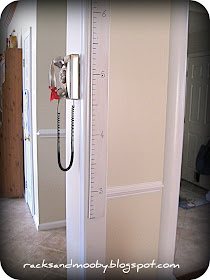


DIY Growth Chart
 

My "biggest" project over the past year was probably adding the mock wainscoting in our main hallway. I am so thrilled with how this turned out and my friends have been impressed that I did it myself! Read about the Boxes on my Walls HERE.


DIY (mock) Wainscoting


I've also shared a few recipes with you as I spend so much time cooking meals for our family every night as well as for all of those birthday parties and other family gatherings. Some of my favorites were my Rainbow Pudding Pops [HERE] (my most-viewed post with close to 10,000 hits! wow!), my Cake Mix Cookies [HERE] (currently my 3rd most-viewed post of all time) and my Mini Marshmallow Flower Cupcakes [HERE].


Rainbow Pudding Pops
 

Cake Mix Cookies - 4th of July style


Mini Marshmallow Flowers
 
The post with the most comments over the past year was for my Snowflake Specimen Art. This was another VERY inexpensive, but so easy to do and such a fun, decorative piece. You'll never guess what this was made with! See answer HERE.


Easy Snowflake Specimen Art

Wow - it's been quite a year! And quite a journey. I never would have imagined I could tackle something like that Wainscoting if it hadn't been for the blog world. Seriously. It would NEVER have entered my mind that I could do something like that myself. I am indebted to all of the other fabulous blogs out there which have inspired me with all of the wonderful creativity. Thank you. All of you - big or small. I admire your talent and appreciate your generosity to share your ideas with me (and the rest of the blog world! :).

In honor of my blogiversary AND reaching over 250 followers AND my upcoming birthday (only 2 weeks away) I'm going to be hosting a GIVEAWAY! Yes, I've been saying this for a while, but this time I mean it! :)  Stay tuned for the details later this week and be sure to come back and sign up for a chance to win! 

Lastly, thank you for following my humble little blog this past year. Whether you've been around from the beginning or are new to my world, I appreciate you traveling along with me. I hope you enjoy the ride! :)

Thank you!!


Wednesday, August 17, 2011

Latest Project ~Teaser~

Want a teaser of my latest project?


How about this...


And this...


Any guesses??


Wednesday, August 10, 2011

White Creme {Chicken} Pizza

Have you ever tried Philadelphia's Cooking Creme? I recently had a couple of coupons for it so I decided to give it a try. I chose the Italian Cheese & Herb version and bought 2 containers. About a month ago I used one of them to make a pasta and chicken dish (following a recipe provided on the package). It turned out pretty good and we definitely enjoyed it. But I wanted to do something a little different with the second container - mainly I wanted to avoid using pasta as my base since we had already a pasta dish that week.

My decision... use the creme as a "sauce" to make a modified version of white pizza. Before I give you the deets, let's drool over the finished product...

White Creme {chicken} pizza

Tell me that isn't drool-worthy??!! Just look at all that creamy cheesy goodness! Yum!

I won't call this a "recipe" since I didn't measure anything but here is what I did...

Ingredients (you don't need to measure anything - just use as much or as little as you would like of each item):

  • Flour tortillas
  • Philadelphia Kitchen Creme
  • Mozzarella Cheese
  • Cooked chicken, shredded or cubed
  • Dried Oregano
  • Garlic Powder
  • Fresh Basil
  • Sun-dried tomatoes (optional)

What you need


First you'll want to spread some cooking creme on a tortilla (as much or as little as you want).

(actually, the very first thing I did was toast up my tortillas a little bit over the open stovetop burner - just to brown them a little bit)

Spread some creme on a tortilla


Next I layered on some pre-cooked shredded chicken. (Side note: When chicken goes on sale, I stock up and freeze it. Sometimes, I'll cook and shred it prior to freezing so I can quickly and easily grab a packet for thawing and use. It is great to use for quick burritos, salads, or a chicken pizza! :)


Layer on some cooked chicken


Then I sprinkled on some shredded mozzarella.


Add some cheese.


Then I popped it under the broiler until the cheese was hot and bubbly. After taking it out I sprinkled on a little dried oregano, garlic powder and some fresh basil.


Done!


Here is another tasty shot...


Drooling yet??

I will admit that we felt it needed a little extra "something", so we added on some sun-dried tomatoes - it tasted great and added that little extra punch of flavor we were looking for!


Some sun-dried tomatoes add a little extra zing!

Really the options are pretty endless. You can use any type of cheese, meat, toppings, etc. - just as you would a regular pizza. What is your favorite type of pizza? Have you ever made an "unconventional" pizza? 


*Be sure to check out my post HERE for a $5 coupon for Dr. Scholl's Gel Insoles!


Note: I am not affiliated with the Philadelphia Brand and I paid for the cooking creme in full (minus the coupon I found in the newspaper). My opinions of the product are my own.


This project was featured! Thank you! Be sure to check out these great blogs!


Linking up to these parties:


The Frugal Girls
A Little Knick Knack
Simply Designing
While He Was Napping
Truly Lovely
Make Ahead Meals for Busy Moms
Polish the Stars
Recipe Swap at RemodelaholicHouse of Hepworths

Are you gellin'? I have coupons to share with you!

Are you on your feet most of the day? Perhaps because of your job or perhaps just from chasing around your kids all day. Personally, even though I typically sit at a desk most of the day while at work, I am up and on-the-go from the moment I get home until the kids are finally in bed. And even then, I'm usually on my feet doing dishes, cleaning, or tackling a craft or home project before hitting the hay. Needless to say, by the end of the day, my feet are S.O.R.E!

Well, you can imagine my pleasure when I got the chance to try out a set of Dr. Scholls' Massaging Gel Insoles {for free!} as part of my "BzzAgent" participation in the lastest "BzzCampaign" (see details below)! Here was the package I recieved in the mail last month:


At first I didn't think I'd be able to use the inserts for a while since I typically wear sandals every day to work in the summer months and this style of insert doesn't really work in sandal. But then I remembered my pair of cute pink loafers and immediately popped them in.

Well, let me tell you ... these inserts are heaven to walk on. At first, I thought they seemed a little weird - kind of squishy and strange feeling. But then, as I got used to the "non-hardness" under my feet, I found they really felt nice. And after a long day at work and long night of standing around the house, my feet were no longer tired and achy at the end of the day! Wahoo!

My only complaint is that the insert made one of my shoes really tight. Even though they are only a few millimeters thick, I guess it was enough to make a difference in how that particular shoe fit. So even though the bottom of my feet felt heavenly after a long day, the top was a little sore from being squished a little too much on top. But I don't think this would prevent me from using them on a regular basis and I would expect that after extended use, the shoe would stretch enough to allow for those extra few millimeters of space from the insert.  

Here is some info from the pamphlet and website:
Dr. Scholl's Gel Technology was designed specifically to deliver outrageous comfort and support. New Dual Wave Design creates soft gel waves that cushion and absorb shock, giving you comfort with every step... The soft blue gel offers cushioning and shock absorption while the firmer purple gel provides added support.

You can check out the Dr. Scholl's website for more information HERE.

My husband is on his feet pretty much all day at work so he will definitely benefit from a couple pairs of these for his shoes! Glad they gave us some coupons to use!

And speaking of coupons...

They sent me a whole bunch of them to share with family and friends! I'm definitely saving a few for the Heela and myself, but I still have 10 left over to share so... if you are interested in one... leave a comment below with your email address and I'll contact you to find out your mailing address so I can send you one! (or email me at address noted above at "contact me" tab). The coupons are for $5 off one set of Dr. Scholl's Massaging Gel Insoles and don't expire until 12/31/2011. The insoles retail for $12.99 so getting $5 off is a nice deal! If you happen to catch a sale, even better! First come, first served. I have 10 total.

Legal Stuff: I recieved one free set of Dr. Scholl's Massaging Gel Insoles and 15 - $5 coupons as part of my participation as a BzzAgent in the Dr. Scholl's Massaging Gel Insoles BzzCampaign. However, my opinions are my own and have not been influenced in any way by the fact that I received the insoles or coupons for free.

Note: What is BzzAgent? "BzzAgent is a network of consumers who voluntarily participate in word-of-mouth (WOM) programs for a variety of products and services. BzzAgent puts products in the hands of countless Agents and helps them share their opinions about them with friends and family via reviews, Facebook posts, photos and videos, blog posts and more". "You get to try awesome products [for free!], your friends get to learn about awesome products and awesome products get even awesomer by listening to your valued feedback". And the best thing, it doesn't cost anything to join or participate - just a little bit of time and the willingess to share your feedback. For more information on the BzzAgent program, including how to join, visit HERE.


Monday, August 8, 2011

Have you been pinned?? Find out now!

Are you a pinner? Have you been pinned??

If you haven't jumped on the "Pinterest" bandwagon, you probably have no idea what I am talking about, huh? And you're probably wondering what that little "Follow me on Pinterest" button over there ------->

is all about too, right?


Well, Pinterest is...

Pinterest is a Virtual Pinboard.

Pinterest lets you organize and share all the beautiful things you find on the web. People use pinboards to plan their weddings, decorate their homes, and organize their favorite recipes.

Best of all, you can browse pinboards created by other people. Browsing pinboards is a fun way to discover new things and get inspiration from people who share your interests. 


It is really fun to have a place to store a variety of ideas for the future without having to print out loads of paper or take up room on my hard drive with link after link. Not to mention how much fun it is to check out all of the fabulous inspiration links pinned by other folks. I highly recommend you try it out if you can. It is invitation only right now, but you can usually get one fairly easily.

Now, if you are completely narcissistic like me, you want to know who has pinned YOUR OWN ideas and blog posts. Well, there is an easy way to do that and I'm going to show you now! :)

Simply type in the following address in your web browser, but replace "racksandmooby.blogspot.com" with your blog address:


You'll get something like this:

Basically it shows you all of the times someone has pinned a page from your blog. And I have to say, it's really fun to see which of your projects are being pinned (and repinned!)! Yes, I'm an ego-maniac like that. :D

If you want a Pinterest invite, let me know in a comment below (be sure you give me the email address you want to use) and I'll send you one! :) Or you can request one directly from the website. Some of the boards I currently have include "Crafts and project ideas", "Party Ideas", "Home and Repair Projects", "Recipes", "Kid Craft Ideas"....

Feel free to follow me if you are so inclined! Just CLICK HERE and then click "follow".

Basics: Once you have an account, you'll be given a handful of default Pin Boards. You can use these, delete them, make your own... it is up to you. The first thing I recommend is to click on the "Everything" link to see what other people are pinning. You can spend hours browsing here, so be careful! LOL. If you click on a pin (photo) that you are curious about, then just keep on clicking through and you will be brought directly to that original webpage with that relevant post. So easy! Good luck!

Happy Pinning!!


This post was featured! Thank you!


Linking up to these parties:
Someday Crafts
House of Hepworths
The Frugal Girls
A little Knick Knack
Simply Designing
While He Was Napping
Truly Lovely
Polish the Stars


Tuesday, August 2, 2011

Another Small Change that makes me :)

So our house has those dated brass doorknobs.... EVERYWHERE. And we have 25 doors in this house. 25? Are you kidding me?? So even though I would love to just go replace them all at once, it ain't gonna happen. But I recently cashed in some credit card points for a $100 Lowes gift card to work on another molding project (more on that later - squee!). And since I was left with a little extra on the card after purchasing my molding strips, I decided to use the balance to change out the doorknobs on the linen closet in our master bathroom.

Here is the ~lovely~ {note scarcasm} before...


Let's take a closer look...

I hate all these brass knobs. Yuck.


Ugh. Yes, did I mention there are 25 of these lovely goodies in our house?? {Technically there are double that since they are 2-sided!} Sigh.

But since the ones on this linen closet are "fake" doorknobs (in that they are only one-sided and don't even actually turn), I figured they would be an easy and inexpensive change. So I bought 2 of these using the balance of my gift card. I think they were only about $7 or so each.


Since these are inactive knobs, all I had to do was remove the screws on the old ones, pop them off and screw the new ones on. No strike plates to deal with or anything! Looking better already...

Looking so much better already!

And here we go with the 2 new ones - SO much better!

Much better!

I love the way they look now. I wish I could change out the other 23 brass knobs in this house! Maybe if I only do one a month?? Ha - 2 years later... LOL

{And yes, I know that some bloggers have had success spray painting their old brass doorknobs, but I just don't have the time or energy to do it properly. Spending the money on these over time is worth it to me.}

What kind of knobs do you have on your doors? Brass? ORB? Nickel? Have you changed them out? Painted them? Inquiring minds want to know! ;)