Showing posts with label Spraypaint. Show all posts

Thursday, March 29, 2012

Spraypainted {Dollar Spot} Owls

{WHoops - don't know why this reposted - I simply made an update to this old post but it re-posted it today - sorry for the repeat!}


Last weekend I decided it was time to bring a little life and color to our front porch. Some nice flowers were certainly a must, but I wanted something more. Then I saw this post over at Jane of All Crafts. I knew I had to get me some of those cute little owls and add some color to them... and to my front stoop!

So I picked up 4 of these ceramic owls from the dollar spot at Target (one to represent each of us - me, the Heela, SweetPea and Boogey).

Cute, but kinda creepy too.


Then I bought a can of Krylon spray paint at Michaels (yes, using a 40% off coupon).

Funny how the camera is focused on the fritos... guess my mind was thinking of something besides paint!

And here they are all decked out in aqua and in their new place of honor on the front stoop.

Peek a Boo Hoo!


Hark! Hoo goes there?


Much Cuter Now!


I'm thinking maybe they could use a little more dimension... maybe some distressing or aging with a dark glaze or something? Doubt I'll ever get around to it though... LOL.


Linking up to these parties:


Pin It!

Tuesday, November 9, 2010

Simple Silver Spray-Painted Santa

**Be sure to enter my giveaway HERE!! :) Ends 11/15/10**


OK, now that Halloween is behind us, I suppose Christmas is free game??!! And yeah, for now, I am just going to skip right over Thanksgiving. Because I can! LOL

On a trip to search for some last minute Halloween items a few weeks ago, I spotted these little guys at the Dollar Tree. And while they have some nice shape and detail to them, they're...well... kind of... cheap and plastic. {Hence, I suppose, why they are at the Dollar Tree! LOL} And even though they do have some nice detail, it's kind of hard to see. (I'm not sure... maybe they are supposed to look like ice?). But I grabbed a couple anyway and thought... hmmm... maybe some spraypaint would help - yeah!!

Dollar Tree Santa and Snowman


Now, mind you, at this point in time, I have had very little experience with spraypaint. In fact, I've only used it twice. So when I say "very little experience", I really mean it!! LOL. The first time was when we used some Rustoleum Hammered Brown for our Patio Table Revival (see post HERE). The second time was when I used a can of white primer on a project that I have yet to finish (so I can't even say it was a successful application yet!). Two times - that is it! But I figured using some spraypaint on a Dollar Tree item would be minimal loss if I messed it all up, right??

Coincidentally, the very same day that I had purchased my figurines, I found a can of Krylon Fusion for Plastic in Metallic Shimmer on the clearance rack at Michaels. I had grabbed it thinking it would be good for something and sure enough... I knew it would be perfect for this project. So I pulled out my leftover Hammered Brown and my Silver Shimmer and got to work.

Leftover Brown and Clearance Shimmer

I set up Mr. Santa in a box outside (didn't want the Heela to give me the ole evil eye again like he did after I got primer all over the driveway during the above-mentioned un-finished project - d'oh!).

Do you believe I was carved from a piece of ice yet??

Then I gave him a coat of Silver and immediately followed that by a very light dusting of the brown.

Better?

I guess I was trying to go for a mercury glass kind of effect but it didn't really turn out quite how I expected it would. However, I like him! And I am surprised by what a difference the paint makes - it really brings out the details of this cute little guy.
  
See all my nice detail! It was hidden in ice before! ;)

Here you can see the brown "dusting"

A simply-stated, silver santa. Not too shabby! What do you think? Here is the before and after...


BEFORE

AFTER

I think he'll look great standing amidst all my Christmas decor! (Whenever I get it up, of course! *sigh* I am ashamed to admit that I still haven't even put the Halloween decorations away! LOL) Not bad for $1.00!!

I'm not sure if I'll do the same treatment on the snowman or not. We'll see!

This project was featured! Thank you!!


cg-holiday-button1.jpg


cross my hooks blog link


And Thanks for the shoutout!


Linking up to these parties:
Between Naps on the Porch
Polly Want a Crafter
These Creative Juices
Todays Creative Blog
Someday Crafts
Its so Very Cheri
The Thrifty Home
Passionaely Artistic
House of Hepworths
The Shabby Chic Cottage
Somewhat Simple
What Allie's Making Now
Cross My Hooks
Between U and Me
Saturday Mornings
Fingerprints on the Fridge
A Little Knick Knack
Be Different Act Normal


Pin It!

Sunday, August 29, 2010

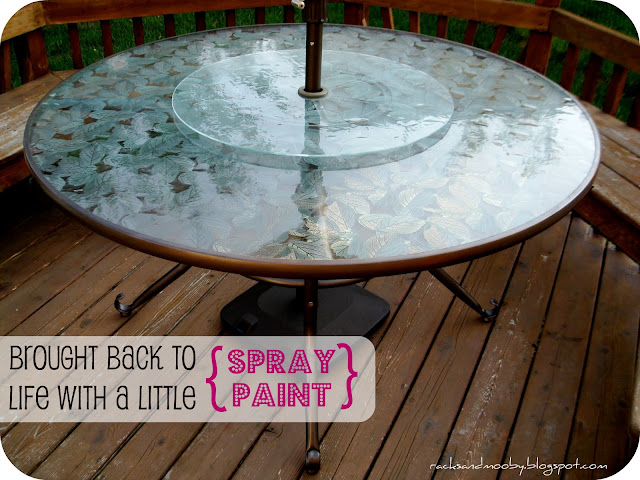
Giving new life to an old table

So our house has a fairly nice-sized deck. In fact, it was one of the selling points when we bought the place 2 years ago. And one section of the deck even has a built-in bench which is the perfect size for a pretty, round, patio table.


1. No we are not alcoholics - this pic was taken when we were hosting a party with a "beer exchange"
2 . Yes, I HATE that our neighbors are so close and we have ZERO privacy. But we deal with it.

Too bad, though, that we didn't actually have a pretty round patio table...

And wouldn't be buying one anytime soon since I am too cheap frugal to spend several hundred dollars on one.

So for the past couple of years we put up with the inexpensive, white, plastic, oblong table I had purchased from Ikea back in 2000. But it never really fit in the space very well. And it was... well... cheap, white and plastic.

Then, ~one fine day~, I spotted an ad on craigslist for a glass-topped, round, patio table. It had a really nice leaf design in the glass AND a built-in lazy susan AND a hole for an umbrella. And not only was it located in the next town over, but they only wanted $25 for it!! What?? Apparently the sellers had already bought a new table so they really just wanted someone to come get rid of the old one for them. Plus, the frame was in rough shape with lots of rust and it didn't come with chairs since they were keeping them. Hence, the low low price.


But I knew the rust was fixable and since we have our lovely built-in bench, we didn't need any chairs. So I immediately sent my husband (and his always-convenient truck) on a mission to get it ASAP! Well, when he got there, it turned out that the sellers didn't have any change for his $20+$10 bills - - so they willingly accepted only $20 for it!!

Here you can see one of the worst spots of rust that was around the edge. (but notice the pretty leaf detail on the glass)


BEFORE

~~~ PAUSE~~~
(I'll admit that it sat in our driveway for a week or two or three...)

We finally tackled it one weekend while our girls napped. I started out by scraping the rust with a wire brush and managed to get most of it off. But the Heelamonster (aka - my husband) decided he wanted to go even further with the rust removal so he took a quick pass over the worst areas with his electric sander and then did a full wipe-down with some Naval Jelly.

(and I apologize for not having any pics of the process, but I didn't have a blog at the time so it didn't occur to me to document the transformation process - DOH!!)

Next step was to give the table a new paint job so I picked out a can of Rustoleum in "HAMMERED BROWN". The Heela volunteered to do the painting for me and I was thrilled by the end result.


AFTER
LURVE IT!!!!

We "splurged" on a nice umbrella and stand from Costco and couldn't believe our luck with the pure coincidence (I swear, it really was!!!) that the color of the umbrella and stand are the same exact color as the new paint on the table.


ahhhhh ahhhhh ahhhhhh
 (ok, in my head that is sounds like the heavens singing, but on the screen it just doesn't quite convey that way)

They honestly look like they were part of a set!! Anyway, we couldn't be more pleased with our "new" table. And can you believe this gorgeous beauty only cost us about $30 total?? (used craigslist table plus one can of spray paint)

As always, here is the Before and After

BEFORE


AFTER


SO?? What do you think?? I love the way it turned out!!


Linking up to these parties:

Pin It!
Related Posts Plugin for WordPress, Blogger...