Showing posts with label Renovations. Show all posts

Thursday, December 8, 2011

Ch ch ch ch changes...

So we've had some big changes going on recently...

Namely...


White Kitchen Cabinets!

We painted our kitchen cabinets white! AND I LOVE IT!!


It is such a huge change and I couldn't be more pleased with the decision. I will be honest that we didn't do it ourselves - we hired it out. But with working full-time and 2 pre-schoolers in the house (yeah, you try and prevent 2 little ones from touching anything in the heart of the home for an extened period of time!)... I knew it would be worth the expense. And it was!

I DID however, do all the installation of the beadboard and baseboard around the island and on the outer edges of the cabinets. Yup - all by myself! Not even any help from the Heela! Quite proud of myself, if I do say so myself. :) I'll post details on that project soon.

(The walls were painted green during the summer when we had the whole lower level re-painted)

We've got a few more things to do in here to really pull it all together, but for now... I'm blissfully happy with it!

How do you feel about white cabinets? Trendy? Timeless?


Pin It!

Tuesday, August 2, 2011

Another Small Change that makes me :)

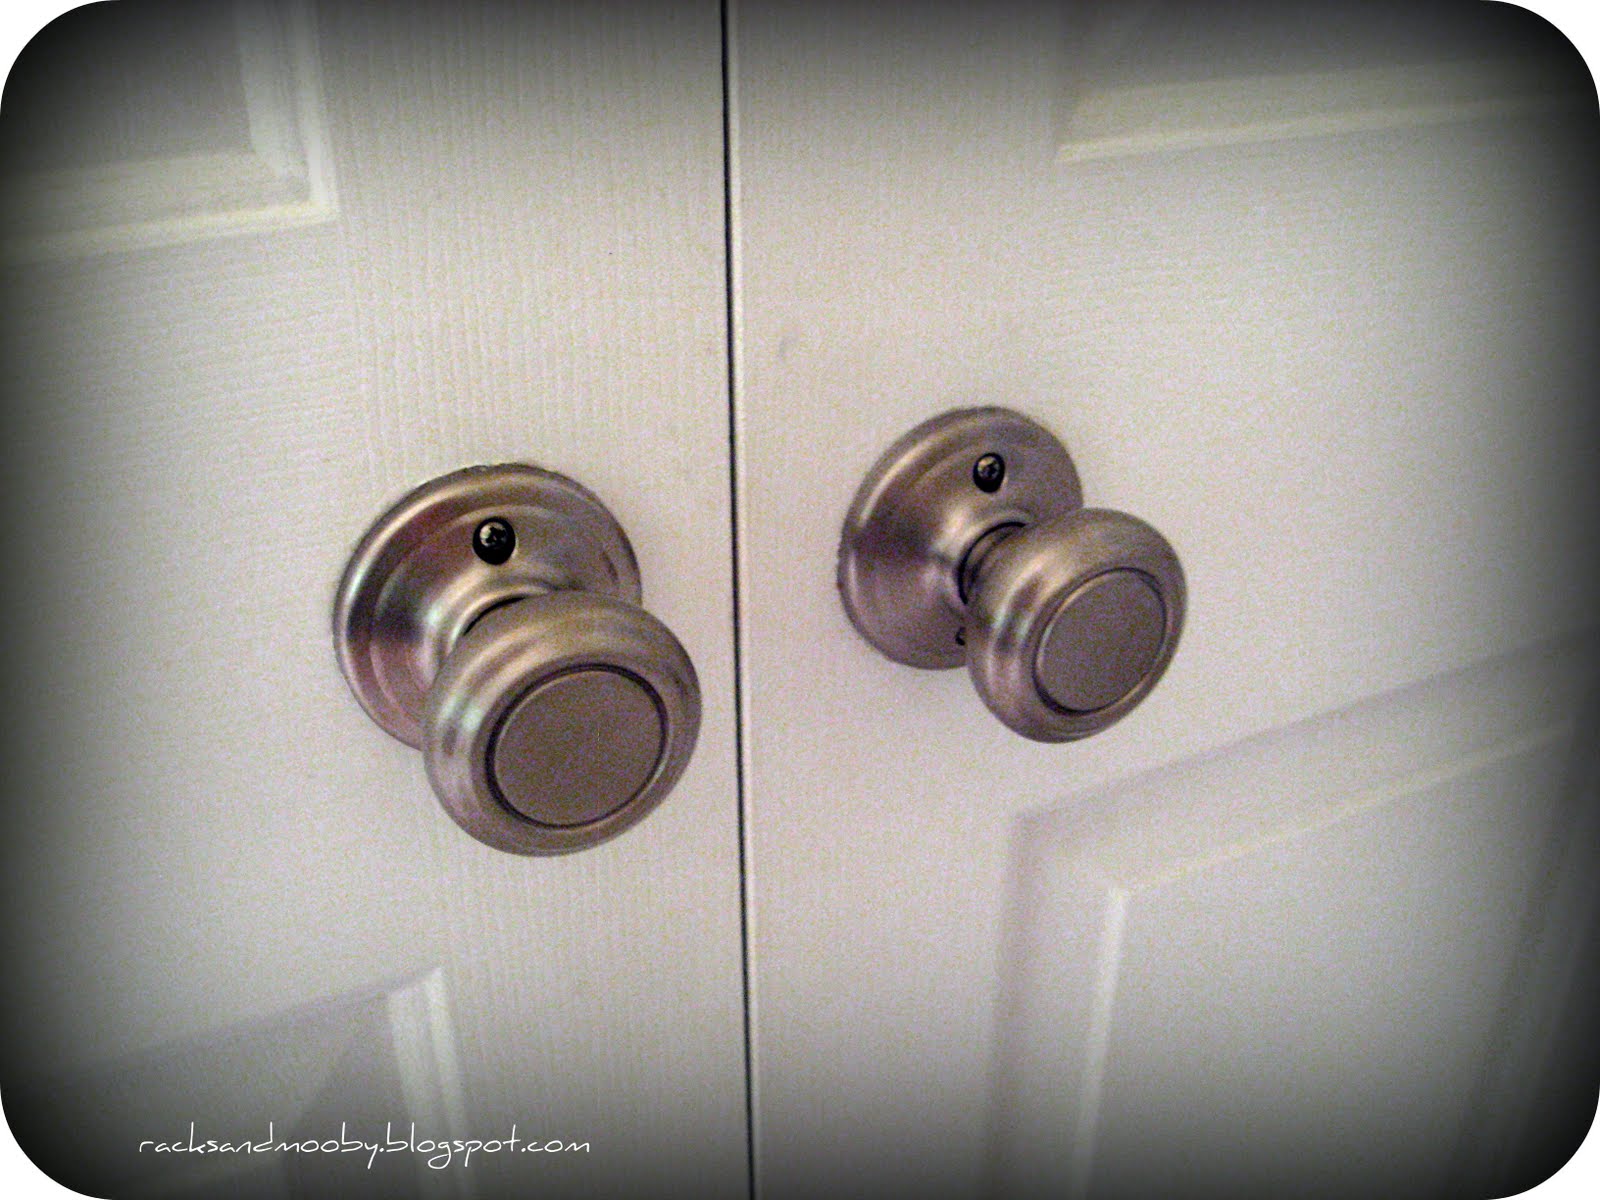
So our house has those dated brass doorknobs.... EVERYWHERE. And we have 25 doors in this house. 25? Are you kidding me?? So even though I would love to just go replace them all at once, it ain't gonna happen. But I recently cashed in some credit card points for a $100 Lowes gift card to work on another molding project (more on that later - squee!). And since I was left with a little extra on the card after purchasing my molding strips, I decided to use the balance to change out the doorknobs on the linen closet in our master bathroom.

Here is the ~lovely~ {note scarcasm} before...


Let's take a closer look...

I hate all these brass knobs. Yuck.


Ugh. Yes, did I mention there are 25 of these lovely goodies in our house?? {Technically there are double that since they are 2-sided!} Sigh.

But since the ones on this linen closet are "fake" doorknobs (in that they are only one-sided and don't even actually turn), I figured they would be an easy and inexpensive change. So I bought 2 of these using the balance of my gift card. I think they were only about $7 or so each.


Since these are inactive knobs, all I had to do was remove the screws on the old ones, pop them off and screw the new ones on. No strike plates to deal with or anything! Looking better already...

Looking so much better already!

And here we go with the 2 new ones - SO much better!

Much better!

I love the way they look now. I wish I could change out the other 23 brass knobs in this house! Maybe if I only do one a month?? Ha - 2 years later... LOL

{And yes, I know that some bloggers have had success spray painting their old brass doorknobs, but I just don't have the time or energy to do it properly. Spending the money on these over time is worth it to me.}

What kind of knobs do you have on your doors? Brass? ORB? Nickel? Have you changed them out? Painted them? Inquiring minds want to know! ;)


Pin It!

Wednesday, July 13, 2011

Boxes on our Walls - Part 4 {Assembling}

When I left off before, I had cut all of my molding pieces and gotten out this baby...


I gave this Nail Gun and Compressor to the Heela for his birthday this past year and he graciously showed me how to use it for this project. Now, you could clearly do this project with a hammer and nails, but if you have access to a nail gun, I highly recommend using one!

If you want a play-by-play visual of how to do this, check out THIS POST here by Thrifty Decor Chick. She actually made a video of the process and it was my go-to guide! I won't go into too much detail since that video is so great, but here are the basics...

{NOTE: Before you start assembling your boxes, I recommend painting your wall (if you plan to) as well as painting your molding pieces. According to all the research I did, it is much easier to paint everything before you put the molding up on the walls. Then later, you just fill in nail holes, caulk edges and touch up paint where necessary. I admit I had the luxury of skipping the painting step altogether since we had hired painters to come do our entire lower level the week after I did my boxes. But if we had not had them coming in, I would have painted everything before nailing, etc.}

Starting at the edge of your wall, use your spacer to determine how far away from the edge/top/bottom your left piece of molding needs to be. I cut my spacer from a paint stirrer/stick.

Use a pre-cut spacer to determine how far from the edge/top/bottom you need to be.


Use your level to make sure your molding is straight.


Make sure it's straight!


Nail in place using nail gun or hammer and nails. Line up the corner of the top piece and repeat the process, then repeat with the right piece, and lastly with the bottom piece. Don't worry if you have some gaps as they can be hidden later with spackle.


Align your angles to make a nice corner.


Here is a finished box - ta da!


For boxes on the same wall, again use your spacer to ensure you are the proper distance away from the first box and from the top. Continue, continue, continue. :)


Use your pre-cut spacer to make the positioning of your boxes easier.


Here is how it looked once I had all my boxes up (before caulking, filling in nail holes or painting).


LOVE!


Your next step would be to fill in all of your nail holes and caulk the edges. As mentioned above, I did not have to do this step myself since the painters we hired to do our lower level preferred to do it themselves. However, go HERE to see recommendations on this step (again from the fabulous Thrifty Decor Chick - she rocks!).

Lastly, your final step would be to touch up any paint. Again, since we had the painters coming in the following week, I was able to avoid the paint process. Here is the final result after they had caulked and painted a coat of primer.


Already looking so good!


And here is the final result after the walls were painted (Sherwin Williams Balanced Beige) and the area below the chair rail was finished out in semi-gloss white.


Finished {mock} Wainscoting - LOVE!


And here is a before and after collage...

What a nice change!

SO?? What do you think? How'd I do? Personally, I love the way the boxes came out! I plan to do some more in the dining room and on the upper landing (where we already have chair rail). Those areas have already been painted white semi-gloss so I'll just need to add my boxes (I'll paint them before hand) and caulk. I'd like to add some along the stairs too, but those require a little lot more work since they will have funky angles. We'll see if my math skills are up to the test - someday! ;)


I'd say this project was a fabulous success and couldn't be more pleased with how it came out. :)


**You can see the rest of this series here:
Part 1 - Idea
Part 2 - Sizing
Part 3 - Cutting


This post has been featured - THANK YOU!! Please be sure to check out these amazing blogs!


UndertheTableandDreaming


Linking up here (see tab above for more details):


Pin It!

Tuesday, July 5, 2011

Boxes on our Walls - Part 3 {Cutting}

Remember how I told you HERE about how I had decided to add some boxes to my walls? And then HERE I told you about how I decided what size to make my boxes. Well, now it is time to tell you how I actually "built" them. In other words, how I cut the molding and put it on the walls.

When I left off before, I had headed out to Lowes to buy the molding to be used for my boxes...


So I knew that I did NOT want to make wood boxes. Yes it would be more professional and all that, but I also knew it would be more difficult to cut, nail, etc. So I took Thrifty Décor Chick’s advice and went for the foam-like stuff that is so much easier to work with. Initially I was going to use the stuff she recommended HERE which costs less than $5 for an 8’ length. 


(pardon the glare and crappy cell phone pic)


But the more I looked at it, the more I felt it was a little too wimpy for the look I was trying to achieve. So I splurged on this stuff which was much more interesting even though it was much more expensive and decided that the extra cost was worth it (although I admit, I had a realllllly hard time telling my cheap frugal side to shut up!).


Much more expensive at $13 a piece, but also much more stylish


I ended up needing 9 pieces for my 7 boxes - ouch! (but oh, so worth it! :)


Next step was to do all my cutting. I had previously purchased a miter box at Lowes (less than $15 for the box and saw) and got it set up in the garage. 


Handy Dandy Miter Box and Saw


Now, mind you... we have a whole wall’s worth of work tables, but the Heela has it all covered in junk important “man stuff” so I had to improvise with a couple of trash cans. Hey, I can be resourceful like the best of 'em! {Tip - I recommend putting something with “grip” under the miter box as I found mine really slipped around a bit. The Heela found an old rubber car floor mat in his pile of junk “man stuff” and it worked perfectly!}


Improvised work area - puts the term "white trash" on a whole new level - LOL


Then I just started measuring my pieces and cutting the ends at a 45 degree angle. {Tip - If your molding strips are like mine and not uniform on each side, make sure you are making your angle cut the right way}. Huh?? Ok… so my molding looked like this.


I decided that I wanted the right edge (as you look at it in the photo above) to be on the inside of my boxes. This means that my angles always need to look like the piece on the right in the photo below…


My angles all needed to be like the piece on the right


I admit that I made my cut going the wrong way more than once. {Rookie mistake!}


Be sure to pay attention to which way your angle needs to go!


But once I got into the groove of things, it just flowed. {Tip - I had previously tallied up how many pieces I needed of each length. Then I determined how to get the best “bang for my buck” from each 8’ length of molding. Some 8’ lengths gave me 3 pieces of cut molding which were all the same size, while others were cut into 4 pieces of different-sized molding. Just play around with the numbers until you are satisfied. The goal is to buy the fewest number of 8’ strips possible}

{Tip - As I cut each piece of molding, I wrote the exact length on the back. This way I wouldn’t have to guess which piece was which or re-measure them later to be sure I had grabbed the right one}.


Jotting down the length on the back of each piece of molding helps keep them organized


Here they are all lined up and ready to go. Yes, it was a lot of cutting, but thankfully, this foam stuff cuts SO easily!


That's a lot of cutting!


Now it was time to put them up on the walls. So I gathered my molding pieces, a level, a 3" spacer (I cut mine from a paint stick) and this lovely baby...


Not a necessity for this project, but it makes it soooo much easier!


In the next installment, I'll tell you about how I actually built the boxes on the walls. To be continued... :)


**You can see the rest of this series here:
Part 1 - Idea
Part 2 - Sizing

Part 4 - Assembly


Pin It!

Sunday, June 26, 2011

Boxes on our Walls - Part 2 {Sizing}

So in my last post HERE, I told you about how I decided to add boxes to my walls and go from this...


*yawn*


To this...


*KA-POW!*


And I did it all by myself! Even better! :)  So here is what I did…

First, I decided which walls I wanted to add the boxes to and measured the length of each one.  Next I needed to determine how many boxes I would put on each wall (this wasn’t so difficult – sometimes it was pretty obvious – um, one! Duh! LOL) and how big the boxes would be (this was the tougher part!).


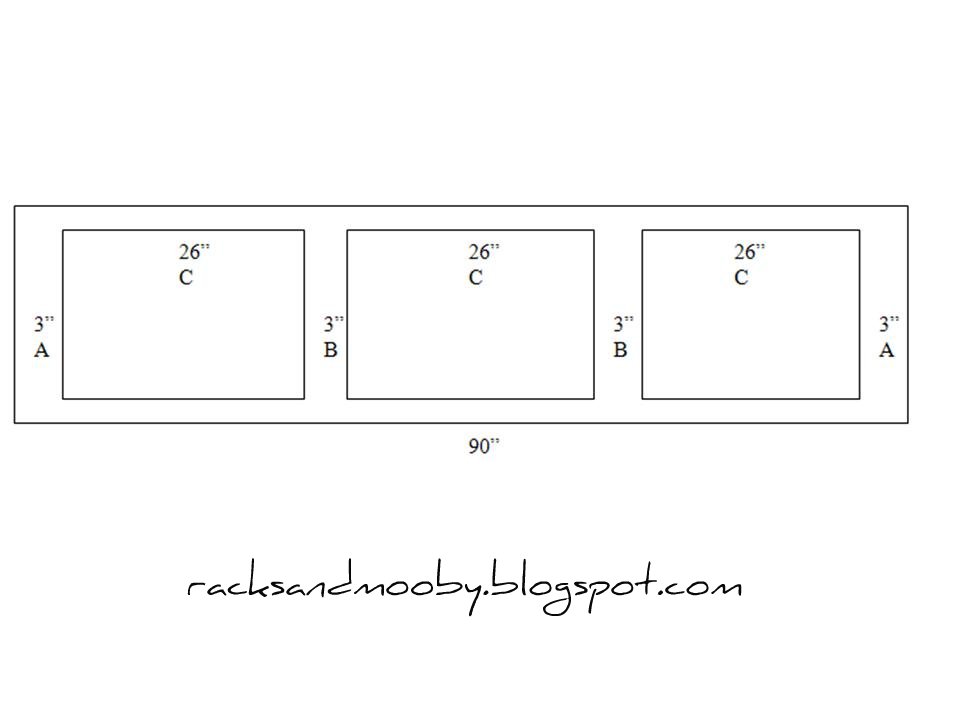
I knew I wanted to have 3” borders around my boxes (the research I did indicated borders on boxes like these are typically either 3” or 6” – but obviously you can do whatever you want!), so this is when I had to break out the math skills. {see, I knew those letters after my name would come in handy after all!}.

Here is an example…My first wall was 90” long so I subtracted 6” to account for a 3” border on each end (A). This left me with an area 84” wide (90”-3”-3”) to fit in some boxes.


I decided that putting only two boxes in that space would result in some really long boxes (just not the look I wanted) so I decided to go with three boxes. From my remaining 84” I then subtracted another 6” to account for the 3” borders in between the three boxes (B).


This left me with 78” for my three boxes (84”-3”-3”). I divided the 78” of box space by 3 to come up with boxes that were 26” wide (C).


To figure out the height of the boxes, I simply measured from the bottom of the chair rail to the top of the base board and then subtracted 6” (for a 3” border on the top and 3” border on the bottom). {Note: I will note here that I later realized that neither the chair rail nor the base boards were exactly level all the way across which led to slightly different heights along each wall. However, none of the differences were material enough to really be that noticeable so I just cut all of my heights the same. I knew it would be much easier to take this approach and just deal with the very slight differences. Besides, imperfection = “character”, right?!? ;} 

Once I had all my measurements penciled out on paper, I wanted to be sure that I would like the layout/sizes of the boxes. So I took some masking tape and my tape measure and roughed out the look of the boxes on the walls. 


Masking tape helped me visualize how my boxes would look.


Thankfully, the Heela (and my folks who were visiting at the time) all agreed that they looked good. So, I set off to Lowes to buy the makings for the boxes.


Stay tuned for the rest of the story... :)


**You can see the rest of this series here:
Part 1 - Idea
Part 3 - Cutting

Part 4 - Assembly

Pin It!

Wednesday, June 22, 2011

Boxes on our Walls - Part 1

When we bought our house about 3 years ago, it already had some nice chair rail in the dining room and the foyer, as well as going down the main hallway to the back of the house, going up the stairs to the second floor and on the walls of the second floor landing. I always liked the extra little detail it added to those areas but felt that it never really “popped”. This was because the paint color above and below the chair rail was the same – a very light and plain manilafolderyellowcreamivory kind of thing. B.O.R.I.N.G.


The walls were really more yellow/cream/ivory than they appear in this photo - rather boring!


So when we finally decided last month to paint all those plain jane walls a different color (Sherwin Williams Balanced Beige), I knew that I wanted to take full advantage of that nice little detail and actually “use” those chair rails to make a statement. My decision… paint the wall space under the chair rail a nice crisp semi-gloss white. Not only would it make a nice statement and highlight the chair rail, but it would prevent having too much of a broad expanse of beige from floor to ceiling (we have one of those double story foyers with two HUGE walls as well as 9’ ceiling throughout).

But the more I thought about it, the more I thought… “Why stop at a plain white treatment? Why not add some molding boxes and REALLY make a statement?!”  I had seen plenty of other bloggers out there do the same thing and figured, “Hey, it doesn’t look that hard. Besides, I have letters after my name… I can handle it!” {Never mind that those letters have absolutely nothing to do with construction or wood cutting or DIY – but I tried not to think about that minor detail}.

While I am sure there are plenty of fabulous tutorials on blogs out there, my go-to posts were found HERE (Thrifty Décor Chick ~video~) and HERE (Décor Chick). These ladies helped me out so much (indirectly, of course) with their useful tips that it made this project so much easier. Thanks ladies!! The end result was this...


Boxes on my walls! (before painting)


Doesn't it make such a big difference? The above photo was taken before the boxes had even been caulked and before the walls were painted, but still such a nice change already.


In my next post, I’ll give you all the “Deets” on how I made them. Stay tuned…


**You can see the rest of this series here:
Part 2 - Sizing
Part 3 - Cutting

Part 4 - Assembly


Pin It!

Thursday, February 24, 2011

Big Girl Room #1 - Hand-Painted Flowers


Prior to buying our current home two years ago, we lived in a modest townhouse that I had purchased on my own (i.e. - pre-Heelamonster in my life). After the Heela moved in, we decorated a few rooms here and there, including both of our daughters nurseries once they came along. Since we didn't find out our first child's gender, we had to decorate it in a neutral theme so we  I chose Classic Winnie the Pooh. I did most all of the decorating work by myself since the Heela was traveling alot back then and, if I do say so myself, it came out pretty darn good! (I hope to post more details on that project later, but here is a pic).


Glimpse of SweetPea's Nursery in Old House

Painting that room had been ALOT of work (granted I was 7 months pregnant at the time) so when we moved into our new house, I just had no desire to re-do that nursery or all that painting despite the fact that SweetPea was still in her crib. Besides, I knew it wouldn't be too long before she moved into a "big girl bed" and the decor would need to be updated at that time anyway. So we left the room in its natural, move-in state and I simply used the Winnie the Pooh accessories to make it liveable for a little while. Here it is in all its sad, pathetic and very plain glory....


SweetPea's Nursery in New House

But when it came time to upgrade to a big girl room, I still had no desire (or energy) to paint the whole room. So I racked my brain to try and figure out how I could add some LIFE and COLOR to the room without having to deal with tape and primer and trim and all that [crapola].

Meanwhile, I came across this awesome comforter cover on clearance at Company Kids. I loved all the bright colors (hmmmm.... no wonder I like the colors of THESE costumes so much!) and knew I she just had to have it.


Comforter Cover bought on clearance from Company Kids


I also liked the fact that it wasn't all ~{Little Girly}~. I figured it would be great if I could find a style that wouldn't absolutely need to be changed in the next few years (i.e. - Dora, Princesses, Elmo, etc.) when SweetPea was 5 going on 15.

And then it dawned on me...


Those flowers look hand painted...


What if I could re-create those comforter flowers...

 ...on the wall?!?!

YES!!! That's it!!

A friend of mine had recently painted a Curious George mural on her son's wall using a basic image found on the internet, projecting that image onto the wall, tracing the image and then painting it in. Easy Peasy!

So, I immediately scanned each of the flowers onto my computer, (splicing multiple scans as necessary) to get .jpg images like this...


I then used a projector (borrowed from work) to project the images onto the wall. Once each image was where I wanted it, I traced the general form with a pencil. (I apologize for not having any pictures of the process - this was pre-blogdom. SO SORRY!). Then I started painting. [I had taken one of the pillowcases up to Lowes and bought the small sample jars of paint (Valspar) in each color of the flowers. I didn't officially "colormatch" them - just eyeballed using the paint swatches. And since I only needed one sample jar of each color, it really wasn't that expensive even though I had 6 different colors]. I had to work in layers to create the flowers, so it took pretty much all day to finish it all, but I couldn't have been more pleased with the results!! And...

{{TA DAAA!}}


Flowers painted on wall to match bedding


I think those flowers came out pretty darn good, if I do say so myself! :)


Close Up


Close Up


And here are a few more pics of the updated room.


The vinyl over the bed says "Always Kiss Me Goodnight" (found on clearance at Kohls for $4)


New girly curtains replaced the heavy, formal ones left by the previous owners.

Green Gingham Panels and Hot Pink Sheers all bought on Clearance (Lowes and BB&B)


This is actually a bath rug but it matched perfectly! (bought on sale at Kohls for $6)

A large green tub at the end of the bed holds (way too many!) stuffed animals.

And I had to add a photo of this awesome little table light from Ikea (not seen in original photos above). Originally I had borrowed a normal old lamp from our guest room and put that on SweetPea's nightstand. But after she burned her fingers on the lightbulb while trying to turn it off one night, I knew I needed something different. I eventually found this little thing at Ikea.

Ikea Table Lamp

It is completely plastic so it won't shatter if it is knocked over. And the lightbulb is totally enclosed (even on the underside of the shade!) so no burned fingers! It has one of those little switches on the cord which SweetPea loves being able to turn off and on herself. I will admit that it doesn't give off a whole lot of light, but it is still enough to read by without using the overhead light. Which is this monstrosity...


Impossible to get a good photo of this light.

I'm not really into these chandeliers but they were here when we moved in. If this had been in the master bedroom, I would have taken it down immediately - just not my style - but I figured it could work in a little girl's room. They each have one. We call them the "sparkle lights" since they make fun designs on the ceiling and the prisms make colorful rainbows on the walls. Not to mention that everyone knows monsters are afraid of "sparkle lights" when they are on the lowest dimmer setting. ;)


I want to paint the lovely {NOT!} brass skelton of that light, but haven't gotten around to it. Plus, I really don't know what color to paint it. Got any ideas? White? Silver? Would love to hear your feedback!


Lastly, on the dresser, is... A green basket I picked up for about $5 on sale at Michaels - it currently holds hair detangler, body lotion, etc.  The "A" was in the Dollar Spot at Michaels. The little bird is from a set my mom gave the girls last summer. The piggie bank is from Target - picked it up during a sale - SweetPea loves to put coins in it.


Needless to say, my daughter absolutely LOVED her new BIG GIRL ROOM!


SweetPea was so excited about her new room!

 
As always, here is the Before and After


BEFORE

AFTER


Linked up to the CSI Project's Kids Places Challenge!
Visit thecsiproject.com 


Also linked up here:

 
Thrifty Decor Chick
Roomspiration


Pin It!
Related Posts Plugin for WordPress, Blogger...