Showing posts with label Halloween. Show all posts

Monday, November 1, 2010

Halloween Costumes 2010

On Friday, my girls had a "Fall Festival" party and costume parade at daycare. Luckily I was able to scoot out of work early and join them and it was a fun time. Since I didn't want to let them near their "real" costumes to be used for trick-or-treating, we raided our dress-up box to see what we could come up with.

SweetPea is going through quite a tomboy phase right now since most of her friends at school are boys. So she was more than happy to be "Bob the Builder".


SweetPea aka "Bob the Builder"
Boogey dressed up as Tinkerbell and ~loved~ playing with the wand the best!


Boogey aka "Tinkerbell"
Thankfully they are both young enough not to care about having fancy, "official" costumes and we pulled these ones off without a hitch! LOL


For trick-or-treating, they were both Jessie from Toy Story. I made the costumes myself and they came out pretty good. See my full post HERE of how I pulled it all together.


DIY Jessie from Toy Story

I hope everyone had a wonderful Halloween! Now it's time for the sugar coma!!


Pin It!

Friday, October 29, 2010

DIY Jessie (Toy Story) Toddler Costume - no sewing!


DIY Jessie from Toy Story Costumes - no sewing involved!


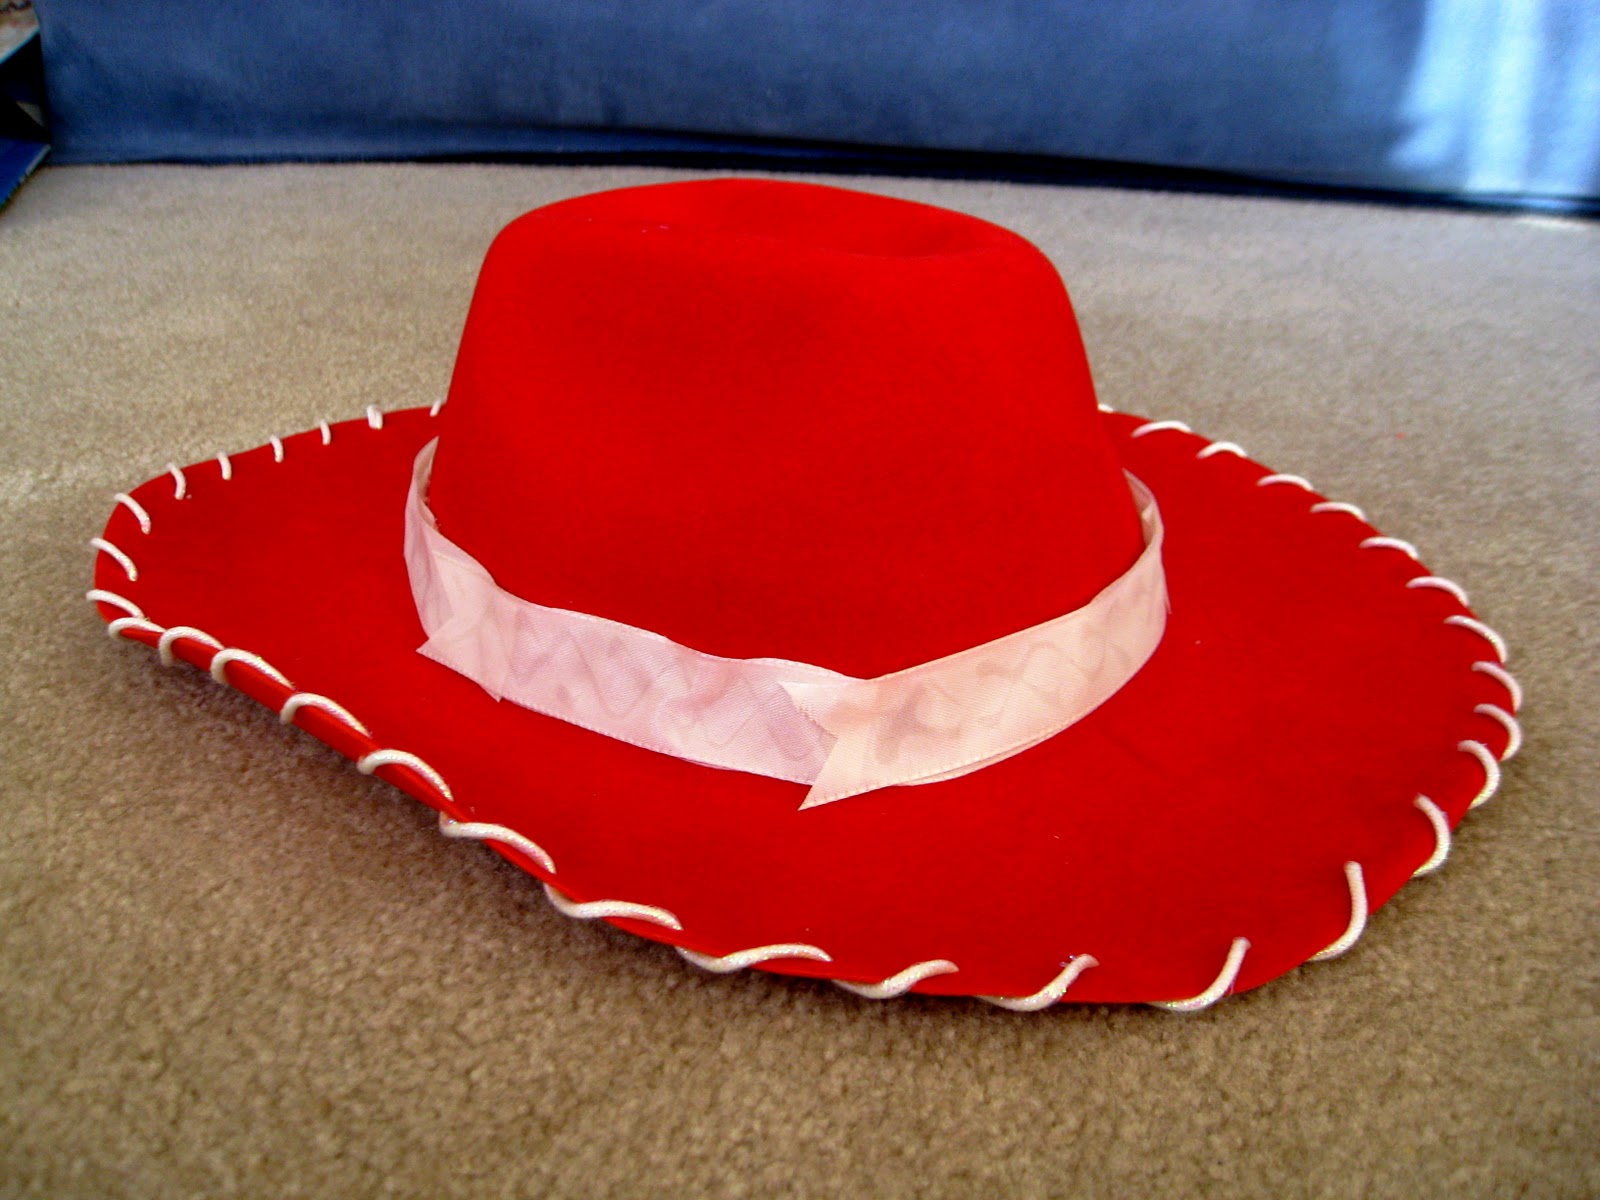
A few weeks ago, during one of my recent trips to Dollar Tree, I picked up a couple of red foam cowboy hats for my girls. They reminded me of Jessie from Toy Story and thought they would be fun for playing dress-up. Well, sure enough, my girls decided that they BOTH wanted to be Jessie for Halloween. Given how cheap frugal I am, I knew I wanted to try to make the costumes - especially since I needed to do 2 of them. In case you aren't familiar with Jessie, here is my model and her crew...

Via fanpop.com
 So I tackled the hat first...

Dollar Tree hat and ribbon from Michaels

I used my mini hole puncher to make holes around the rim of the hat about an inch apart from each other. Then I strung through some string-like ribbon I bought at Michaels (half-price sale, baby!!).

Holy cow, that's alot of holes!

All strung up!

Next I took some plain white ribbon (from the dollar bin at Michaels!) and secured it around the hat with my glue gun in one long piece. This didn't work quite as well as I had hoped due to the width of the ribbon and the slope of the hat. So the first strip I glued around was all wrinkly and gross looking. So then I cut smaller strips of ribbon and glued them around one at a time. This worked better and helped cover up some of the mess from the first attempt. It isn't perfect but good enough for a 3 year old! Lastly I added some more of the string-like ribbon to act as a tie around the neck since the hat is kind of loose. (not seen in this pic)

Ta-Daa!

Not too bad if I do say so myself! Total came to about $3 for the hat plus the amount of ribbon I used up.

For the shirt I had to improvise since neither of my girls have a long-sleeved button-down collared shirt and I certainly wasn't going to invest in one just for this costume. Thankfully, at Target, I found short-sleeved polo shirts that were on clearance (only $4!) since they were intended to be for a school uniform. I didn't let the short sleeves deter me since I knew I could layer it over a long-sleeved (non-collared) white shirt.

$4 on clearance at Target

I purchased a sheet of yellow self-stick felt at AC Moore ($0.79) and cut it to form the bodice of the shirt and stuck it on. Then I took some red sparkly rope-like ribbon (1/2 price at Michaels so less than $2 for the whole spool) and hot glued it to the bodice, copying the design of the "real" Jessie. :)

Bodice added

Next, I cut a sheet of yellow felt in half ($0.29 at AC Moore) and shaped it to form the wristlets. I attached a piece of self-stick velcro (left over from another project) to one edge so it could easily be wrapped around my daughter's wrist without having to be a permanent addition to the shirt. I added a little more red ribbon and some white felt fringe with my hot glue gun.

A strip of self-stick velcro will keep the cuffs closed around their wrists


Hot glued on some details


Then I tackled the pants. I purchased some cow print fabric at Joann's (on sale for 60% off!) and cut it the size of the front of the pant legs, shaping it like a pair of chaps. Since I didn't want to damage the jeans, I simply pinned the fabric on using safety pins.

Time for chaps!

Lastly, I made a simple belt out of some black felt (extra from a future project - stay tuned!) and a piece of self-stick sparkle foam ($0.99 for a sheet at AC Moore). I cut an oval out of the foam and stuck it to a piece of really thick cardstock (I think it was actually that cardboard stuff that new sheets/curtains are wrapped around). And then I used a piece of the self-stick velcro to "close" the belt.

Felt, glittery foam and velcro make a belt

And here is the finished product all together! (imagine a long-sleeved white shirt underneath). Oh and you'll have to wait until after Halloween for a picture of the girls modeling them - I'm not going to risk something being spilled on those white shirts! We're talking toddlers here!! LOL


TA-DAAA! A DIY Jessie from Toy Story Costume (well, close enough!)
  
Not bad for less than $10 each! And the bonus is that the felt can be peeled off the shirts after Halloween and can be used as regular clothing so if I take that element out of my cost, you're talking around $5 each! Not too shabby!

**EDIT** OK, here are the girls on Halloween... 


SweetPea and Boogey as Jessie from Toy Story
Halloween 2010
    Not bad for about $5 (each) out of pocket!! And they loved them and had a blast trick or treating! And THAT is worth a million! :)


Linking this project up to the CSI Project's DIY Halloween Costumes Challenge
Visit thecsiproject.com


Entertain Exchange


Mommas Kinda Crafty
Fingerprints on the Fridge

Pin It!

Wednesday, October 27, 2010

Wordless Wednesday

So here's another Wordless Wednesday (well, about as "wordless" as you're going to get from this chatterbox, anyway). I'll stick with the Halloween theme I brought up last week and give Boogey a turn...

Pacifier? Check. Sippy Cup? Check. Pumpkin? Check. Woobie? Check. Banana? Check.
OK, I'm ready for Trick or Treating!
Boogey - Halloween 2009


Pin It!

Monday, October 25, 2010

Halloween Decor

I haven't shared my "Halloween Decor" with you yet because... well... it isn't all that fancy - especially compared to most of you amazing bloggers out there. But, what the heck, I'll show you what little I've got. I wish it was more, but I honestly don't know if I'll get the chance to accomplish anything else at this point so now is as good a time as any to show it to you!

This is the front door. I showed you this project HERE. (I now wish I had cut the strips of fabric a little bit shorter because I feel like they are too droopy since they are so long. Oh well, next time! Live and learn!)

Too droopy but it'll have to do.


When you walk past the Dining Room you'll see this on the table (as discussed HERE) (with a few new additions from the Dollar Tree)

Spooky Skulls, Skeletons and Spiders!

In the kitchen you will see our pantry doors decorated with rather pathetic simple cutouts and SweetPea's constuction paper pumpkin.

Small Pantry Door
Big Pantry Door
The "Witch Is In" sign is from the Dollar Tree. I have to say it is actually pretty cute for only $1! I believe it is made from chipboard so it has some durability to it.

Bubble Bubble, Toil and Trouble!


In between our two pantry doors (they're actually on separate walls) is our retro-style phone that the Heela gave to me as a birthday gift last year - love it! Anyway, I added a cute orange ribbon to the handle and love the little punch of festive color it adds!

Who ya gonna call? Ghostbusters!


On the hutch, is the cute yellow bowl I bought for only $1 at the Habitat for Humanity Restore Store (mentioned in my post HERE). I filled it with some candy corn and adorned it with a few more homemade decorations courtesy of SweetPea and Boogey (all made at some festival they went to with the grandparents while we were in Miami). I should have gotten a better pic of the ghosts in the bowl, but they are lollipops, with a paper napkin tied on with some festive string - so simple!

Boo!

Over the kitchen table I hung this awesome "Happy Halloween" sign which I got last year at Target's after-Halloween sale for 75% off. I remember I had it in my cart as I was walking around looking at other things and this woman comes up to me, points at the sign and asks "Do you really want that?". In my head, I was thinking "UM yes, moron, why else would I have put it in my cart??". But instead I just said "Yes, sorry! *smile* " and I walked away. HA! I mean, it wasn't like she was offering me $50 for it or something. In fact, she didn't offer me anything. I guess she figured it didn't hurt to ask, but still... I remember being surprised by her inquiry. Anyway, it's mine (hee hee) and it hangs in our kitchen. :)


And then you move into the living room/TV room/Den (we've lived here for 2 years and still haven't settled on a name for it yet, but it is where we spend all our time) and all the Halloween Decor is confined to the fireplace/mantle. Here is the distance view. To be honest, I didn't even take any of my regular decorations off the mantle - just left it all "as is" and added a few ~Halloweenie~ things.

Fireplace


This witch isn't really my style (a little too country), but one of the Heela's aunts gave it to us last year (actually, she gave us 2!) and the girls like it, so I put it out. She's posing with a few of those fake pumpkins you can find at Michaels which I have had for yeeeeeaaaarrrrs.

Cackle!

On the right side of the mantle is a silver glitter skull and a black crow (both from Dollar Tree) accompanied by the ~awesome~ subway art I won from Andi at Jane of All Crafts (see my post HERE). I also added a cute Frankenstein bust which I picked up for $1 at Michaels (half price sale!)
Love my Subway Art! So do Frank, Mr. Crow and Mr. Skull!

On the left side of the mantle, I have another skull and a plaster gravestone (both from the Dollar Tree). I originally wanted to paint them both, but I just haven't had the time. The plan was to invert the colors on the skull and make it black with white eyes and mouth. And I was thinking of painting the gravestone white and distressing it with some glaze or something. But, I don't see it happening this year. Oh well. (I've since added my Mock Specimen Art to this side of the mantle)

Spooky! (um, not really. lol)

So that is it. Not really much compared to most of you bloggers out there. But it is something, right??
Pin It!

Saturday, October 23, 2010

Halloween Specimen Art (Shortcut style)

I've seen quite a few bloggers out there recently doing "specimen art". Such as this (at Tatertots and Jello) and this (at Embellishing Life). LOVE them!! I really wanted to try my own but haven't had a chance (the Heela's been traveling AND working on the weekends this month so things have been pretty crazy around here, to say the least!). But when I spotted these stickers at Michaels the other day... I knew I could take a shortcut! :) 

It's hard to tell in this picture, but the images are on raised discs so they have some dimension.

And the bonus? They were half price! Score!

So while the girls were napping today, I got out some scrapbook paper and found an unused frame and put it all together. I left the glass in the frame but put the paper on top of it so the stickers would be uncovered and you could really "experience" the dimension of them. It isn't "real" specimen art, but it'll do!

Not too bad for a 5-minute project
To be honest, I had intended on having more red show around the border, but I misjudged how much wouldn't be seen because of the way the frame worked. Oh well!

It's on the mantle and I'm pretty pleased with how it turned out. 

Easy Peasy! And fast! AND cheap!! :)


(In case you are a new visitor,  
Here are links to my other forrays into specimen art if you're curious:


I'm linking this project up to the following parties (also see buttons in "Linky Parties" tab above):

Entertain Exchange

UndertheTableandDreaming
I was featured! Thanks Stephanie!!


Pin It!

Wednesday, October 20, 2010

Wordless Wednesday

OK, so I thought I would jump on the Wordless Wednesday bandwagon. Why? It makes for an easy post which takes mimimal time! LOL. (Gee, and I'm not doing a very good job at being wordless yet... ). Here is a sweet memory...


SweetPea's first Halloween - Oct 2007

Pin It!

Tuesday, October 12, 2010

Super Cute DIY Crayon Costumes

I'm going to go back in time a bit with this post, but I wanted to share the cute (if I do say so myself!) costumes I made for the girls to wear to their Halloween celebration at daycare last year.

I wish I could claim credit for this wonderful idea, but I can't. I stole the idea got my inspiration from the October 2009 issue of Parents magazine (see online article/instructions HERE).


Crayons costume
Courtesy Parents.com

{I won't repeat the instructions seen at the link above as they are already nicely detailed, but I will note that I adjusted my measurements a bit to fit my girls better. Boogey was only 1.5 at the time so hers really needed to be compressed and made smaller.}

 
First I bought matching shirts and pants from Old Navy (on sale, of course!). Then I went to Michaels where I got 2 sheets (8.5 x 11, I think) of black self-adhesive felt and one package of black self-stick felt letters (I think I bought 2" letters).  

I ended up having to improvise a bit with my letters since I didn't have quite enough to make all of my words (and I certainly wasn't going to pay for 2 packs of letters! I'm cheap frugal, remember?? LOL). For example, I turned the "Z" sideways to make the "N" for "pink". And I used an upside down "V" and a piece of extra felt to make an "A". And a number zero was substituted as an "O".

I also didn't bother to make the hats - I knew they would NEVER stay on my toddler girls so didn't want to waste my time or the supplies.

Once again, this was pre-blogdom, so I don't have any photos of the process {SORRY!!}, but here they are posing the final product.

SweetPea and Boogey 2009


Boogey was "Pink"


SweetPea was "Magenta"

(I couldn't resist posting this one - could she BE any cuter??)

And the bonus of the whole thing... the next day, I simply peeled off all the felt and was able to use the shirts and pants as a regular outfit!

This post has been linked the following parties (also see Linky Parties Tab above)
These Creative Juices
Its So Very Cheri
The Thrifty Home
House of Hepworths
Between U & Me
Somewhat Simple
The Shabby Chic Cottage
A Little Knick Knack
Remodelaholic
While He Was Napping
Craft Envy
Be Different, Act Normal
Under the Table and Dreaming
Between Naps on the Porch
Sew Many Mamas
What Allie's Making Now

Entertain Exchange
 
Linking this project up to the CSI Project's DIY Halloween Costumes Challenge
Visit thecsiproject.com


Pin It!
Related Posts Plugin for WordPress, Blogger...