Showing posts with label Featured. Show all posts

Monday, June 25, 2012

Re-Generate your Green Onions? It's true!


Several months ago I saw an idea on Pinterest that claimed you could re-generate green onions simply by placing the cut off stems in a cup of water. Ummmmm. Really? I mean, REALLY??? OK, I gotta admit, I was pretty skeptical. In fact, I didn't even repin it to any of my boards as I wasn't sure I was buying it.

Well, I happened to have a bundle of green onions on hand the other day for a recipe. So, I decided to give the old idea a try. I mean, it was worth a try, right? Well... follow me this way...

First I cut off the green stems and left the white roots strapped together by a rubber band.

How to re-generate green onions


Then I dropped the bundle into a small tupperware container, added some water and placed it on the pathetic miniscule just plain old sad excuse of a window ledge in the kitchen.


re-grow your green onions


Then I waited.

But not long.

Because...

By Day 3, my stubs looked like this...


And by Day 5, we were here...


And just ONE day later we already had this!


On to Day 8...


And here we are at Day 15. So it took about 2 weeks to get to this point. A not-quite-so-perfect, but damn-good-enough batch of green onions! WOW!


Regenerated Green Onions

What do you know?? It actually worked! Go figure! I will never buy green onions again! OK, well, that may not be true. To be honest, my re-growth isn't quite as "hardy" as a new batch of onions from the grocery store would be. But they'll work! And I can't say if these will re-generate again after I cut off those new green stems. BUT, I defintiely plan to give it a try! :) And I'll be sure to come back and update ya!

In the meantime, I highly recommend this trick at least once!


This post has been featured! Thank you so much! Please be sure to check out these fabulous blogs and their parties!


IhookedupwithHoHlamespice

  
Linking up to these fun parties:


Pin It
Pin It!

Monday, June 4, 2012

DIY Sidewalk Chalk Paint {fun kid activity!}


The Heela typically has to work 1 weekend a month. Both days. In addition to working all week. From 7am to 7pm. And, no, he doesn't get paid anything extra for it. Raw deal, huh?

Yeah, well, not only is it hard on him, but I admit that it is often a little challenging for me too on those weekend when he works because I not only have to get all of our "normal" weekend responsibilities done {by myself} that don't get done during the week since we both work full-time, but I also have to take care of {and entertain} those 2 pesky preschoolers known as SweetPea and Boogey. WHAT??? The horror!!! ;)

Just kidding. They're not THAT pesky.Just a little annoying with having to eat 3 meals a day plus 2 snacks and drinks. Greedy little boogers! AND they want to be kept busy for 12 hours straight. Geesh! Where was THAT in the manual??!! I'm not sure I recall signing up for that part of parenthood!

OK... I kid, I kid. They're fabulous! And I do a damn good job as Mommy, thank you very much. But I dare any of you to tell me it isn't hard work! ;)

Anyway.... on weekends like this we usually spend the first half of the day running around doing errands (after a quick stop at the park. Ever been to the playground at 8am? It is pleasantly empty. I highly recommend!). It usually involves a trip to the grocery store and/or Target or some other necessary (but terribly boring for a 4 and 5 year old) task. So I like to try and do something a little more fun/creative in the afternoons. After all, these kids usually spend 10 hours a day at pre-school during the week where they are constantly being entertained or, at least, doing some sort of educational activity so they are used to being kept busy! So Momma gotta deliver! And I can only convince them that scrubbing the tile floors is fun so many times, ya know? ;)

So this past month, I decided to try out one of the activities from my "Kid's Crafts Ideas" Pinterest board. (of course I went and accidentally deleted the pin and now I can't remember where I found this idea originally, but it is all over blogland in various forms)

DIY Sidewalk Chalk Paint

The recipe for this 'paint' is so easy it is barely worth listing out, but I'll do it anyway because it gives me something more to write about. [haha]. Basically, you want to combine 1 part water to 1 part cornstarch and then add a touch of food coloring. You can make your batches of each color paint as big or small as you want, but as long as you keep that one-to-one ratio, you'll be good to go. Here is what we did...

What you need (per color):
1/4 Cup Cornstarch
1/4 Cup Water
A few drops of food coloring (I used Wilton gels)

Ingredients needed for DIY Sidewalk Chalk Paint

What to do:
The mixing and storing method is up to you, but here is what we did...

In a plastic cup, dump in 1/4 cup cornstarch.

Next, add 1/4 cup water.


Add 1 part water to 1 part corn starch

Stir well. Be sure to get all those globs out!
Stir well

Add a few drops of food coloring and stir well again.

Repeat in a new cup for each color desired.

Paint!

(See, this isn't rocket science people! ;)

[note: The cornstarch will settle a bit as time passes so just be sure to stir up the paint before you use it each time]

We transferred our paints to a muffin tin so there was less chance of a cup tipping over and then headed outside with our paint brushes in hand. Here you go...

DIY Sidewalk Chalk Paint

I have to say that the effect of the 'paint' was pretty cool and really did look like chalk once the water had evaporated. We did this activity on a warm day so the water evaporated almost instantly which gave us instant gratification. All the better! We had more success seeing the different colors on the white sidewalk than we did on the black driveway (which was no surprise) so keep that in mind when choosing your "canvas". We also noted that some colors showed up better than others for us, but that didn't detract from the fun in any way. My girls really enjoyed this activity and I will definitely do it again!


Be advised that this is a messy activity (assuming your kids are normal) so be prepared with some baby wipes/towels/a hose for clean up before going back in the house!

The carnage

And since you're already so messy, you might as well follow this activity up with some juicy watermelon. :)


Now get out there and have some ~FUN~!!!

*UPDATE* Since a few people have asked... We did not have any problems with stains on clothes (or kids!) but I will caveat that by saying my girls are 4 and 5 and managed to keep their clothes relatively clean. They really got more of the “paint” on their legs, arms and hands, but no color remained after a quick washing up. But, to be safe, I don’t let my kids do messy crafts in their “sunday best” anyway. In terms of the pavement, we actually had rain that very night and, much to the girls dismay, the “paint” was completely washed away with no evidence of the fun time the day before. But, I’ll add the disclaimer, of course, that your experience may vary so use your own judgment.


This post was featured! Thank you! Be sure to check out these awesome blogs:


I was published!! In a real printed magazine!!
Check out the August 2012 issue of Elegant Impressions Magazine!


Linking up to these parties - go check 'em out!
Pin It
Pin It!

Saturday, March 10, 2012

Stuff it! {aka - How to make snacks go further}

Today I'm going to share a "Quick Tip" with you...


Have you ever found a really cute bowl in your 'stash' or in a store and wanted to use it for chips, cookies, rolls, whatever, but then realized you would need to fill it with, oh, I don't know....  about 5,000 POUNDS of said chips, cookies, rolls, whatever so that it wouldn't look pathetically empty? Yeah. Me too. Sucks, don't it?

Well, I'm here to share my little secret with you on how to get around that little dilemma...

NAPKINS!


Yes, you read that right, I use paper napkins. {and, yes, you could easily use cloth napkins if you want to be more green, I just prefer to use paper - especially if they already match my theme. sue me.}. The first time I discovered this trick was during the great popcorn fiasco. Haven't heard that one? Oh, do let me share...

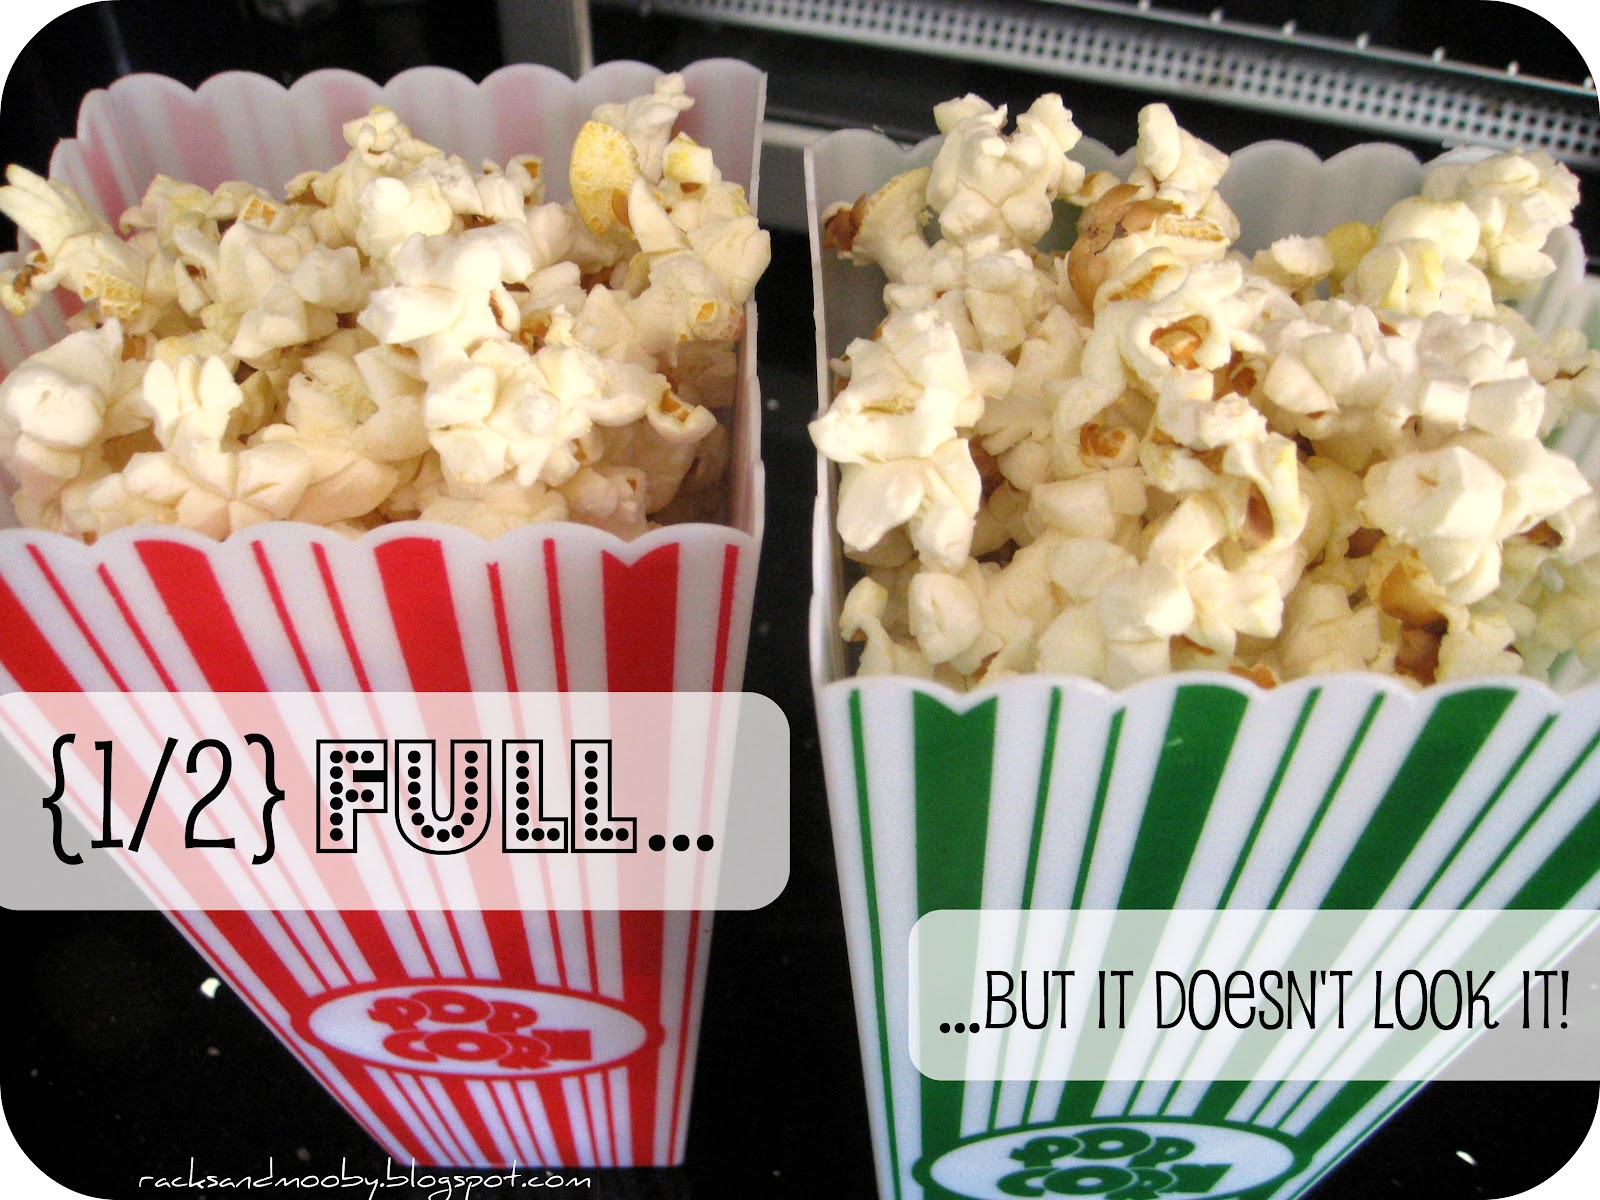
Sometime last summer, I found these super cute plastic popcorn containers in the Dollar Spot at Target (it's so dangerous to wander in there, isn't it??). I got one in each of 4 different colors. So cute, right?

Plastic popcorn containers from Target


The only problem was that they were just way too deep to fill all the way up with popcorn for my pre-schoolers. There was just no way they could eat all that popcorn. Well... on second thought... maybe they could, but they didn't need to! ;)  So, I usually make one of those 100 calorie packs and let them share it between themselves. But when I dumped 1/2 of the bag into each container, they only got filled up about 1/2 way full.

Well, if you have little ones, you know that THAT was NOT going to fly. Don't mind the fact that this is the SAME AMOUNT they would always get in the OTHER BOWL I used to use...

As far as they were concerned, there was PLENTY OF ROOM LEFT! They wanted the container to be filled up to the TOP!!!!!!!!!!!!!!!!!!!!!!!!!!!!!! Give me MOOOOORE!! Hey, and while I'm at it, I'd like to point out that... SHE has MORE than I DO!!! MOOOOOOOOOOOOOOOOOOOOOOOMMMMMMM! NO FAAAAIIIIIIRRR! {ever hear those kind of shrill cries coming from a 3-year old?? yeah, good stuff.}

So, I quickly drank a shot of tequilla improvised and stuffed a loosely-crushed napkin down into the lower half of the container to help take up space.


Then I poured the popcorn back in (which now went right to the top) and the rugrats couldn't have been happier. And it isn't like they didn't know the napkin was in there. I guess it was the ~visual~ of a half-empty container that just didn't sit well with them. You know, like I was trying to gyp them or something. Not that I have ever tried to do that to my children. Ahem. Moving on...

(and yes, that is how you spell "gyp" - looks weird, I know, but I checked Webster's HERE and it's right).


Sneaky, sneaky!

Ahhhh... peace and harmony had been restored to our household... at least for the next 5 mintues. :/


I also used this trick during Boogey's RAINBOW party (posted HERE). I had found some cute colored buckets at the party store and grabbed them on a whim, not really knowing for sure how I planned on using them. Ultimately I decided to use them to house some chips, pretzels and goldfish. But they were so deep that I knew I would need double the amount of chips, pretzels and goldfish than I had just to fill them up to the top. Um, yeah... not going out to buy more snacks, especially when I know they won't all get eaten anyway.

Insert... the napkin trick!


Use a paper napkin to take up space in the bowl

I ever so slightly wadded up a paper napkin and stuffed it into the bottom of the buckets. The napkin minimized the amount of open space in the buckets so I was able to use less snacks to make them look "full" and, therefore, make my snacks go FURTHER! Yay!


Make your snacks go further! It's all an ~illusion~!

Of course the napkin trick won't work as well with really heavy snacks but works great with things like chips, crackers, etc.  If you have something that is heavier, you should, instead, use an inverted bowl or cup as your filler. This is a pretty common trick for vases and such and would be a great option to make heavier treats like M&M's and other candy items go further. Yes, it's all an ~ILLUSION~ folks! :)

And that's my 'quick tip' for the day! Do you have any food display "cheats" you like to use? Let me hear about 'em!

p.s. I want to say a quick "THANK YOU" to Michelle over at Macaroni Kid for featuring my Rainbow Cupcakes on the Macaroni Kid (Harlem edition) website {Click HERE to see it!}!

This project was featured! Be sure to check out these fabulous blogs!!


Pin It

Linking up to these parties - check  'em out!
Someday Crafts
The Thrifty Home
A Turtles Life for Me
Bacon Time with the Hungry Hypo
Polish the Stars
Keeping it Simple
The Scott's Crib


Pin It!

Tuesday, February 28, 2012

Rainbow Cupcakes

So in my post about Boogey's RAINBOW party HERE, I gave you a glimpse of the rainbow cupcakes that I made. Aren't they fun?

Colorful Rainbow Cupcakes


They were a big hit with the guests and defintiely came out better than this cupcake "fail" HERE.


Candy rainbows on cupcakes

Now, I won't claim that these were my original idea - you can do a google or pinterest search for "rainbow cupcakes" and come up with a kajillion blog posts about them. But I will share my process with you and if you get inspired or learn a little something... great! :)

First I mixed up 2 boxes of yellow cake (maybe one of these days I'll try making cake from scratch, but for now, I'm a "from a box" fan!). Then I divided the batter into 6 plastic bags. [Tip: place your bag in a plastic cup to help keep it open and make it easier to fill].

Use a cup to keep your plastic bag open while you fill it!


Batter divided evenly and ready to be colored

Next I put a little gel color into each bag and kneaded the batter until it was well-mixed.


Batter colored like the rainbow!


Next, I cut a small corner off the edge of each bag to make it easier to pipe it into the cupcake tins.

Cut a corner off the bags makes piping the batter easier

Then I piped a layer of each color into the tins trying to make sure the individually-colored layers were the same thickness.

Pipe the batter in equal layers of each color
Bake according to the package directions then remove from oven and cool.

Rainbow cupcakes waiting for frosting

These worked out much better than my semi-fail HERE and I was really pleased with the end result of the rainbow effect. So pretty!


Rainbow Cupcakes


Next I took out my tub 'o' frosting (I used buttercream) and got ready to make my rainbow-adorned sky. {sorry no pictures of the process, but it isn't too difficult to figure out}. First, I reserved a small amount of the white frosting in a plastic bag to use later for my "clouds". Then I colored the remaining amount blue to simulate the sky and spread it on top of each cupcake. Next I applied the rainbows! For these, I bought a package of Airheads Extremes in "rainbow berry" flavor - they're sour belts and I found them at the candy store. I cut the long belts into smaller pieces (about 3" or so), formed them into an arc and stuck the ends into the frosting to look like a rainbow.

{empty} wrapper of candy used to make rainbows

Then I piped a small amount of the reserved, no-colored frosting at the base of each end of the rainbow to (1) prevent the candy from sliding in the frosting sky and (2) simulate the look of clouds. It worked great and looked fabulous! Lastly, I added cupcake toppers I made using the same freebie images (found HERE at Paper Glitter) that I had used for the goodie bags and paper cup stickers.

Side note: If you haven’t ever made your own cupcake toppers before, they’re really easy but add so much “professional” flair! As mentioned, I used some freebie images I found online. I printed them out on photo paper  I bought at the dollar store (I don’t use my good photo paper for this project as it will just be tossed at the end of the day – use the inexpensive stuff! But I do find that the photo paper gives a nicer, more ‘professional’ finish/look than cardstock (but that would work OK too if it’s all you have). Then I cut the images out using a 2” circle punch. You can certainly do the cutting by hand, though, or use other shapes – so many options! Then I stuck the printed toppers to lollipop sticks using some 1” white circle stickers. (I use THESE which I found at Office Depot, but you could also just use scotch tape).  And that is it! So easy, but such a big impact. 

And... voila! I think they came out pretty darn cute if you ask me!

Rainbow Cupcakes with candy rainbows on top


And another view...

Candy rainbows really make these Rainbow Cupcakes special!

I think it's fair to call these a success, don't you??

Rainbow cupcakes


These would be great for St. Patrick's Day too!

 What do you think??


See the rest of the RAINBOW party HERE!


This project was featured! Thank you!!
And be sure to check out these fabulous blogs!!


IhookedupwithHoHlamespice
Linking up to these parties - check 'em out: 
{If I joined your party but didn't link back here, I apologize. This post had to be rebuilt and I couldn't remember all of the places I had linked up - I'm so sorry!}
A Turtle's Life for Me
House of Hepworths
Polish the Stars
A Little Knick Knack
It's a Keeper
Somewhat Simple
The Frugal Girls
Kitchen Fun with My 3 Sons
WHile He Was Napping
Truly Lovely
Bacon Time with the hungry Hungry Hypo
Eat at Home Cooks


michellepaige


Pin It
Pin It!
Related Posts Plugin for WordPress, Blogger...