Friday, December 31, 2010

HAPPY NEW YEAR!!!!


I wish you and your family all the best for a very


HAPPY NEW YEAR!


My Wishes for You...

Happiness deep down within.
Serenity with each sunrise.
Success in each facet of your life.
Family beside you.
Close and caring friends.
Health, inside you.
Love that never ends.
Special memories of all the yesterdays.
A bright today with much to be thankful for.
A path that leads to beautiful tomorrows.
Dreams that do their best to come true.
Appreciation of all the wonderful things about you. 


Author Unknown

Happy New Year!!

Pin It!

Tuesday, December 28, 2010

In case you hadn't noticed... (ha ha!)

In case you hadn't noticed, I've been taking a little break from blogging. Things got REALLY busy before Christmas with all of the last minute preparations. *sigh* I'm usually so on top of things, but it really crept up on me this year!!

We had a really fabulous celebration on Christmas Eve with the Heela's family and a fun Christmas day here at home. The girls got waaaaay too many presents, but hey, they're kids - it is supposed to be sensory overload, right? ;)

This week, I am enjoying spending time with my parents who traveled here from 9 hours away to stay for a week. Because of the distance, we only get to see them twice a year - usually once during the summer and again at Christmas. So I am making the most of their visit and taking a little sabatical from the blogging. Hope you can understand that! :)

I'll be back in full swing with some more projects in the new year so I hope you stick around! :D

Happy {belated} Holidays
and a very
Happy New Year!!!


Pin It!

Monday, December 20, 2010

Quick and Easy Teacher Gifts

My girls go to daycare - all day - every day. Needless to say, their teachers are saints! So we always try to give a nice little token of appreciation at the holidays. But, there are a lot of them and we just can't afford to do anything "big" when you have to multiply it by 8. (can you beleive some websites suggest one week's tuition?? Um, yeah, I don't think so!!!). So I try to think of frugal ideas every year that are thoughtful but won't break the bank.

Last year, I used coupons to score big Glade candles for $1 a piece. They were a huge hit, but were still nice to my pocketbook. ;)

This year, I happened upon some great aluminum water bottles on clearance at Michaels and scooped up a whole bunch of them. At only $1.50 a piece (50% off from $3), I thought they were a good deal. And I especially like the fact that they are "green". 


Shortly after I found the water bottles, I happened across these re-usable bags at Kohls - in the clearance section. They were marked down from $1.99 to only 79 cents! I grabbed every one they had. I really like the fact that they have snaps to hold them together when not in use.


The girls helped decide which teacher got which color bottle and SweetPea wrote each teacher's name on a circle we punched out of card stock and then taped to the bottom of the bottle.


Then we tucked the water bottle into a bag. Easy-peasy! :) I might tie a piece of ribbon to the top of the water bottle, but otherwise, we won't be wrapping them. I think they look fine just the way they are. :)

A Rainbow of gifts!

Not bad for less than $2.50 a piece total. And I am really pleased that it is a 100% "GREEN" gift!


What are some of your thrifty teacher gift ideas?


Pin It!

Friday, December 17, 2010

How To Make a Superhero Cape {no sew!}

So in my post HERE about my daughter's 4th birthday party, I told you how it was a Batman-themed "Superhero Academy". And as part of the whole "transformation" into a Superhero, each kid got to put on a ~cape~. I mean, c'mon, who doesn't love wearing a cape???!!! 

Now initially, I went to my good old stand-by, Amazon. But it seemed that they wanted about $15 per cape! WHAAAAAAT???? Um, yeah, I don't think so!! Not when I've got 10 kids coming to this party!!

So, I thought... hmmmm... maybe I could MAKE the capes...

Ha! This from a woman who doesn't sew.

But, the more I thought about it, and the more searching I did on the internet for examples, the more I thought... yes, I can do this! I found a great template available for free HERE at Serving Pink Lemonade and started out on my quest!

Tutorial: How to make a no-sew superhero cape

So I headed out to Joann's Fabric and bought a whole lot of black fleece. I chose black to stick with the yellow and black "Batman" theme I had going. And when I say I bought a "whole lot" I mean "way too much"! LOL. Given that I have never bought fabric before I really didn't judge properly how much I needed - d'oh - but I am hopeful I will be able to find a use for it in some future project. Even though I had bought waaaay too much fabric, I only spent about $12 since it was on 60% off sale.

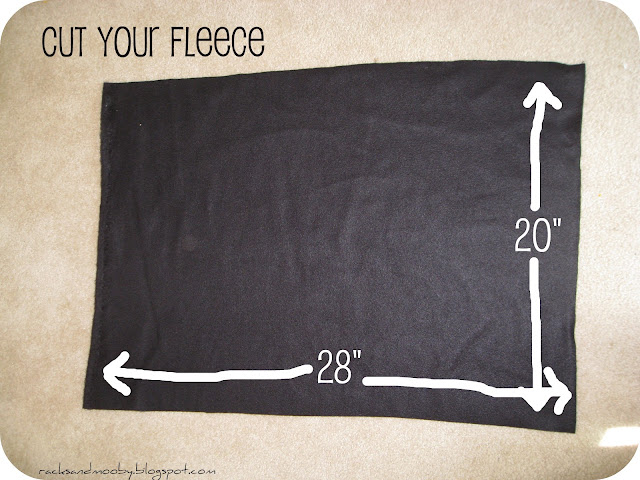
Anyway, I brought it home and, after a little trial and error with my daughter, I cut a piece of fleece into a 20" x 28" rectangle (you may want to adjust your size depending on the height of your child - mine were just right for 4 year olds). I learned that fleece won't fray so it was perfect for this project!


Then I folded it in half and placed my template on it. I have to admit that it took me a minute to figure out which direction to place the template. In case you are as pattern-challenged as I am, the fold is on the right in the below photo with the 2 open edges on the left.


Then I simply cut around the edges of my template. (I didn't even pin the template down - I just held it in place while I eyeballed my cutting). Then I cut some squigglies (yes, that is the technical term) along the bottom.


And here is what it looks like when you open it up. Don't worry if your two ends don't touch. When you put it around the child's neck, it will close just fine. Besides you want it to have plenty of room and not be too tight.


To enable easy closure around the neck, I applied some self stick velcro (about a 1" x 1" square) to each end of the skinny part at the top. Keep in mind that you want to place your velcro on opposite sides of the fleece so the two pieces of fleece will overlap when closed. Again, I had some trouble with this so I'll try and explain it clearly. In the picture below, you'll only see one side of the velcro (on the right) because the piece on the left is on the underside of the cape. When you close it, you'll essentially place the left piece on top of the right piece. 


Next it was time for the "applique" on the back. Be reminded, I DON"T SEW, so I had to improvise. I bought sheets of felt at AC Moore (a local craft store similar to Michaels) for 29 cents each. I used yellow for the boys and pink for the girls. And white for the letters. I cut them out using the templates I found HERE at Tip Junkie and applied them to the back of the fleece with Permanent Fabric Glue. Now, if you're like me and have never used this product before, be advised that this stuff takes a loooooong time to dry. It does say on the back of the tube that you need about 24 hours for it to cure, but I admit I was a little worried when it wasn't sticking AT ALL after about an hour. I'm used to the instant gratification of a glue gun and crazy glue, so that delay really threw me! LOL. But the next morning, that felt was glued on TIGHT! Here is the final product.


You can see my glue "star" a little in this pic
 
As an FYI, I did find that, because the felt was rather thin, that the Fabric Glue showed through when applied (and stayed that way when it dried) so I made a point to apply it in a star-like pattern so it wouldn't look too "messy" underneath the trapezoid.

I have to tell you that all of the kids were thrilled to get their very own personalized capes. I am still hearing from parents a month later about how often their child wears their cape around the house. One has even insisted on wearing it to the store!

They even look good with bedhead and pajamas! :)

Obviously you can do this with any color fleece and felt. The nice thing about the fabric glue is that the capes can be washed without damage! (I'll be honest that I don't know how the self-stick velcro will hold up in the wash as I haven't had to wash ours yet, but you can always add a few hand stitches with a needle and thread if you have troubles with it sticking).

And the best part, each cape cost less than $1 to make!! Now THAT'S what I'm talking about!!! :)

Pin It!

Tuesday, December 14, 2010

FINALLY got our tree decorated!

Yes, I can admit it... our Christmas tree stood bare for a whole week in our living room. Well, not totally bare... it had lights on it. And the star. But that is it. No ornaments. Nothing. For a week. *sigh*  

Yes, if you've been following me since the beginning, you won't be surprised by this. It tends to happen quite a bit in this house... where things just SIT and SIT... for a while. Such as HERE and HERE. Yes, with both the Heela and I working full-time and adding 2 pre-schoolers into the mix, "free time" is just scarce. But, it IS what it IS and we've grown to just deal with it. :)

So 2 Sundays ago, we committed to getting our tree. We usually go to the local church and pick one out, but this year we decided to go to a nearby Farm/Orchard and cut one down ourselves. It was a chilly day so we got the girls bundled up and tried to convince them this would be FUN! LOL. (But it didn't really take too much convincing and they had a blast).

We found a good candidate fairly quickly so the Heela got down and dirty for the cutting. The farm provides handsaws for people to use, but the Heela had the BRILLIANT idea to bring his battery powered Black&Decker to make the job super easy and fast. It cut like BUTTA! :)


Meanwhile, the girls had fun frolicking in the field.

Showing me the cool grass (aka weeds) they found
SweetPea pokes Boogey in the eye with her grass (on purpose!!) as Mommy gets photo evidence of the crime :)

We managed to get the tree in the stand that very afternoon and later that night, the Heela got the lights on. And the star.

And then it SAT and SAT and SAT.

*sigh*

For a whole week.

*double sigh*

In our defense, we had an appointment on Monday night. Then the Heela worked late on Tuesday and Wednesday. Then I worked late on Thursday. And then on Friday we had to go to the Heela's office holiday party. So FINALLY, on Saturday evening, we were able to dig out the ornaments and get them on the tree.

TADAA!!

(by the way, those cute stars in the transom window were from the Dollar Tree and are so fun and glittery!)
As you'll notice, we don't decorate our tree in a very fancy/traditional way. There are no bows... nor tinsel... nor garland. And... the ornaments are all non-matching. And... there are only a handful of glass balls. And... I LOVE it! :)

Here are a few of my favorite ornaments:


This is a carved pod of some sort. Can't recall what kind, but I think this guy is so cute! My cousin gave him to me after a trip abroad years ago.
I have 2 of these ceramic "William" hippos from the Met. My parents have a reproduction of this statue in their house so this ornament brings back lots of good memories from my childhood.

This is a real egg that is beautifully decorated.  I bought it in Maui when I had to go there for work 5 years ago.

This is one of the first ornaments my mom gave me after I moved out on my own. It's a real sanddollar. Love it.
From a set my Mother-in-Law gave us the year we got married.

I grew up on Long Island so I love the beach. This is a real starfish, painted as Santa - so cute!

This ceramic penguin is from a set of 4. I bought the set for my first real tree after moving into my own place and they are so fun and full of character.
I made this in 1979 (yes I'm aging myself!) and wrote my name on the back. Lots of sentiments with this old guy!
I bought this glass ornament for Sweetpea the year she was born. Her nursery was decorated with Classic Pooh so it is the perfect memory for that first Christmas with her.

I bought this for Boogey the year she was born. Her nursery had a jungle theme and she still has a sweet giraffe photo on her wall.

The Heela loooooooves this Movie. He wanted a real lamp. I compromised with the ornament. LOL


Another hommage to a great movie. "You'll shoot yer eye out!"

These are my all-time favorites. My mom bought these about 30 years ago at a church fair and gave them to my aunt. Last time we were there, my aunt passed them on to me (much to my cousin's dismay!). I love love love this sweet Mr. and Mrs. Claus.
And here is another shot of the tree.

I think the kitty scratch pad really completes the look! LOL!!!

Now we just need to wait for Santa to load it up!!


Is your tree ready? Do you go fancy/traditional? Or sentimental mish-mosh like us?

Pin It!

Sunday, December 12, 2010

Superhero (Batman) Birthday Party - Part 2

So in my post HERE, I gave you the low-down on the decorations and food for my daughter's 4th birthday party - a BATMAN party! Now it is time to tell you about the activities we did.

As mentioned, the whole premise was that the kids were attending a "Superhero Training Academy". Now, again, I will NOT in any way take credit for this amazing idea. I fully admit that I copied these ideas from Tip Junkie HERE and Designer Girl 007 HERE and only made minor adjustments to suit our needs.

The first thing on the agenda was to get the kids outfitted as Superheros. After all, if you want to be a superhero, you need to look like one! So I made each kid a cape out of black fleece (see my tutorial for this no-sew project HERE) with their initial on the back.


Next we put temporary tattoos on each kid. I found these batman ones on eBay for a reasonable price. I don't know why, but toddlers and pre-schoolers LOVE temporary tattoos so these were a big hit!


Once all the kids were properly outfitted as superheros, we headed to the basement. Our first activity was the "Power Push" - after all, any good superhero needs to know how to defend themselves and push a bad guy away. My husband happened to have this defense target (from his job) and the kids loved giving it a good push and a kick!

Time for the "Power Push"


The next activity was the "Batcave". We set up the girls' tent and tunnel in the basement and draped a tarp over top to make sure it was nice and dark inside.


"Batcave!"

On the inside of the tent, I hung lots of black streamers (I found the roll of black streamers at Target's Halloween clearance for only 15 cents!). I then taped a bunch of those glow sticks that can be made into bracelets to the walls and ceiling (these were also bought on clearance at Target - 50 cents for a pack of 10) .

The concept was that the kids had to crawl through the tunnel and retrieve 2 glow sticks (kryptonite). They got to wear the bracelets once they came out and take them home with them. Again, what kid doesn't love glowstick bracelets?? Another big hit!


Impossible to get a good pic of the inside of the tent! LOL

Next we moved up to the living room where it was time for "Mighty Muscles". For this activity, I made a set of dumbbells out of foam craft balls (bought with 40% off coupons from Michaels) and a wood dowel that I spray painted black. The kids had fun taking turns lifting the "heavy" weights and I took a photo of each one holding it up. The photos were later emailed to each parent (I had intended on printing them out and including in the thank you cards, but totally forgot until after the cards had been sealed - d'oh!)

Here the Heela demonstrated how "heavy" the dumbbell was. :)
SweetPea shows everyone how it is done!


The last formal activity was "Vaporize a Villain". 


This was the one sign I had to make myself - came out pretty good I think! The others were borrowed from the sites listed above.

For this, we headed out to the garage... here are all the bad guys...

We taped the pictures to a tarp so the silly string wouldn't make a mess of the garage door


And here were the vaporizers!! Silly string!!! (well, knock-off brand from the Dollar Tree! "Goofy String". LOL)


Each kid got a turn spraying their choice of color at their choice of picture(s) and, let me tell you... they LOVED it!! I don't think any of them had ever used silly string before and they had an absolute BLAST!!! (I will note that most of the kids had a little trouble pushing down the nozzle so the Heela had to help them - but they still loved this activity!).


Anihilated!


I had intended on sending a can of string home with each kid, but admit that I totally forgot to do this at the end of the party. Frankly, I don't think any of the parents were all that disappointed! LOL.


Once the activities were done we had the pizza and cupcakes. All in all, I think everyone had a great time. I know that SweetPea really enjoyed her party - I'm so glad I could make it special for her.


Happy 4th Birthday SweetPea!!!


Pin It!
Related Posts Plugin for WordPress, Blogger...