So in my post HERE about my daughter's 4th birthday party, I told you how it was a Batman-themed "Superhero Academy". And as part of the whole "transformation" into a Superhero, each kid got to put on a ~cape~. I mean, c'mon, who doesn't love wearing a cape???!!!
Now initially, I went to my good old stand-by, Amazon. But it seemed that they wanted about $15 per cape! WHAAAAAAT???? Um, yeah, I don't think so!! Not when I've got 10 kids coming to this party!!
So, I thought... hmmmm... maybe I could MAKE the capes...
Ha! This from a woman who doesn't sew.
But, the more I thought about it, and the more searching I did on the internet for examples, the more I thought... yes, I can do this! I found a great template available for free HERE at Serving Pink Lemonade and started out on my quest!
 |
| Tutorial: How to make a no-sew superhero cape |
So I headed out to Joann's Fabric and bought a whole lot of black fleece. I chose black to stick with the yellow and black "Batman" theme I had going. And when I say I bought a "whole lot" I mean "way too much"! LOL. Given that I have never bought fabric before I really didn't judge properly how much I needed - d'oh - but I am hopeful I will be able to find a use for it in some future project. Even though I had bought waaaay too much fabric, I only spent about $12 since it was on 60% off sale.
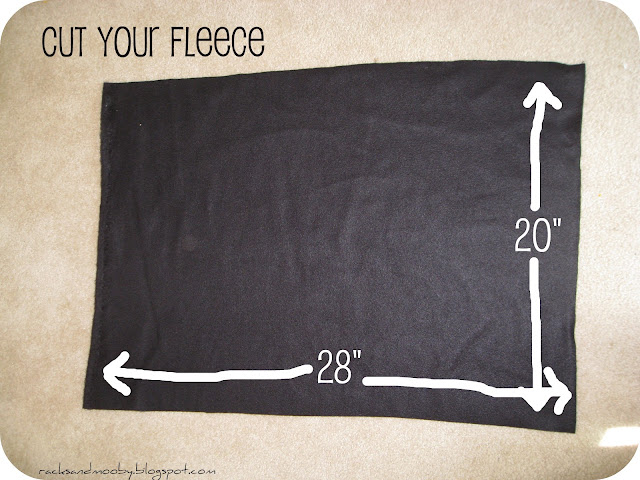
Anyway, I brought it home and, after a little trial and error with my daughter, I cut a piece of fleece into a 20" x 28" rectangle (you may want to adjust your size depending on the height of your child - mine were just right for 4 year olds). I learned that fleece won't fray so it was perfect for this project!
Then I folded it in half and placed my template on it. I have to admit that it took me a minute to figure out which direction to place the template. In case you are as pattern-challenged as I am, the fold is on the right in the below photo with the 2 open edges on the left.
Then I simply cut around the edges of my template. (I didn't even pin the template down - I just held it in place while I eyeballed my cutting). Then I cut some squigglies (yes, that is the technical term) along the bottom.
And here is what it looks like when you open it up. Don't worry if your two ends don't touch. When you put it around the child's neck, it will close just fine. Besides you want it to have plenty of room and not be too tight.
To enable easy closure around the neck, I applied some self stick velcro (about a 1" x 1" square) to each end of the skinny part at the top. Keep in mind that you want to place your velcro on opposite sides of the fleece so the two pieces of fleece will overlap when closed. Again, I had some trouble with this so I'll try and explain it clearly. In the picture below, you'll only see one side of the velcro (on the right) because the piece on the left is on the underside of the cape. When you close it, you'll essentially place the left piece on top of the right piece.
Next it was time for the "applique" on the back. Be reminded, I DON"T SEW, so I had to improvise. I bought sheets of felt at AC Moore (a local craft store similar to Michaels) for 29 cents each. I used yellow for the boys and pink for the girls. And white for the letters. I cut them out using the templates I found HERE at Tip Junkie and applied them to the back of the fleece with Permanent Fabric Glue. Now, if you're like me and have never used this product before, be advised that this stuff takes a loooooong time to dry. It does say on the back of the tube that you need about 24 hours for it to cure, but I admit I was a little worried when it wasn't sticking AT ALL after about an hour. I'm used to the instant gratification of a glue gun and crazy glue, so that delay really threw me! LOL. But the next morning, that felt was glued on TIGHT! Here is the final product.
 |
| You can see my glue "star" a little in this pic |
As an FYI, I did find that, because the felt was rather thin, that the Fabric Glue showed through when applied (and stayed that way when it dried) so I made a point to apply it in a star-like pattern so it wouldn't look too "messy" underneath the trapezoid.
I have to tell you that all of the kids were thrilled to get their very own personalized capes. I am still hearing from parents a month later about how often their child wears their cape around the house. One has even insisted on wearing it to the store!
 |
| They even look good with bedhead and pajamas! :) |
Obviously you can do this with any color fleece and felt. The nice thing about the fabric glue is that the capes can be washed without damage! (I'll be honest that I don't know how the self-stick velcro will hold up in the wash as I haven't had to wash ours yet, but you can always add a few hand stitches with a needle and thread if you have troubles with it sticking).
And the best part, each cape cost less than $1 to make!! Now THAT'S what I'm talking about!!! :)


