Friday, April 29, 2011

I admit it. I have an addiction.

Do you have dry lips? Do you enjoy using lip balm? Do you have a tube of lip balm in virtually every room in your house?? Do you have 4 tubes in your bedroom alone??? Yeah, I do. I'm obsessed, I admit it. Yes, I am addicted to lip balm. In my defense (??) I don't wear lipstick. Ever. When I want a little bit of color, I opt for a berry-colored lip gloss but I really prefer the non-sticky feeling of lip balm instead. So when I came across a tinted lip balm in a recent online group sale, I knew I just had to try it.
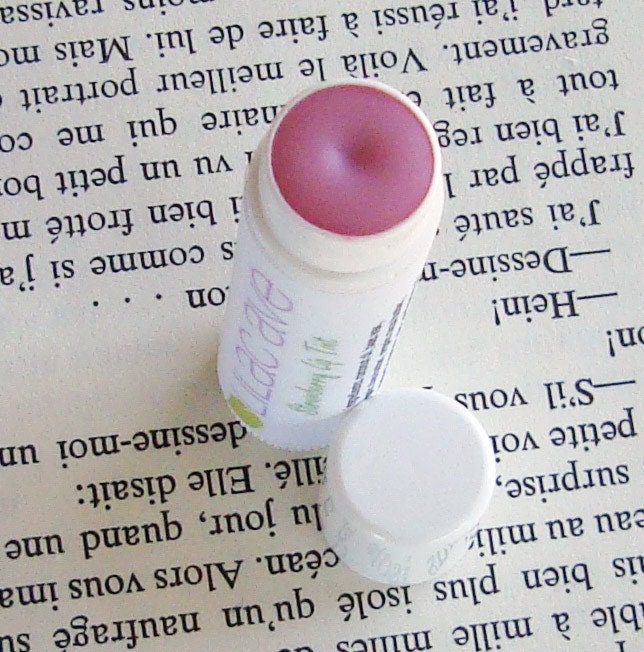
Courtesy of Lilac Ave etsy shop


This tinted balm is made and sold by Lilac Ave, a super cute etsy shop that specializes in handmade soy candles, SLS free soaps, and natural spa products.. Through the group sale, I was able to choose from many different flavors for the lip balm and I decided to go for "mint" (although I am still really intrigued by the "margarita" option!!). The package arrived incredibly fast and I admit that I ripped it open voraciously!

Imagine my disappointment when I opened up the tube to find an untinted version of the mint-flavored lip balm. :(  I knew it had to be an unintentional error due to the sheer volume of sales involved in the group sale and I immediately sent an email off to Deb, the shop owner, asking if we could arrange an exchange. Let me tell you, Deb couldn't have been sweeter about the whole thing and immediately apologized for the mistake. And, to make things whole, she offered to send me the tinted mint lip balm free of charge while insisting that I keep the untinted balm too! How nice is that??!! The second package arrived only 2 days later and contained the fabulous tinted lip balm. (Deb also threw in a sample of vanilla scented body scrub - how sweet!!) 

Now, I really have to rave about this lip balm. It goes on SO smoothly. It almost feels like it turns into liquid when you rub it on your lips - unlike any lip balm I've ever used before (and I've tried them all!). I also love the subtle sheer color that the tint provides. It really just enhances the natural color of your lips and doesn't look at all like you're wearing lipstick and it isn't sticky like a gloss. Love it. My only complaint (if you can really call it that - maybe "recommendation" would be a better word) is that I wish the mint flavor was a little bit stronger. But that is just my preference - I like it bold! ;)

I highly recommend trying out this all-natural lip balm. You don't have to get the tinted version if you aren't interested in the added drop of color - she sells it untinted as well (Obviously!). And she offers it flavored or unflavored. See all your lip balm options HERE. While you're there, be sure to check out all of Lilac Ave's other natural items! Thanks, Deb, for selling such a great product!


Legal stuff - While I did receive two lip balms for the price of one (plus a sample of sugar scrub), this has not influenced my opinion of the lip balm product itself. My opinions are honest, unbiased and my own.


Pin It!

Tuesday, April 26, 2011

Easter Dessert "Reveal" {mini marshmallow flowers}

Hmmmm... using the word "reveal" in my post title sounds so dramatic! But, since I gave you a "teaser" in my last post, I suppose it'll work. LOL.

So as I mentioned, we went to my in-law's house for an Easter Brunch on Sunday. I was in charge of fruit salad and dessert. I decided to make cupcakes for dessert and immediately knew that I wanted to go with a spring-like theme so that meant... FLOWERS!

First I just made some plain yellow cake cupcakes - I was able to get 12 regular size and 24 mini size out of one box of cake mix. Then frosted them with white, vanilla frosting (yes, from a can - for shame, I know!). Sounds pretty boring up to this point, doesn't it? Well... that's when I added the piece de resitance! :) These flowers...


DIY edible flower


Before I tell you how to make them, let me show you a couple more pics of these little beauties.


Mini Marshmallow Flowers are so easy to make!

I love all the pretty colors

So how do you make these beautiful little things? It is really very easy, but I'll admit it, kinda time consuming so be sure you have a couple hours set aside. 

Here is what I used: mini marshmallows, colored sugar sprinkles, white chocolate and mini M&Ms. You'll also need a sharp pair of scissors, some wax paper and a plastic bag.


My supplies for Mini Marshmallow Flowers

First you want to cut your mini marshmallows in half - along the diagonal.

Cut the Marshmallows diagonally

Drop your cut halves into the sugar sprinkles. Shake them around and you'll see that the inner, sticky part of the marshmallow (the edge that you cut) will pick up all those pretty colored sprinkles.

Toss the halves in the sugar sprinkles

Melt some of your white chocolate in the microwave. Place it in a small plastic bag and snip off a tiny bit of one corner.

Cut off a tiny corner of your plastic bag filled with white chocolate.

Squeeze out a dime-size amount of chocolate onto some wax paper. I recommend only doing about 3 dollops at a time otherwise the chocolate will start to set up on you too quickly. Take my word for it! LOL. As you can see in the below photo, I didn't take this approach at first and had to re-melt most of those dollops! :)

Dime sized dollops of white chocolate

Take 5 of your marshmallow halves and place them in a circle around the edge of your white chocolate (you want the marshmallow to actually be about halfway in the chocolate). 

Place your "petals" in the white chocolate, leaving a little room in the middle.

After you place your 5 petals, add a mini M&M in the center. Of course, you don't have to use an M&M here - a small round pearl sprinkle would work well, or some other mini round candy. Whatever you happen to have or find! :)

When the chocolate sets up, the marshmallow "petals"  and the M&M will stick to it, creating a solid flower that can be peeled off the wax paper in one piece. I was worried that the marshmallows would harden overnight but I stored them in a ziploc bag and they were still nice and soft the next day. (And for the record, it is now Wednesday -  4 days later - and the leftover flowers are STILL nice and soft!). Now keep making flower after flower after flower! LOL.


I then just stuck one flower on each mini cupcake and 3 on each large cupcake. The white frosting really helps the colors of the petals POP!

Stick 3 flowers into the frosting of a big cupcake and voila! Beautiful Marshmallow Flower Cupcakes!


You could put all the same color flowers on each cupcake, but I chose to mix it up!

Mini cupcakes got one flower. For these petals, I mixed up the sprinkle colors together.
The kids actually placed these flowers - they just stick right to the frosting - so easy!

I also made a few bunny rabbits for the kids using some big marshmallows I had on hand for the ears, a big dollop of chocolate for the face, chocolate sprinkles for the whiskers and a heart sprinkle for the nose. I put one each on a big cupcake - the kids loved them!

hop hop hop


Ready to go! (I always have to keep one naked cupcake for my niece who doesn't like frosting - whaaaat???)

You could even customize the colors of your sugar sprinkles to suit your needs - think baby shower or wedding shower. Oh and they'd be sweet for Mother's Day too! And the nice thing is you can prepare the cupcakes and flowers in advance like I did. Then on the day of the event, simply frost and apply the flowers.

So, what do you think? Pretty? Fun? If nothing else, they're cheap frugal! :) The cake mix and frosting cost $1 each on sale. The bag of mini marshmallows was on sale for $0.99 (and I only used about half of it). I actually had all of the sprinkles on hand already (I admit it, we let the girls put sprinkles on their fruit cups and applesauce) so there was no cash out of pocket for those. And the mini M&M's were from a snack size bag left over from trick or treating so again, no cost to me. Gotta love a pretty dessert for less than $3 out of pocket! :) Not to mention the YUM factor!

Lots of pretty marshmallow flowers - I just love looking at them!


This project was featured! Thank you!
 
UndertheTableandDreaming

It's a Keeper

WWFB


Linking up here:

Also Linked up to the CSI Project's Flower Challenge!
Visit thecsiproject.com


Pin It!

Saturday, April 23, 2011

Easter Dessert Teaser

We're going to my in-laws for an Easter brunch tomorrow. I am in charge of bringing fruit salad and dessert. Here is a teaser pic of the dessert...


DIY Edible Flowers
Pin It!

Thursday, April 21, 2011

Another "Take 2"

So remember HERE where I told you about how I "springified" my clearance find vase? And do you remember how I wasn't loving the vinyl flower I had added to the vase? Well, I ended up taking it off altogether and didn't replace it with anything. Instead, I put in a few (fake) forsythia branches and let the simpleness of the vinyl "bloom" speak for itself.


I placed the vase on the mantle next to one of my Dollar Tree Hurricanes (see HERE for how I "made" this for only $2!). Inside the hurricane, I put a bag of split peas (cost less than $1 at the grocery store) and a candle from my basement stash (free!). I like it!! :)

Have you ever gone back and changed one of your projects to make better and been pleasantly surprised by the edits?


Pin It!
Related Posts Plugin for WordPress, Blogger...